
kUSRP 사용설명서User Manual · PoC
← kUSRP 홈 (다운로드 · 개발이력 · Q&A)← kUSRP home (download · history · Q&A)
1.앱 소개App Introduction
kUSRP for PoC는 DS5QDR(이헌민)이 개발한, PoC 전용 단말용 디지털 음성 클라이언트입니다. 주요 특징은 다음과 같습니다.
kUSRP for PoC is a digital voice client developed by DS5QDR (Heonmin Lee) for dedicated PoC hardware. Key features include:
- 멀티모드 직접 접속 — Phone 버전과 같이 STFU·D-STAR·NXDN·P25·YSF·M17·ASL·EchoLink를 핫스팟·DVSwitch 서버 없이 연결 Direct multi-mode connection — like the Phone version, STFU, D-STAR, NXDN, P25, YSF, M17, ASL and EchoLink with no hotspot or DVSwitch server
- 실시간 LastHeard 모니터링 — 각 토크그룹의 최근 교신자와 이력을 화면에서 확인 Real-time LastHeard monitoring — view recent operators and history for each talkgroup on screen
- QRZ 정보 표시 — 교신 상대의 사진·국기·이름·주소를 자동 표시 QRZ information display — automatically shows the other station's photo, flag, name, and address
- 물리 버튼 Key Mapping — 단말의 PTT·다이얼 노브(▲▼)를 앱 기능에 매핑 Physical button Key Mapping — maps the device's PTT and dial knob (▲▼) to app functions
- 고품질 보코더 엔진 — AMBE+2는 MD-380 펌웨어 에뮬레이터 / mbelib 이중 구조, D-STAR는 libdstar, P25는 IMBE, M17은 Codec2, EchoLink는 GSM High-quality vocoder engine — AMBE+2 via the MD-380 firmware emulator / mbelib fallback, D-STAR via libdstar, P25 IMBE, M17 Codec2, EchoLink GSM
2.초기 설정 (MyInfo)Initial Setup (MyInfo)
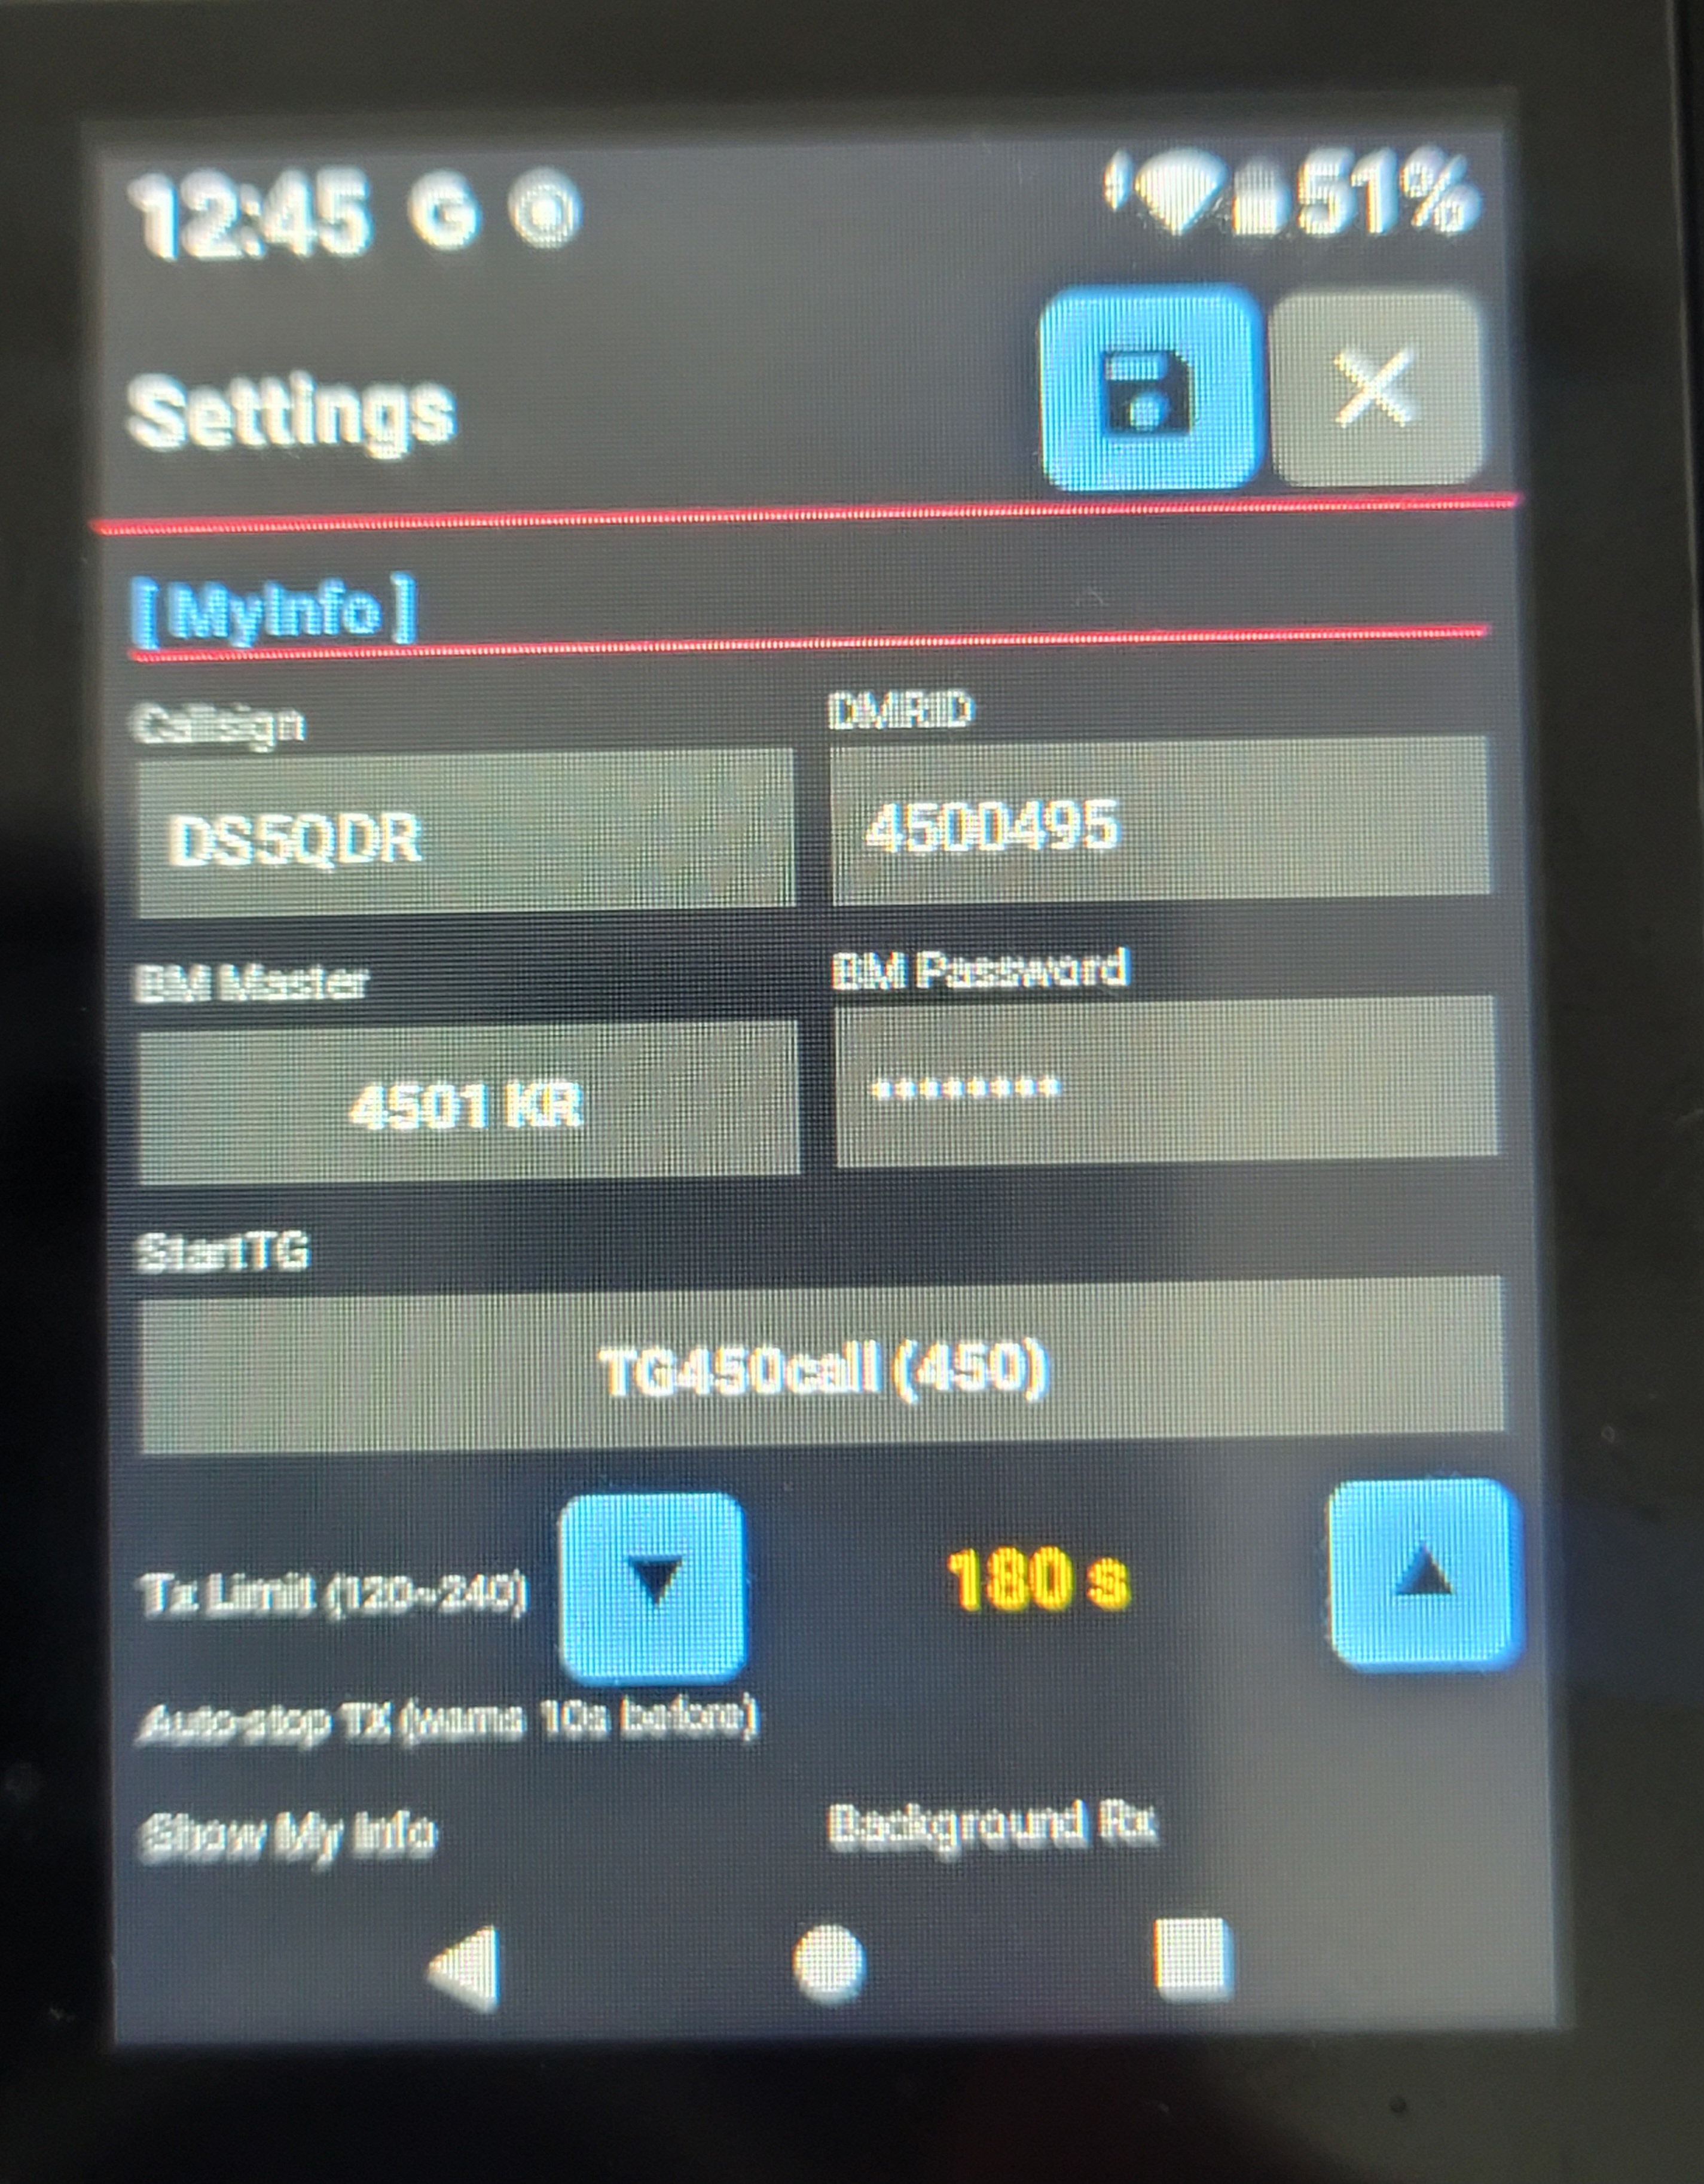
설정 화면의 [ MyInfo ] 항목을 입력합니다. Phone 버전과 거의 동일하지만, 아래 두 항목은 PoC 단말에는 없습니다.
Fill in the [ MyInfo ] fields on the settings screen. This is almost identical to the Phone version, except the two items below don't exist on the PoC device.
- Callsign — 본인 호출부호. 소문자로 입력해도 자동으로 대문자로 변환됩니다. Callsign — your callsign. Lowercase entries are auto-converted to uppercase.
- DMRID — 본인 DMR ID. 콜사인과 일치하지 않으면 저장 시 경고가 표시됩니다. DMRID — your DMR ID. A warning appears on save if it doesn't match the callsign.
- BM Master — 접속할 BrandMeister 서버. 기본값은 4501 KR(한국)입니다. BM Master — the BrandMeister server to connect to. Default is 4501 KR (Korea).
- BM Password — BrandMeister SelfCare에서 설정한 비밀번호. BM Password — the password set in BrandMeister SelfCare.
- StartTG (first launch) — 앱 첫 실행 시 자동 접속할 토크그룹. StartTG (first launch) — the talkgroup to auto-connect to on first launch.
- Tx Limit Second (120~240) — 연속 송신 제한 시간(초). 종료 10초 전 경고가 표시됩니다. Tx Limit Second (120–240) — maximum continuous transmit time in seconds; a warning appears 10s before auto-stop.
- Show My Info at Tx — On으로 켜면 송신 중에도 상단 정보 영역에 내 정보를 표시합니다. Show My Info at Tx — when On, your own info stays shown in the top info area while transmitting.
- Background Rx — On이면 화면을 모두 닫아도 백그라운드에서 수신을 계속 유지합니다. Background Rx — when On, receiving continues in the background even after closing all screens.
그 아래에 모드별 설정이 있습니다(내용은 Phone 버전 3장과 같음).Below that are the per-mode settings (same as section 3 of the Phone manual).
- [ EchoLink ] — 인증된 EchoLink 계정의 Password와 Location (콜사인 = MyInfo Callsign, 공개 프록시로 접속) [ EchoLink ] — Password and Location of your validated EchoLink account (callsign = MyInfo Callsign; connects via a public proxy)
- [ ASL ] your node via IAX2 — Node Host · Port(4569) · Node · User(iaxclient) · IAX Password [ ASL ] your node via IAX2 — Node Host · Port (4569) · Node · User (iaxclient) · IAX Password
- Mode menu — 모드 메뉴에 보일 모드(두 줄 체크박스). 새로 설치하면 STFU·DSTAR만 켜져 있습니다. Mode menu — modes shown in the mode menu (two rows of checkboxes). A fresh install enables only STFU and DSTAR.
입력 후 Save를 누르면 저장되고 자동으로 접속을 시도합니다. Tapping Save stores the settings and automatically attempts to connect.
3.메인 화면 사용법Main Screen Guide
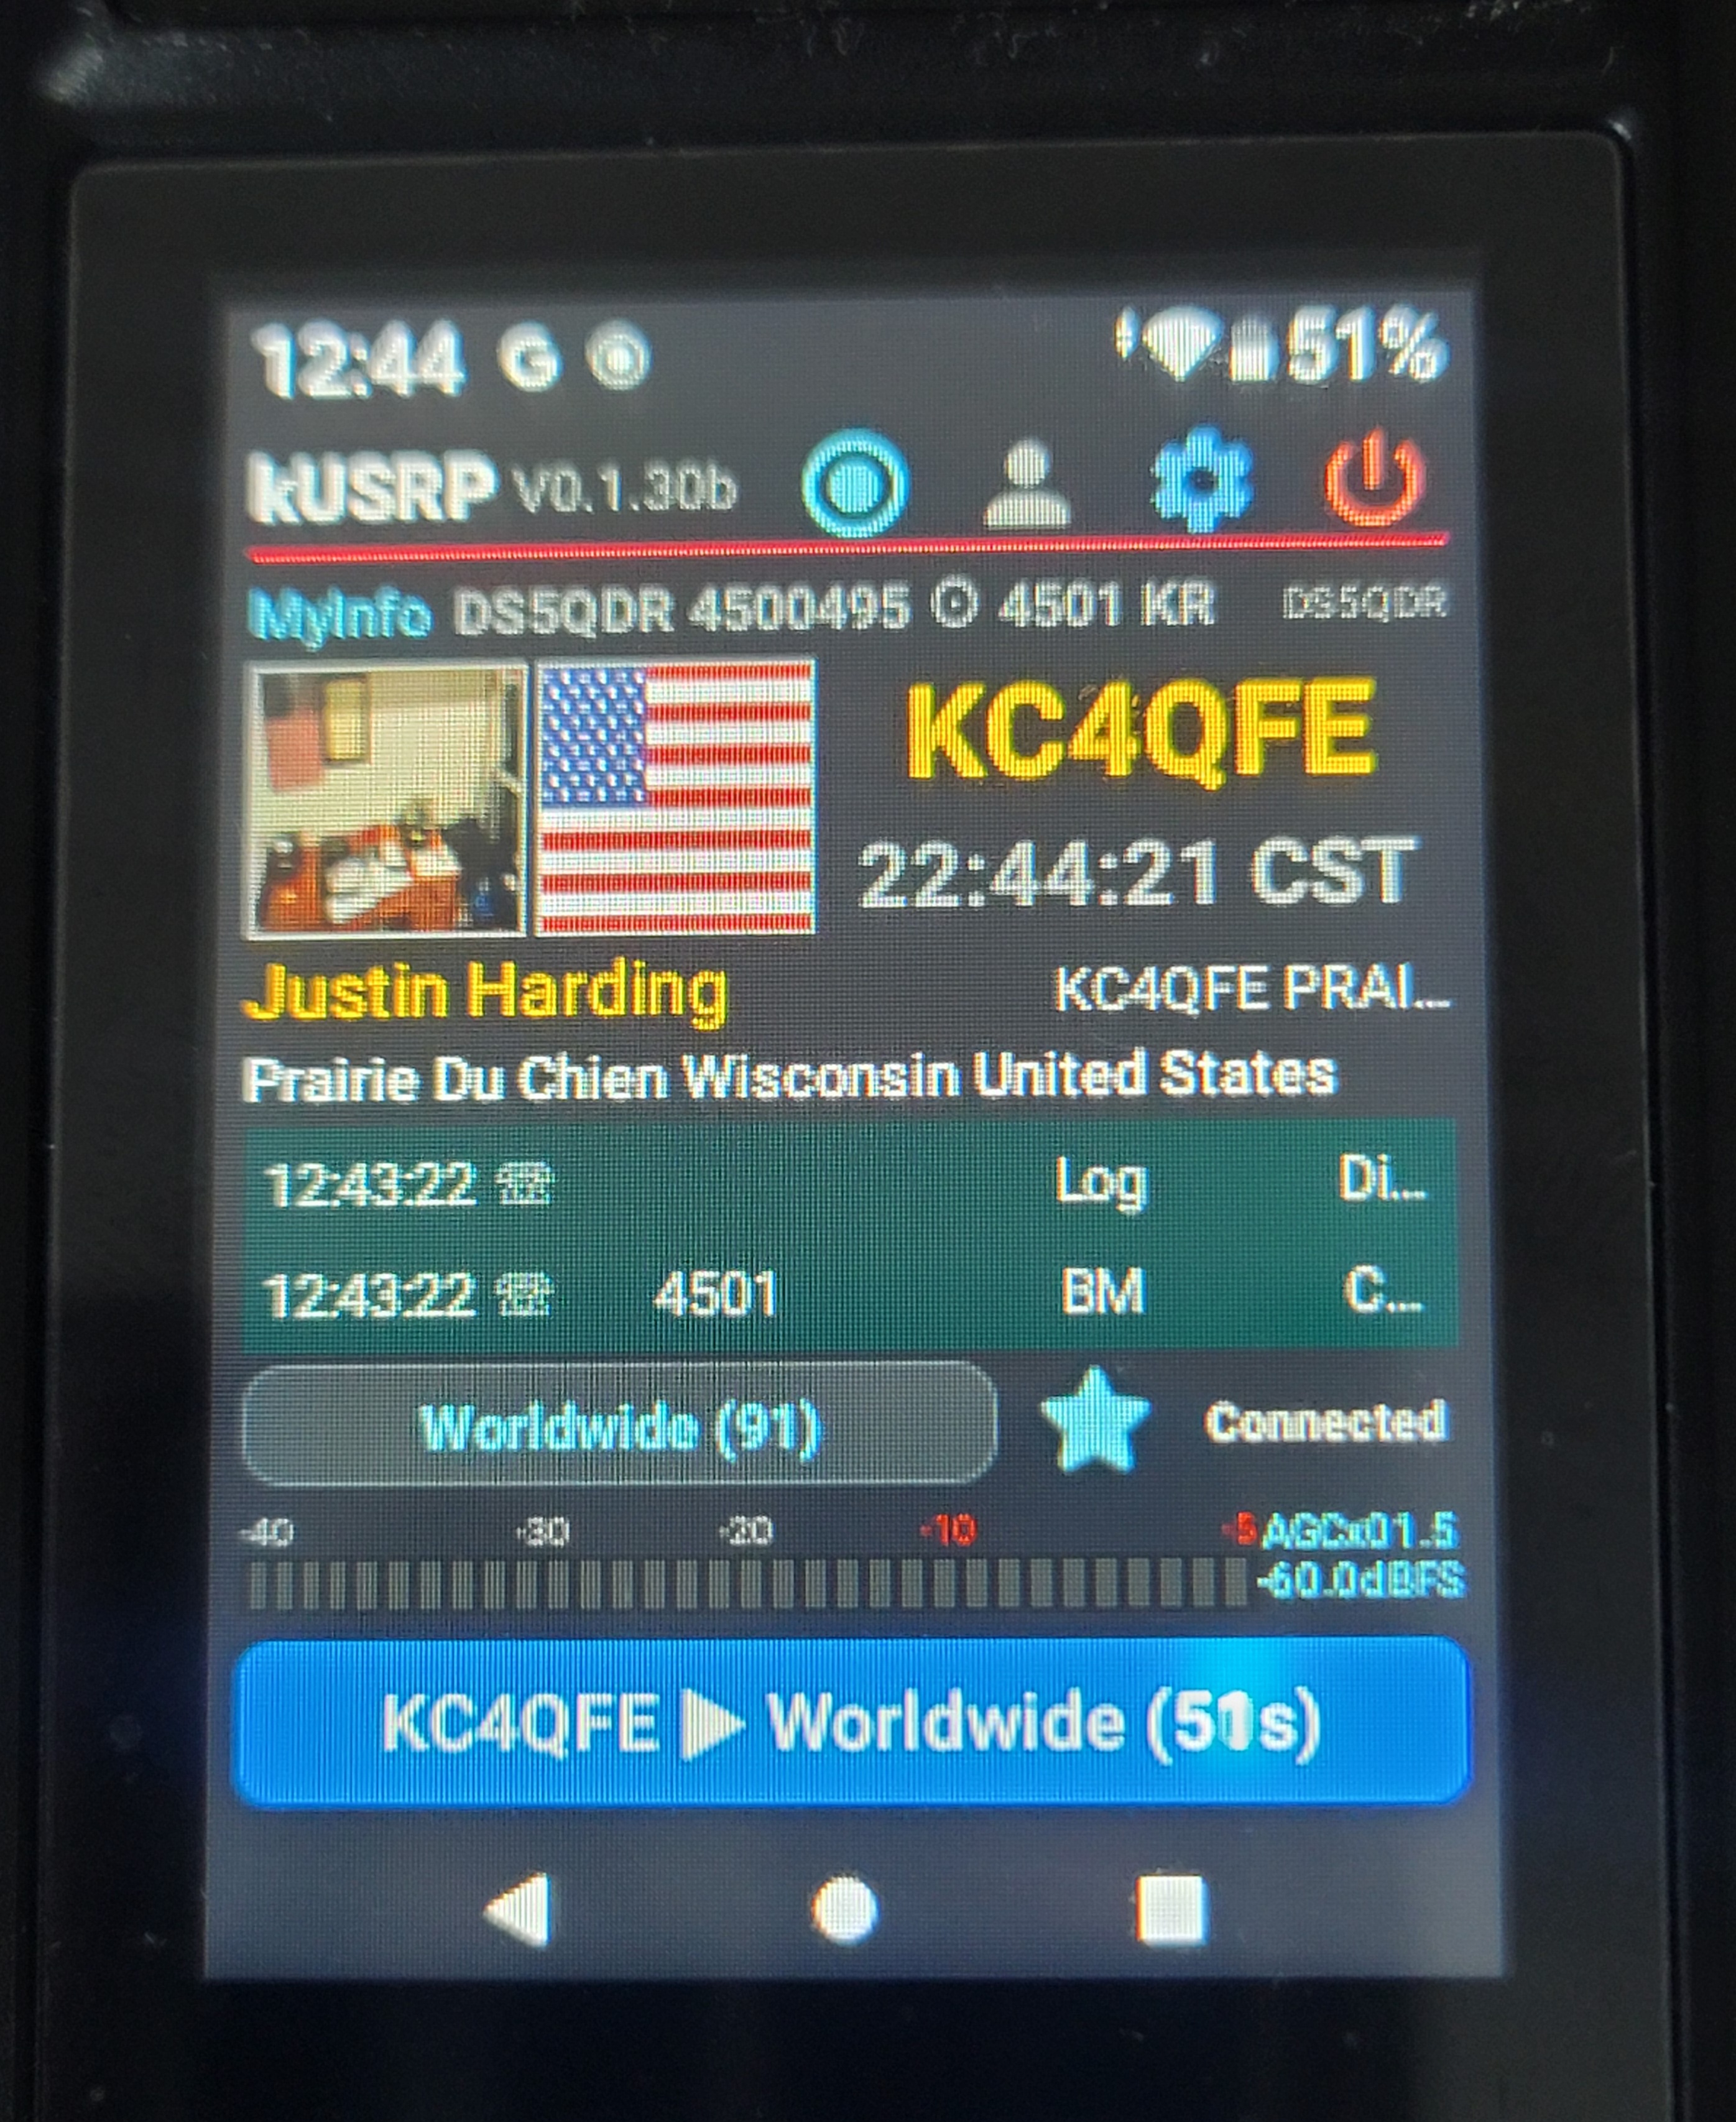
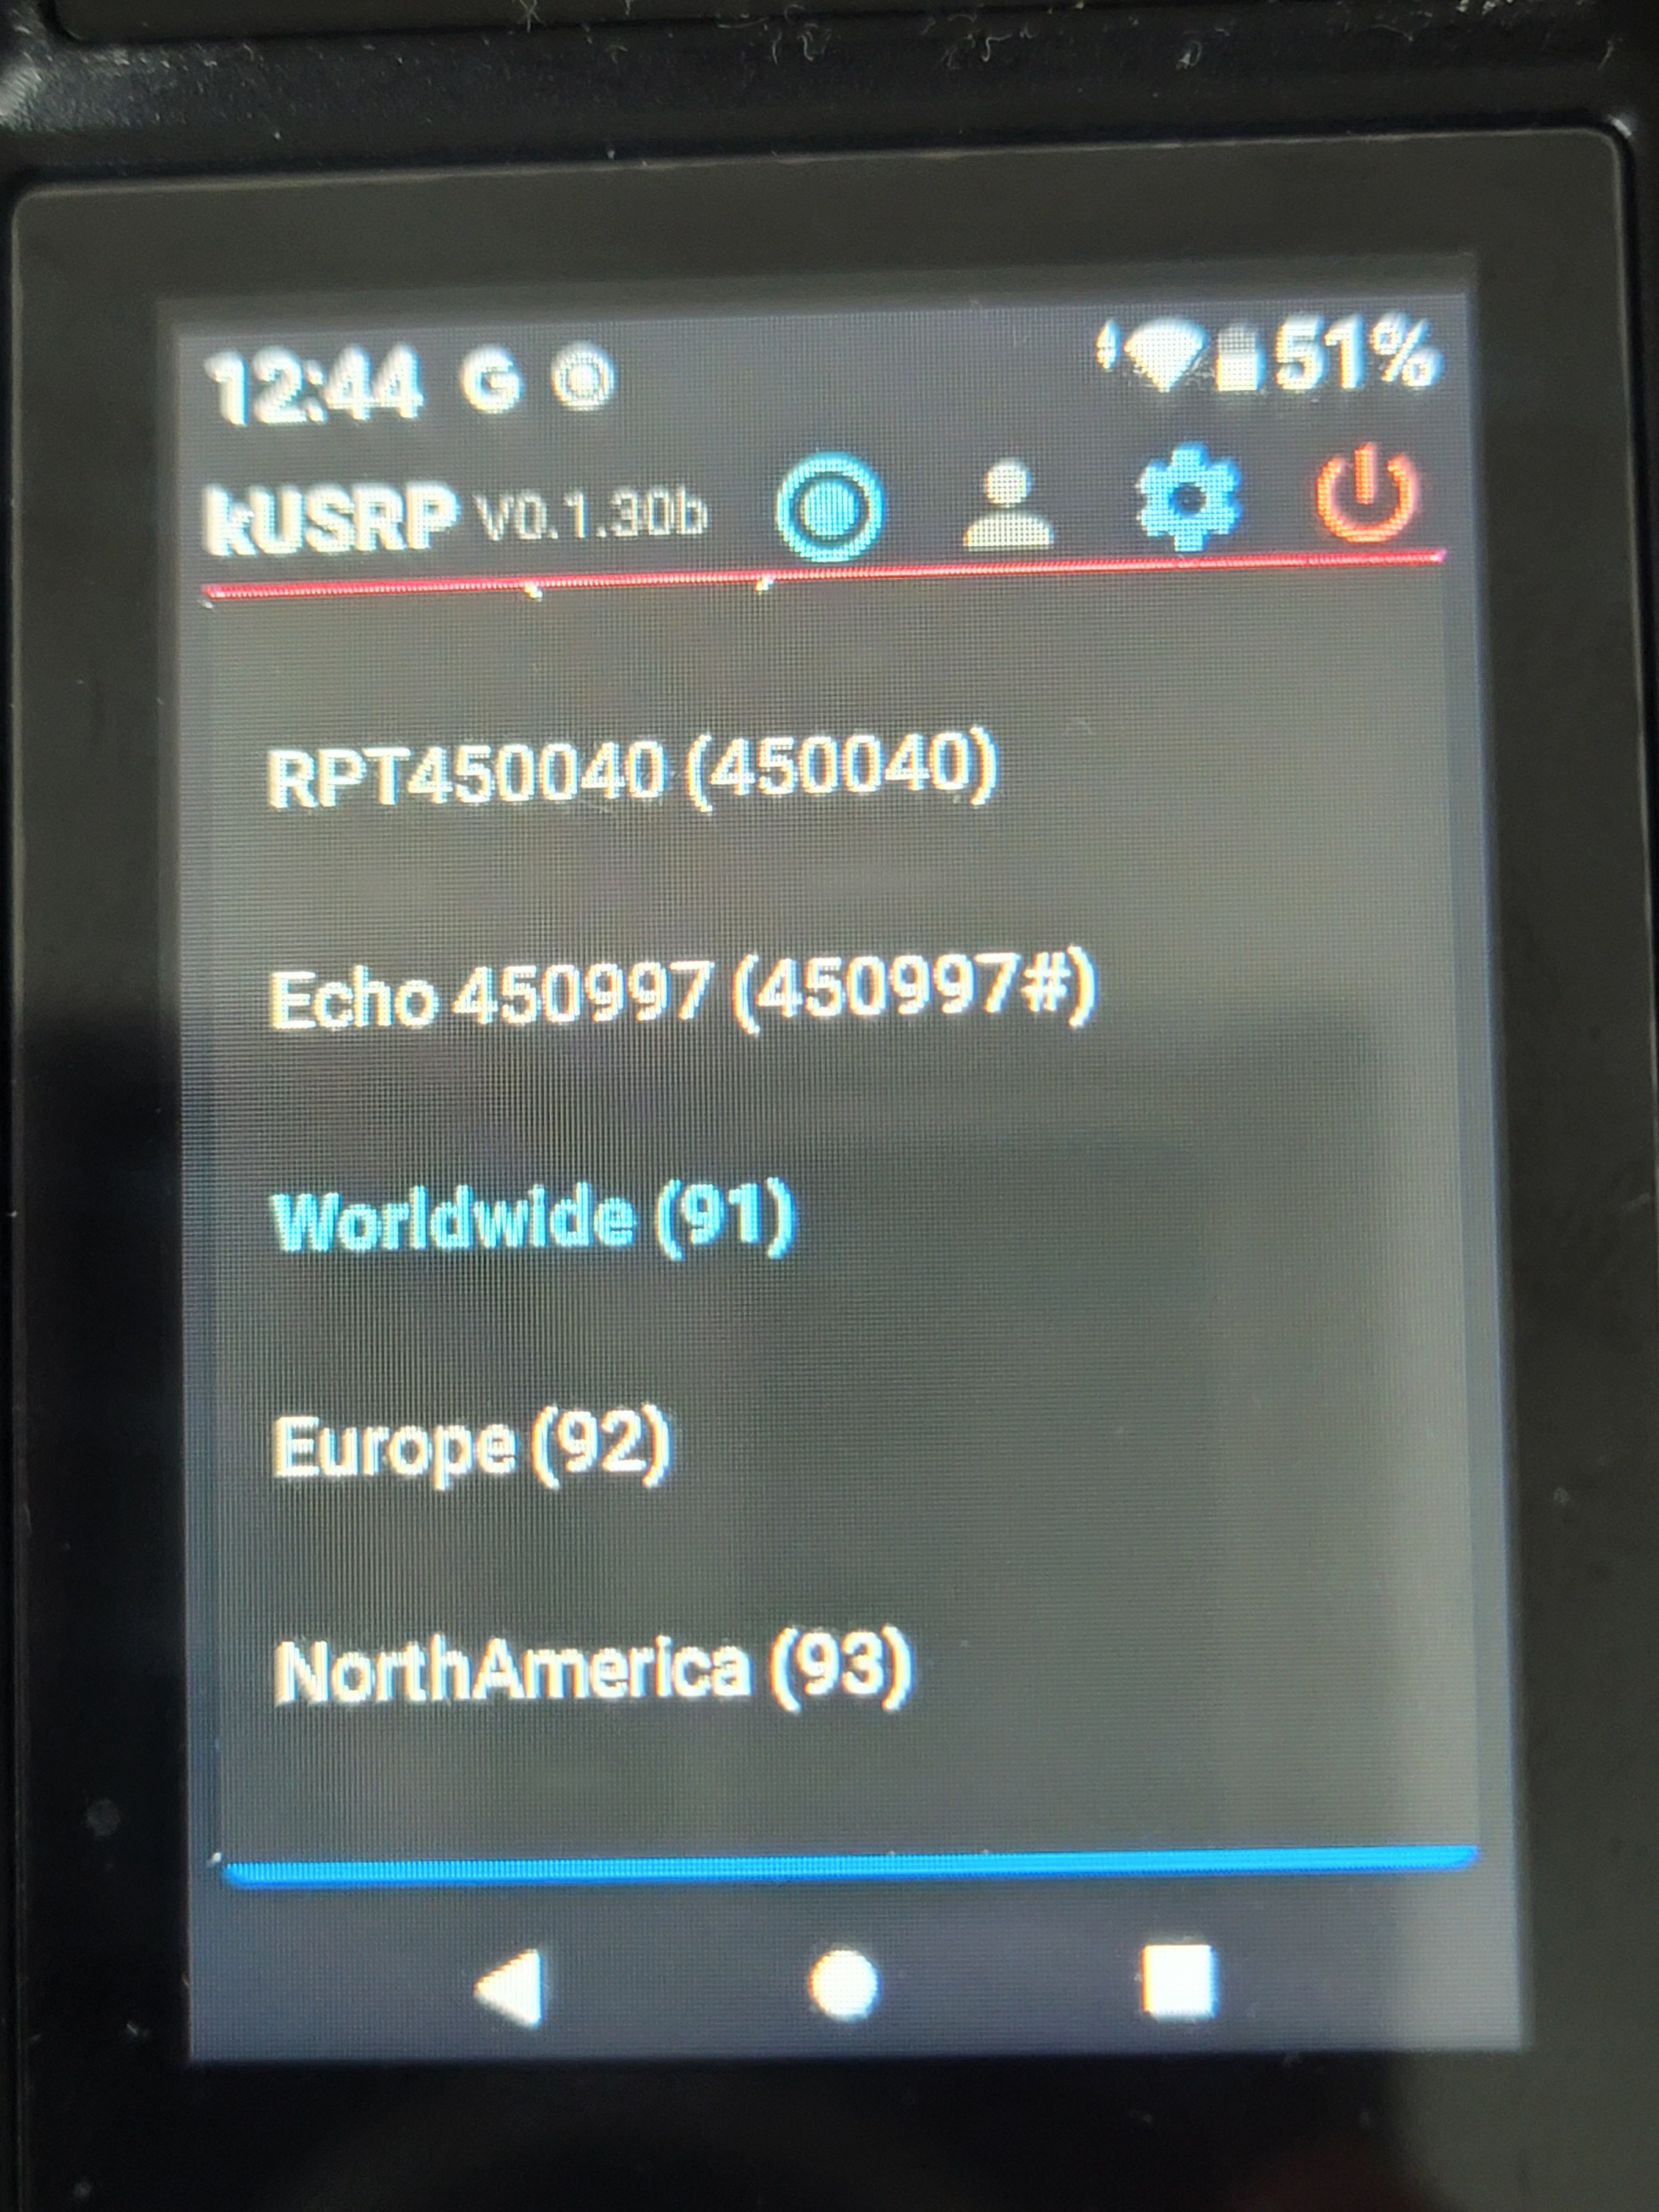
메인 화면 구성은 Phone 버전과 동일하며, 단말의 작은 화면에 맞춰 배치되어 있습니다.
The main screen layout is the same as the Phone version, arranged to fit the device's smaller screen.
- 제목줄 / MyInfo 요약바 — 내 콜사인·DMR ID·접속 서버 Title bar / MyInfo summary bar — your callsign, DMR ID, and connected server
- 정보 영역 — 현재 교신자의 QRZ 사진, 국기, 콜사인, DMR ID, 이름, 주소 Info area — the current operator's QRZ photo, flag, callsign, DMR ID, name, and address
- 모드 · TG 선택줄 — 맨 앞 모드 박스(예:
STFU ▾, 모드마다 색이 다름, 탭하면 모드 메뉴), 현재 TG/리플렉터, 접속 상태(Connected) Mode · TG bar — the mode box at the front (e.g.STFU ▾, a different color per mode; tap for the mode menu), the current TG/reflector and connection status (Connected) - 미터 & PTT 바 — 음량 미터와 현재 송신자/토크그룹, 경과 시간 표시 Meter & PTT bar — volume meter plus the current transmitting station/talkgroup and elapsed time
화면을 직접 탭해도 되지만, 대부분의 조작은 단말의 물리 PTT·노브 버튼으로 하는 것이 더 편리합니다(7장 Key Mapping 참고). You can tap the screen directly, but most operations are more convenient using the device's physical PTT and knob buttons (see section 7, Key Mapping).
4.모드 선택 (멀티모드)Selecting a Mode (Multi-mode)
TG 선택줄 맨 앞의 모드 박스를 탭하면 모드 메뉴(STFU / DSTAR / NXDN / P25 / YSF / M17 / ASL / EchoLink)가 열립니다. 모드를 고르면 그 모드의 Favorite TGs 목록으로 바뀌고 마지막 항목에 자동 접속합니다. 메뉴에는 설정의 Mode menu에서 켠 모드만 보이며, 앱은 항상 STFU로 시작합니다. 모드별 접속 대상과 코덱은 Phone 사용설명서 5장 표와 같습니다.
Tap the mode box at the front of the TG bar to open the mode menu (STFU / DSTAR / NXDN / P25 / YSF / M17 / ASL / EchoLink). Picking a mode switches to that mode's Favorite TGs list and auto-connects to its last entry. Only the modes enabled under Mode menu in settings appear, and the app always starts in STFU. Targets and codecs per mode are the same as the table in section 5 of the Phone manual.
5.송신(PTT)과 수신Transmit (PTT) & Receive
접속되면 선택한 토크그룹의 음성이 단말 스피커로 자동 재생됩니다. 송신은 화면의 PTT 버튼 대신, 단말 측면의 물리 PTT 버튼을 누르는 것이 기본입니다.
Once connected, audio from the selected talkgroup plays automatically through the device speaker. Instead of an on-screen PTT button, transmitting is normally done with the physical PTT button on the side of the device.
6.Audio LevelAudio Level
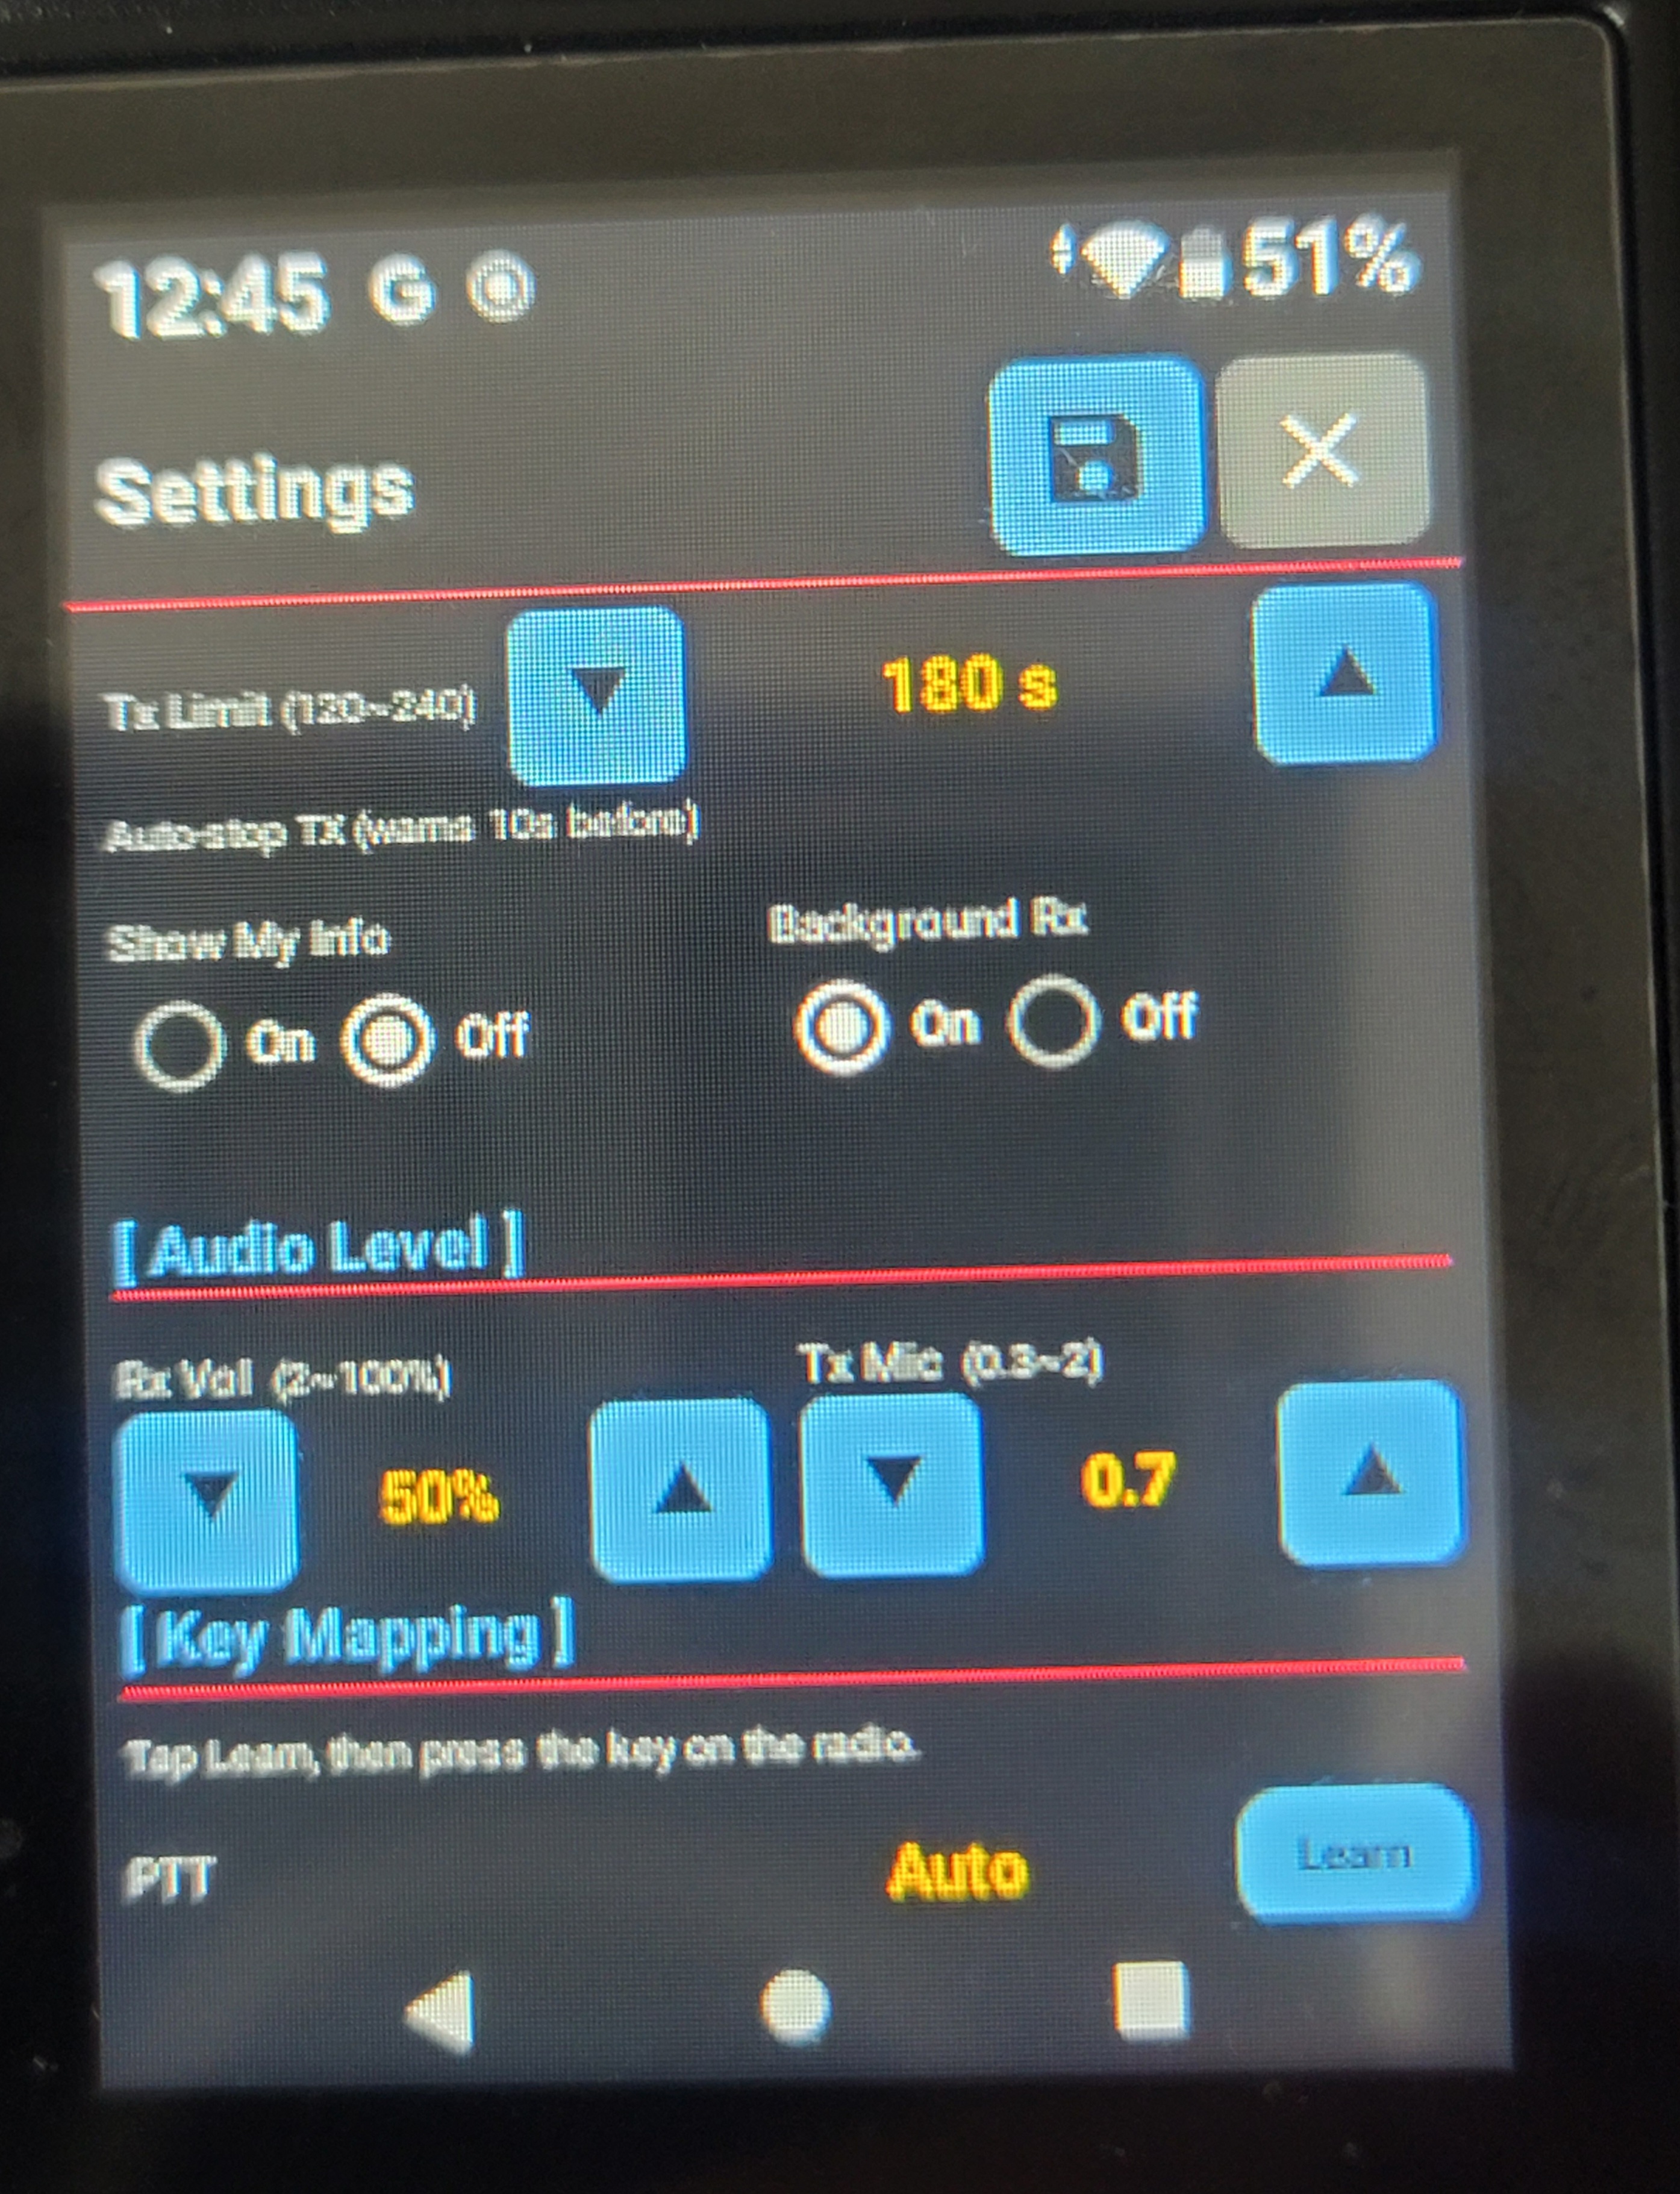
설정 화면의 [ Audio Level ]에서 수신/송신 음량을 조절합니다. Phone 버전과 달리 PoC는 마이크가 하나뿐이라 Tx Mic 게인이 하나로 통합되어 있습니다.
Adjust receive/transmit volume under [ Audio Level ] in settings. Unlike the Phone version, the PoC has a single microphone, so there is just one combined Tx Mic gain setting.
| 항목Item | 설명Description | 범위Range |
|---|---|---|
| Rx Vol | 수신 음량Receive volume | 2 ~ 100% |
| Tx Mic | 송신 마이크 게인 (단일)Transmit mic gain (single, combined) | 0.3 ~ 2 |
AMBE+2(STFU·NXDN·YSF) 보코더는 Phone 버전과 동일하게 MD-380 펌웨어 에뮬레이터를 우선 사용하고, 로드에 실패하면 mbelib로 자동 전환됩니다. D-STAR(libdstar)·P25(IMBE)·M17(Codec2)·EchoLink(GSM)·ASL(μ-law)은 앱 안의 소프트웨어 코덱으로 처리합니다. The AMBE+2 vocoder (STFU, NXDN, YSF) works the same as the Phone version — it prefers the MD-380 firmware emulator and falls back to mbelib if loading fails. D-STAR (libdstar), P25 (IMBE), M17 (Codec2), EchoLink (GSM) and ASL (μ-law) use software codecs inside the app.
7.Key Mapping (물리 버튼 매핑)Key Mapping (Physical Buttons)
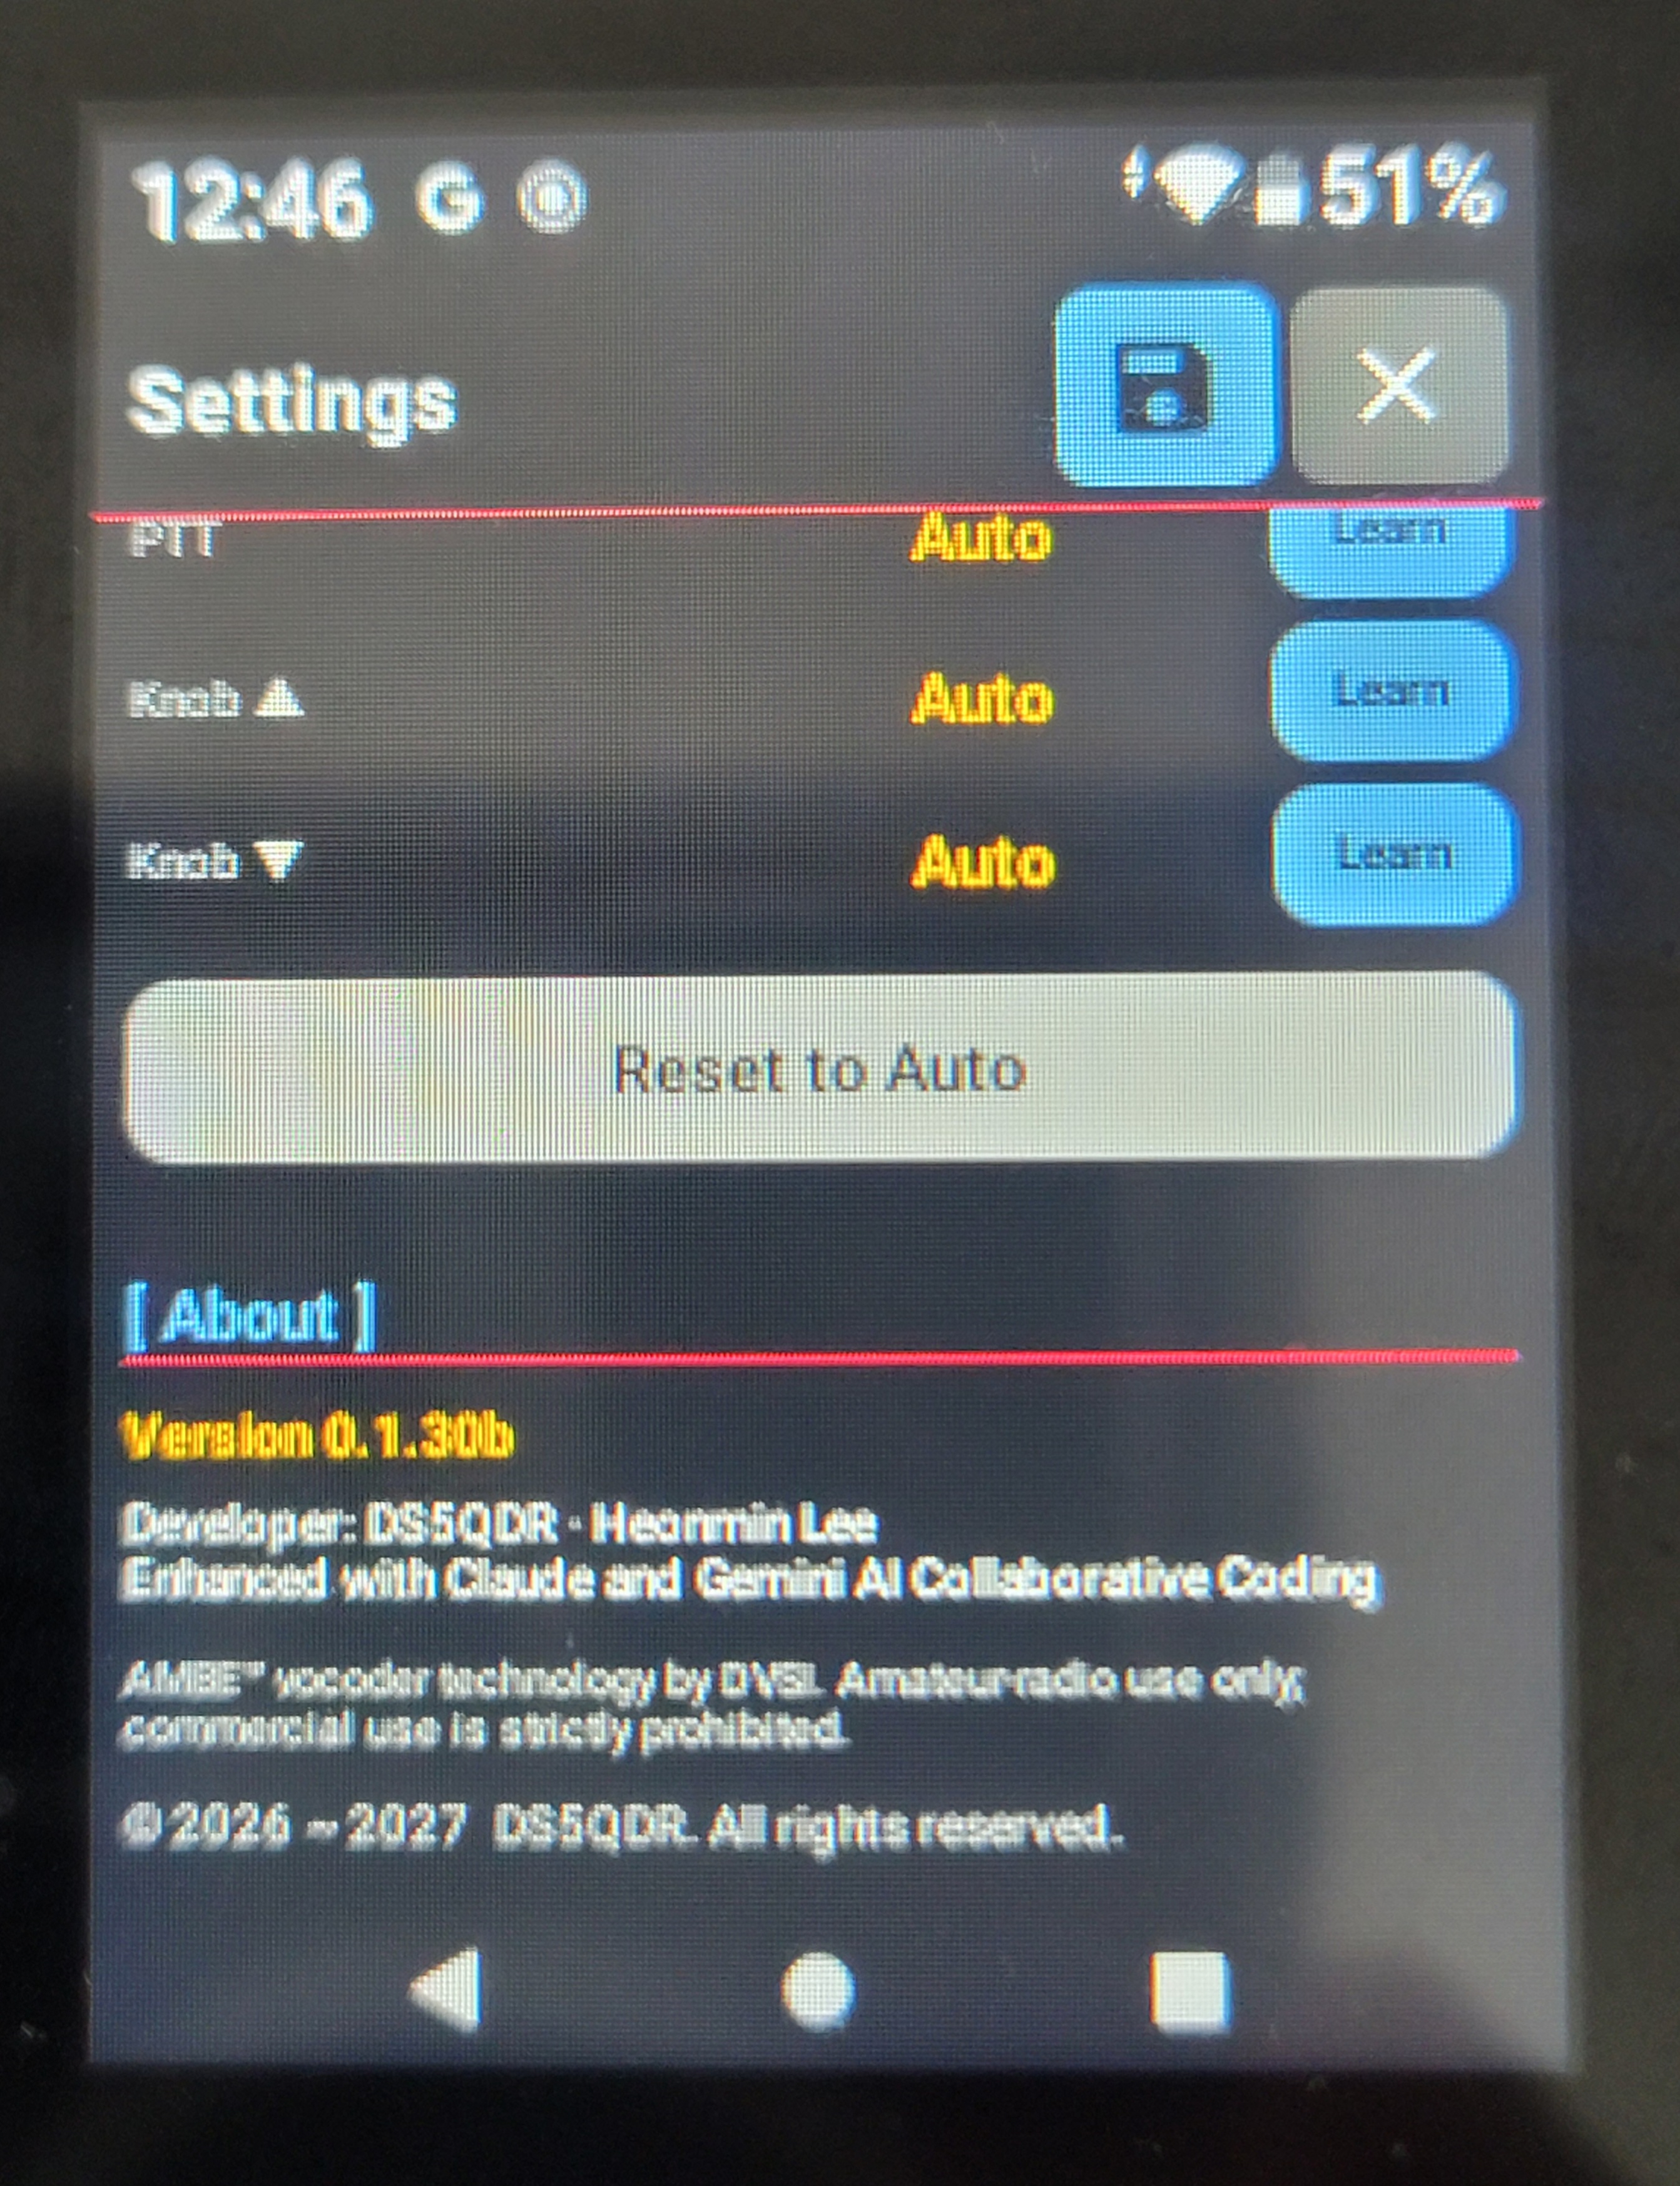
PoC 단말 전용 기능으로, 단말의 물리 버튼(PTT, 다이얼 노브 ▲▼)에 원하는 앱 동작을 지정할 수 있습니다.
This is a PoC-only feature that lets you assign app actions to the device's physical buttons (PTT, dial knob ▲▼).
- PTT — 기본값 Auto(눌러서 송신). Learn을 누른 뒤 원하는 버튼을 누르면 그 버튼으로 매핑이 변경됩니다. PTT — default is Auto (press to transmit). Tap Learn, then press the button you want, and PTT is remapped to it.
- Knob ▲ / Knob ▼ — 기본값 Auto(토크그룹/채널 위아래 전환). 마찬가지로 Learn으로 원하는 버튼에 재매핑할 수 있습니다. Knob ▲ / Knob ▼ — default is Auto (switches talkgroup/channel up or down). Also remappable to any button via Learn.
- Reset to Auto — 모든 매핑을 공장 기본값(Auto)으로 되돌립니다. Reset to Auto — restores all mappings back to their factory default (Auto).
8.Favorite TGs (목록 편집)Favorite TGs (List Editing)
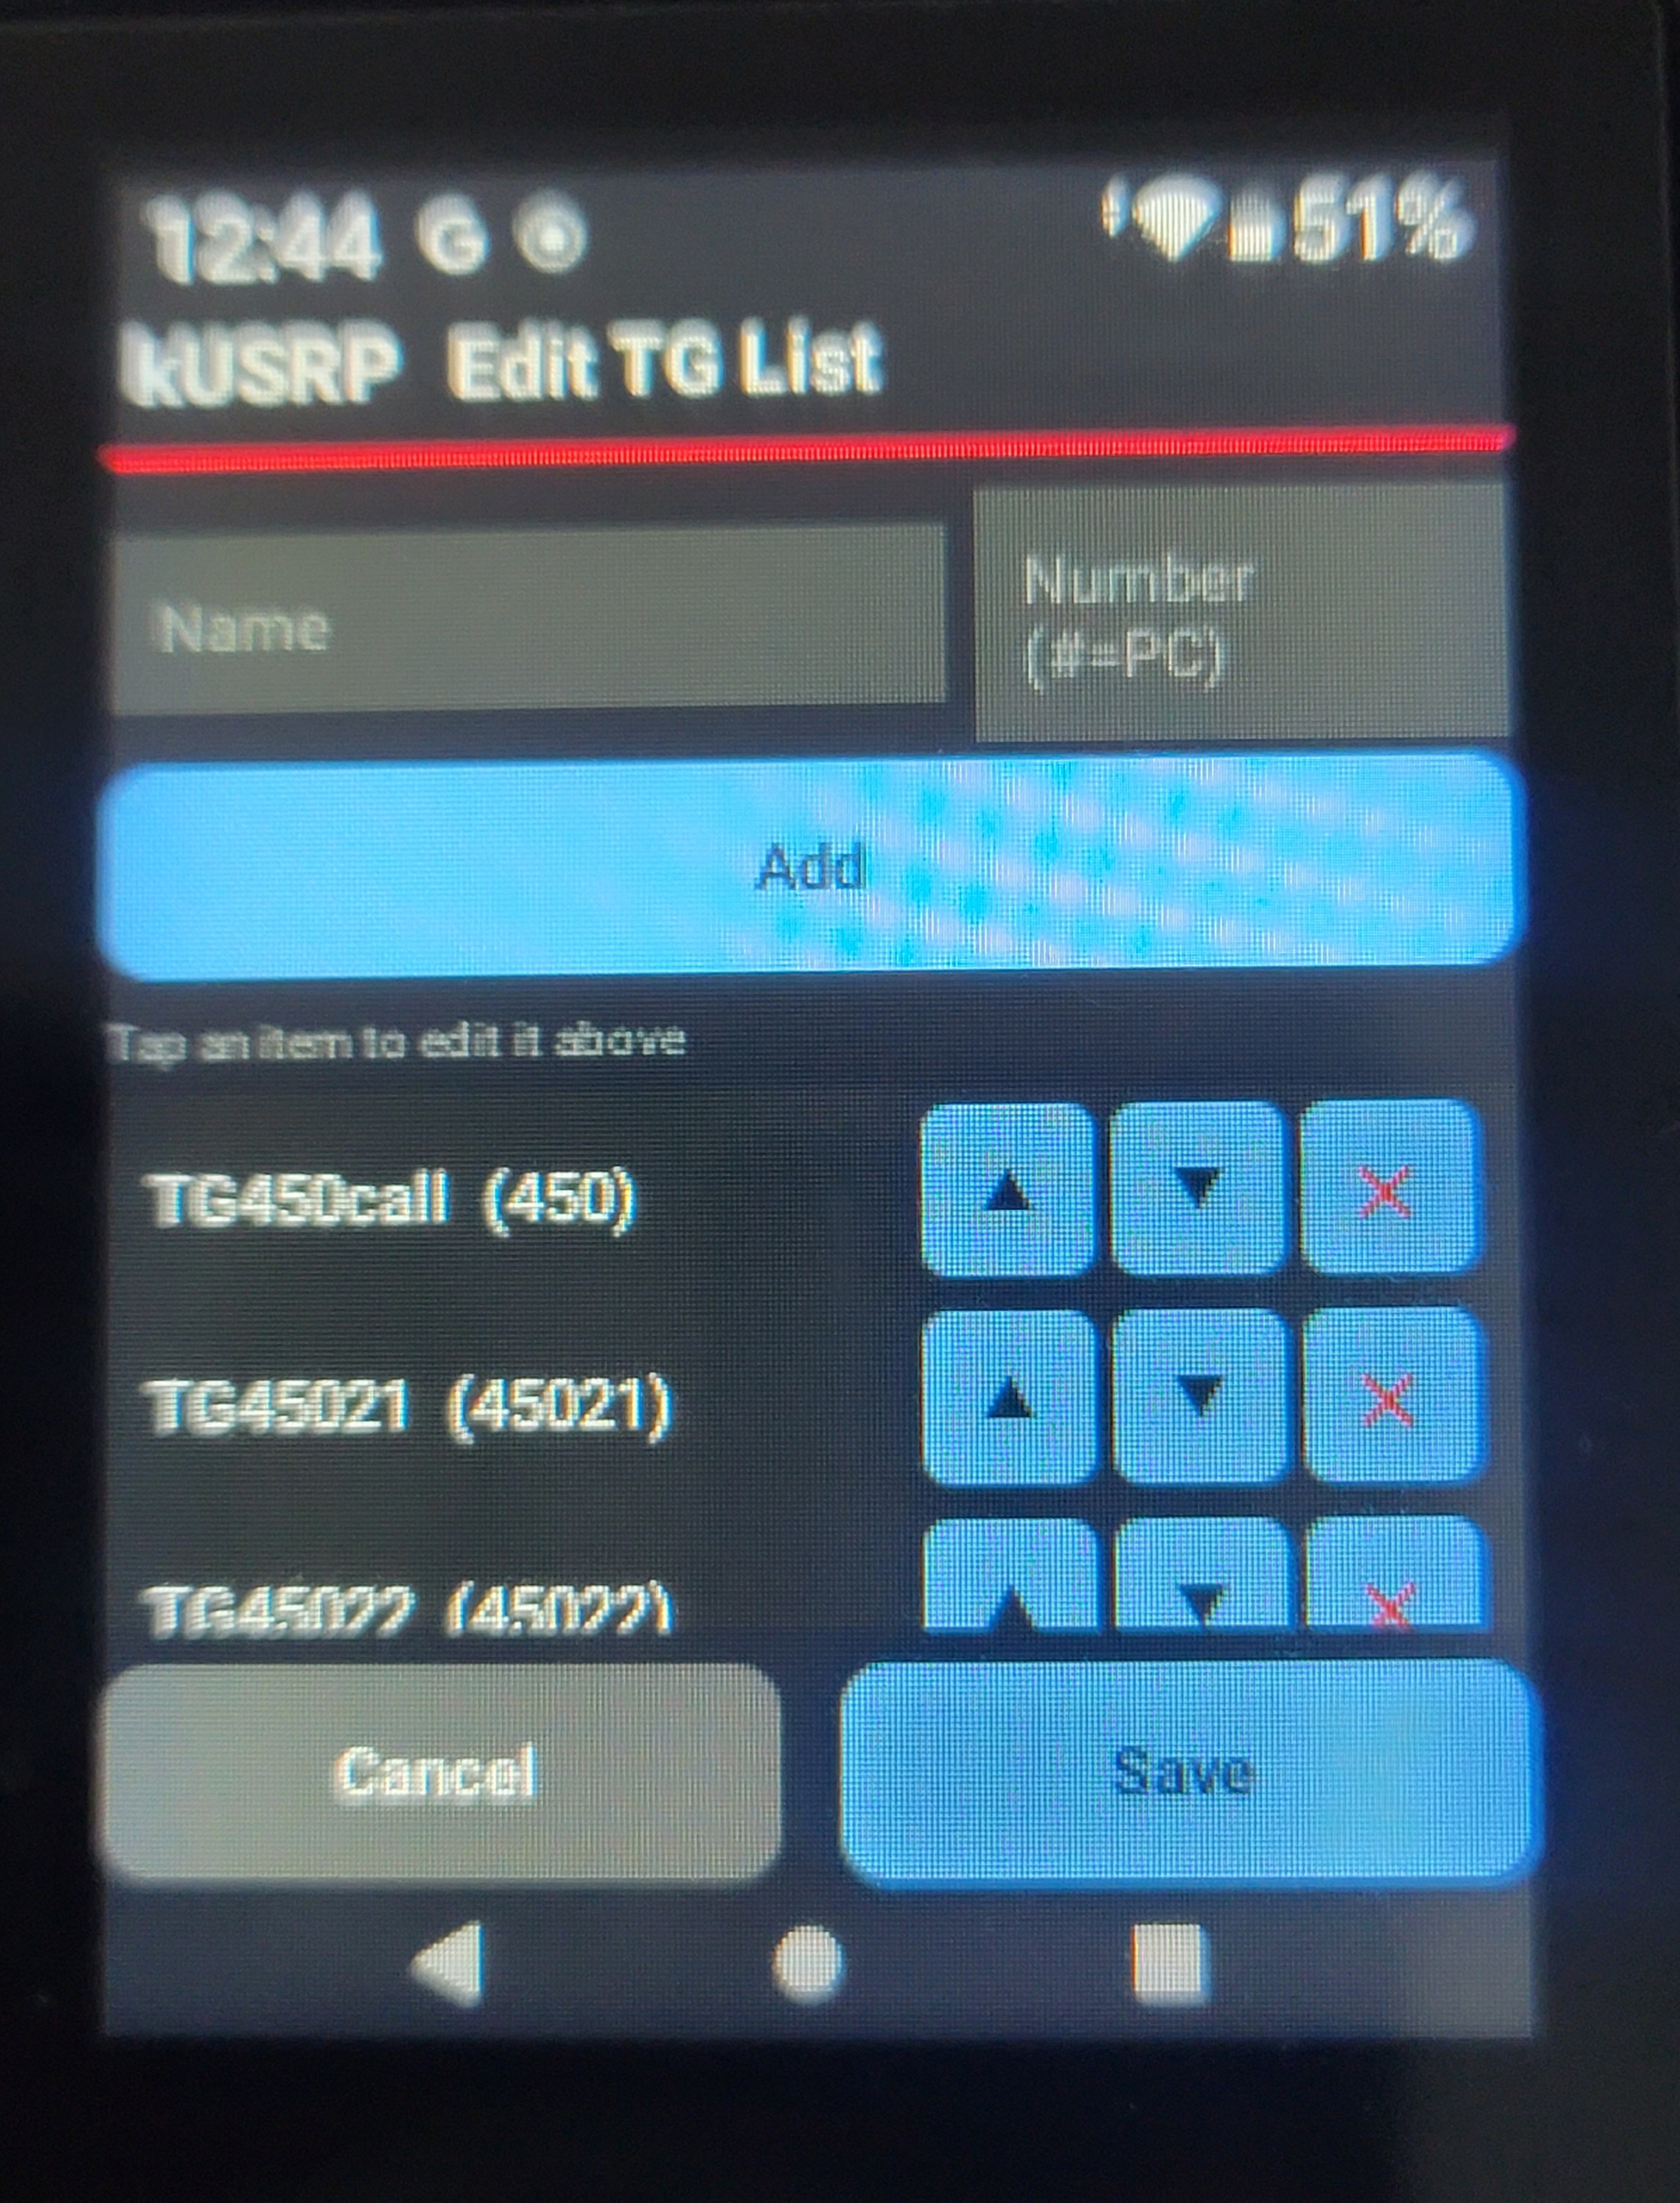
편집 버튼으로 지금 모드의 Favorite TGs 화면에 들어갑니다. Phone 버전과 동일하게 동작하며(모드별 목록, NXDN·P25·YSF·M17·ASL·EchoLink는 Search로 추가), STFU에서는 Number 입력란에 #=PC 힌트가 표시됩니다.
Use the edit button to open the Favorite TGs screen for the current mode. It works the same as the Phone version (a list per mode; NXDN, P25, YSF, M17, ASL and EchoLink entries can be added via Search), and in STFU the Number field shows a #=PC hint.
- Name / Number를 입력하고 Add로 새 TG를 추가합니다. Enter a Name / Number and tap Add to add a new TG.
- Number (#=PC) — 그룹콜(TG) 번호 앞에
#을 붙이면 프라이빗콜(PC, 개인호출) 번호로 등록됩니다. Number (#=PC) — prefixing the number with#registers it as a private call (PC) number instead of a talkgroup. - 목록의 ▲▼로 순서를 바꾸고, ✕로 삭제합니다. Use ▲▼ in the list to reorder, and ✕ to delete.
- Save를 눌러 변경사항을 저장합니다. Tap Save to save your changes.
9.문제 해결Troubleshooting
| 증상Symptom | 확인 사항What to check |
|---|---|
| Connected가 안 됨Won't show Connected | BM 비밀번호, Callsign/DMR ID 확인. 팝업 안내에 따라 설정 재입력.Check BM password and Callsign/DMR ID. Re-enter settings as prompted by the popup. |
| 물리 PTT 버튼이 안 눌림Physical PTT button doesn't respond | Key Mapping에서 PTT가 다른 버튼으로 잘못 매핑되지 않았는지 확인. 필요시 Reset to Auto.Check whether PTT was accidentally remapped in Key Mapping. Use Reset to Auto if needed. |
| 노브(▲▼)로 채널이 안 바뀜Knob (▲▼) doesn't change channel | Key Mapping의 Knob ▲/▼ 매핑 확인 후 Learn으로 재설정.Check the Knob ▲/▼ mapping in Key Mapping and re-learn it if needed. |
| 송신 음량이 너무 큼/작음Transmit volume too loud/quiet | Audio Level의 Tx Mic 게인을 조금씩 조절.Adjust the Tx Mic gain under Audio Level in small steps. |
| 음질이 낮음 (MD-380 미로드)Low audio quality (MD-380 not loaded) | MD-380 펌웨어가 없어 mbelib로 자동 전환된 상태. 설정의 Vocoder Emulator 버튼으로 펌웨어를 다운로드.The MD-380 firmware isn't installed yet, so it fell back to mbelib. Download the firmware via the Vocoder Emulator button in settings. |
| 모드 메뉴에 원하는 모드가 없음A mode is missing from the mode menu | 설정 → Mode menu에서 그 모드를 체크하고 Save.Tick that mode under Settings → Mode menu and Save. |
| EchoLink / ASL 접속 실패EchoLink / ASL won't connect | 설정 [ EchoLink ]의 Password(인증된 계정), [ ASL ]의 Node Host·Node·User·IAX Password 확인.Check the Password (validated account) under [ EchoLink ], and Node Host, Node, User and IAX Password under [ ASL ]. |
10.라이선스 안내License Notice
kUSRP for PoC는 모드마다 아래 코덱으로 디지털 음성을 인코딩·디코딩합니다. (설정 화면의 [ About kUSRP ]에서 언제든 다시 확인할 수 있습니다.)
kUSRP for PoC encodes and decodes digital voice with the codecs below, depending on the mode. (You can revisit this notice anytime under [ About kUSRP ] in settings.)
- AMBE+2 — STFU / NXDN / YSF — md380_fw 펌웨어 보코더(md380_vocoder) 또는 mbelib vocoder_plugin(DroidStar). AMBE+2 — STFU / NXDN / YSF — md380_fw firmware vocoder (md380_vocoder) or mbelib vocoder_plugin (DroidStar).
- D-STAR AMBE 3600x2400 — libdstar — DroidStar mbe/imbe(AD8DP) + QSO One의 D-Star 보정(DVSI 칩을 블랙박스로 측정, DVSI 펌웨어·코드는 사용하지 않음). GNU GPL v3. D-STAR AMBE 3600x2400 — libdstar — DroidStar mbe/imbe (AD8DP) + QSO One D-Star fixes (measured on a DVSI chip as a black box; no DVSI firmware or code used). GNU GPL v3.
- IMBE — P25 — OP25 imbe_vocoder (Pavel Yazev, 2009). GNU GPL v3 이상. IMBE — P25 — OP25 imbe_vocoder (Pavel Yazev, 2009). GNU GPL v3 or later.
- Codec 2 3200 — M17 (David Rowe VK5DGR 외, LGPL-2.1) · GSM 06.10 — EchoLink (© 1992-1994 Jutta Degener, Carsten Bormann, TU Berlin) · G.711 μ-law / IAX2(RFC 5456) — ASL Codec 2 3200 — M17 (David Rowe VK5DGR et al., LGPL-2.1) · GSM 06.10 — EchoLink (© 1992-1994 Jutta Degener, Carsten Bormann, TU Berlin) · G.711 μ-law over IAX2 (RFC 5456) — ASL
- 특허 — AMBE, AMBE+2, IMBE는 Digital Voice Systems, Inc.(DVSI)의 기술입니다. 여기 포함된 소프트웨어 코덱은 아마추어 무선 실험을 위한 독립 구현이며, 특허 상태는 나라마다 다르므로 각 나라 법을 지키는 것은 사용자 책임입니다. Patents — AMBE, AMBE+2 and IMBE are technologies of Digital Voice Systems, Inc. (DVSI). The software codecs here are independent implementations for amateur radio experimentation; patent status varies by country, and users are responsible for complying with local law.
- 프로토콜 · 데이터 출처 — BrandMeister STFU · G4KLX ircDDBGateway, MMDVMHost, NXDN/YSF/P25Clients, MMDVM_CM, mrefd · DroidStar(AD8DP) · SvxLink echolib(SM0SVX) · Asterisk IAX2 | Pi-Star Host Files · DVRef/refcheck.radio · radioid.net · EchoLink 디렉터리 · AllStarLink 노드 DB. EchoLink®는 Synergenics, LLC의 등록상표, D-STAR는 JARL의 상표입니다. Protocols · data sources — BrandMeister STFU · G4KLX ircDDBGateway, MMDVMHost, NXDN/YSF/P25Clients, MMDVM_CM, mrefd · DroidStar (AD8DP) · SvxLink echolib (SM0SVX) · Asterisk IAX2 | Pi-Star Host Files · DVRef/refcheck.radio · radioid.net · EchoLink directory · AllStarLink node DB. EchoLink® is a registered trademark of Synergenics, LLC; D-STAR is a trademark of JARL.
Developer: DS5QDR · Heonmin Lee · Enhanced with Claude and Gemini AI Collaborative Coding · © 2026~2027 DS5QDR. All rights reserved. Developer: DS5QDR · Heonmin Lee · Enhanced with Claude and Gemini AI Collaborative Coding · © 2026–2027 DS5QDR. All rights reserved.