kUSRP

DMR & D-STAR 디지털보이스 클라이언트 · by DS5QDR DMR & D-STAR Digital Voice Client · by DS5QDR

kUSRP 정보와 다운로드 사이트 kUSRP Information & Download Site

BrandMeister DMR(STFU)와 D-STAR(REF/XRF/XLX)를 지원하는 디지털보이스 클라이언트입니다. Android 폰용, PoC(Push-to-talk over Cellular) 전용 단말용, Windows PC용 3종을 이 사이트에서 직접 내려받을 수 있습니다. A digital voice client supporting BrandMeister DMR (STFU) and D-STAR (REF/XRF/XLX). Three builds — for Android phones, for PoC (Push-to-talk over Cellular) devices, and for Windows PCs — are distributed directly from this site.

BrandMeister DMR (STFU) D-STAR (REF/XRF/XLX) Android · Kotlin Windows · Python/Tkinter

개발이력Development History

kUSRP 프로젝트의 주요 연혁과 각 앱의 상세 릴리즈 노트를 함께 보여줍니다. Key project milestones together with the detailed release notes for each app.

프로젝트 연혁Project History

kUSRP AndroidV0.1.xx2026.09.15
kUSRP Android App 공개버전 V1.0.0 출시 (Phone & PoC 2종)Public release of the kUSRP Android App V1.0.0 (Phone & PoC editions)
kUSRP WindowsV1.xx2026.09.06
kUSRP for Windows Version V1.00 출시 (DVSwitch Server 없이 동작, STFU & D-STAR 지원)kUSRP for Windows V1.00 released (no DVSwitch Server required; supports STFU DMR & D-STAR)
kUSRP AndroidV0.1.xx2026.08.18
kUSRP Android App 개발 시작Started development of the kUSRP Android App
USRP WindowsV3.992023.01.27
USRP Client for Windows V3.99 출시 (DVSwitch Server 접속 버전, All DV Modes)USRP Client for Windows V3.99 released (connects via DVSwitch Server, all digital voice modes)
DVSwitch pyUC2021.01.22
DVSwitch pyUC의 UI 개선판 개발 시작Began developing a UI-improved version of DVSwitch pyUC

kUSRP Series 종류kUSRP Series Lineup

릴리즈 노트Release Notes

각 앱의 상세 릴리즈 노트를 최신순으로 모아 보여줍니다. (내용은 info/kUSRP/kUSRP_version.json 파일에서 자동으로 불러옵니다) Detailed release notes for every app, newest first. (Automatically loaded from info/kUSRP/kUSRP_version.json)

다운로드Download

기기에 맞는 버전을 선택해 내려받으세요. 최신 버전 정보와 체크섬(SHA-256)은 아래 목록에 표시됩니다. Choose the build that matches your device. The latest version info and SHA-256 checksum are shown below.

설치 안내 (안드로이드 APK)Install notes (Android APK)
  1. Play 스토어를 통하지 않는 배포이므로, 설치 시 "출처를 알 수 없는 앱" 또는 "이 출처 허용" 권한을 한 번 허용해야 합니다. Since this is not distributed via Google Play, you must allow "install unknown apps" / "allow from this source" once during installation.
  2. 가능하면 위에 표시된 SHA-256 체크섬으로 다운로드한 파일의 무결성을 확인하세요. Where possible, verify the downloaded file against the SHA-256 checksum shown above.
  3. 앱 실행 후 새 버전이 있으면 자동으로 확인 후 알려드리며, 다운로드와 설치 승인은 Android 정책상 사용자가 직접 눌러야 합니다(완전 무인 자동설치는 Android 보안 정책상 불가능합니다). The app checks for updates automatically on launch. Downloading and confirming the install still requires a tap from you — fully silent installation isn't possible under Android's security model for a sideloaded app.
⚠ Windows 실행파일은 자체 서명 인증서가 없는 경우 "Windows Defender SmartScreen" 경고가 표시될 수 있습니다. "추가 정보 → 실행"을 눌러 진행하세요. (자세한 내용은 사용설명서 탭 참고) ⚠ The Windows executable may trigger a "Windows Defender SmartScreen" warning if it isn't code-signed. Click "More info → Run anyway" to proceed. (See the User Manual tab for details)

사용설명서User Manual

설치와 기본 사용법을 안내합니다. 세부 내용은 추후 계속 보강될 예정입니다. Installation and basic usage guide. More detail will be added over time.

① kUSRP for Phone / PoC 설치 (Android)① Installing kUSRP for Phone / PoC (Android)

  1. 다운로드 탭에서 kUSRP_Phone.apk(일반 스마트폰) 또는 kUSRP_PoC.apk(AnySecu W70 등 PoC 전용 단말)를 내려받습니다. From the Download tab, get kUSRP_Phone.apk (general smartphones) or kUSRP_PoC.apk (PoC devices such as AnySecu W70).
  2. 설정 → 보안(또는 앱) → "출처를 알 수 없는 앱 설치 허용"에서 사용 중인 브라우저 또는 파일관리자를 허용합니다. Go to Settings → Security (or Apps) → "Install unknown apps" and allow it for your browser or file manager.
  3. 내려받은 apk 파일을 눌러 설치를 진행합니다. Tap the downloaded APK file to install.
  4. 최초 실행 시 마이크 권한을 허용해야 정상적으로 송신(PTT)할 수 있습니다. Grant microphone permission on first launch — it's required for transmitting (PTT).

② kUSRP for Windows 설치② Installing kUSRP for Windows

  1. 다운로드 탭에서 kUSRP.exe를 내려받아 실행합니다. Download and run kUSRP.exe from the Download tab.
  2. "Windows Defender SmartScreen" 경고가 나타나면 "추가 정보"를 누른 뒤 "실행"을 선택합니다. If a "Windows Defender SmartScreen" warning appears, click "More info" then "Run anyway".
  3. USB 오디오 인터페이스(예: ThumbDV) 등 필요한 하드웨어를 먼저 연결한 뒤 프로그램을 실행하는 것을 권장합니다. It's recommended to connect any required hardware (e.g. a ThumbDV USB dongle) before launching the program.
KOkUSRP는 안드로이드 스마트폰에서 BrandMeister DMR 네트워크에 직접 접속하여 디지털 음성 교신(수신·송신)을 할 수 있는 아마추어 무선 앱입니다. 별도의 무전기나 핫스팟 없이, 휴대폰과 인터넷만으로 전 세계 토크그룹(TG)에서 교신할 수 있습니다.
ENkUSRP is an amateur radio app that lets your Android smartphone connect directly to the BrandMeister DMR network for digital voice communication (receive and transmit). No radio or hotspot is required — with just your phone and an internet connection, you can reach talkgroups (TGs) worldwide.

1. 앱 소개1. App Introduction

KOkUSRP는 DS5QDR(이헌민)이 개발한 안드로이드용 디지털 음성 클라이언트입니다. 주요 특징은 다음과 같습니다.

ENkUSRP is an Android digital voice client developed by DS5QDR (Heonmin Lee). Key features include:

  • BrandMeister 직접 접속 — 핫스팟 없이 휴대폰에서 바로 DMR 네트워크에 연결 Direct BrandMeister connection — connects to the DMR network straight from your phone, no hotspot needed
  • 실시간 LastHeard 모니터링 — 각 토크그룹의 최근 교신자와 이력을 화면에서 확인 Real-time LastHeard monitoring — view recent operators and history for each talkgroup on screen
  • QRZ 정보 표시 — 교신 상대의 사진·국기·이름·주소를 자동 표시 QRZ information display — automatically shows the other station's photo, flag, name, and address
  • 블루투스 PTT 마이크 지원 — Inrico B01 등 PTT 마이크로 송신 가능 Bluetooth PTT mic support — transmit using PTT microphones such as the Inrico B01
  • AGC 자동 음량 조절 — 마이크가 달라도 일정한 송신 음량 유지 Automatic AGC leveling — keeps transmit volume consistent regardless of microphone

2. 설치 및 첫 실행2. Installation & First Launch

KOkUSRP는 Google Play가 아닌 APK 직접 배포 방식으로 제공됩니다.

ENkUSRP is distributed as a direct APK download, not through Google Play.

  1. 배포 페이지에서 kUSRP APK 파일을 다운로드합니다. Download the kUSRP APK file from the distribution page.
  2. 브라우저가 다운로드를 차단하면 "계속 다운로드 / 유지"를 선택합니다. If your browser blocks the download, choose "Keep" / "Download anyway".
  3. 다운로드한 APK를 열고, 안드로이드가 물으면 "이 출처의 앱 설치 허용"을 켭니다. Open the downloaded APK and, if Android prompts you, enable "Allow installs from this source".
  4. 설치 후 앱을 실행합니다. Launch the app after installation.
  5. 첫 실행 시 마이크와 블루투스(근처 기기) 권한을 허용합니다. On first launch, grant Microphone and Bluetooth (Nearby devices) permissions.
첫 설치 후에는 내 정보(MyInfo)가 비어 있어 자동으로 설정 화면이 열립니다. 아래 3번을 참고해 설정하세요.
After first install, MyInfo is empty so the settings screen opens automatically. See section 3 below to configure it.

3. 초기 설정 (MyInfo)3. Initial Setup (MyInfo)

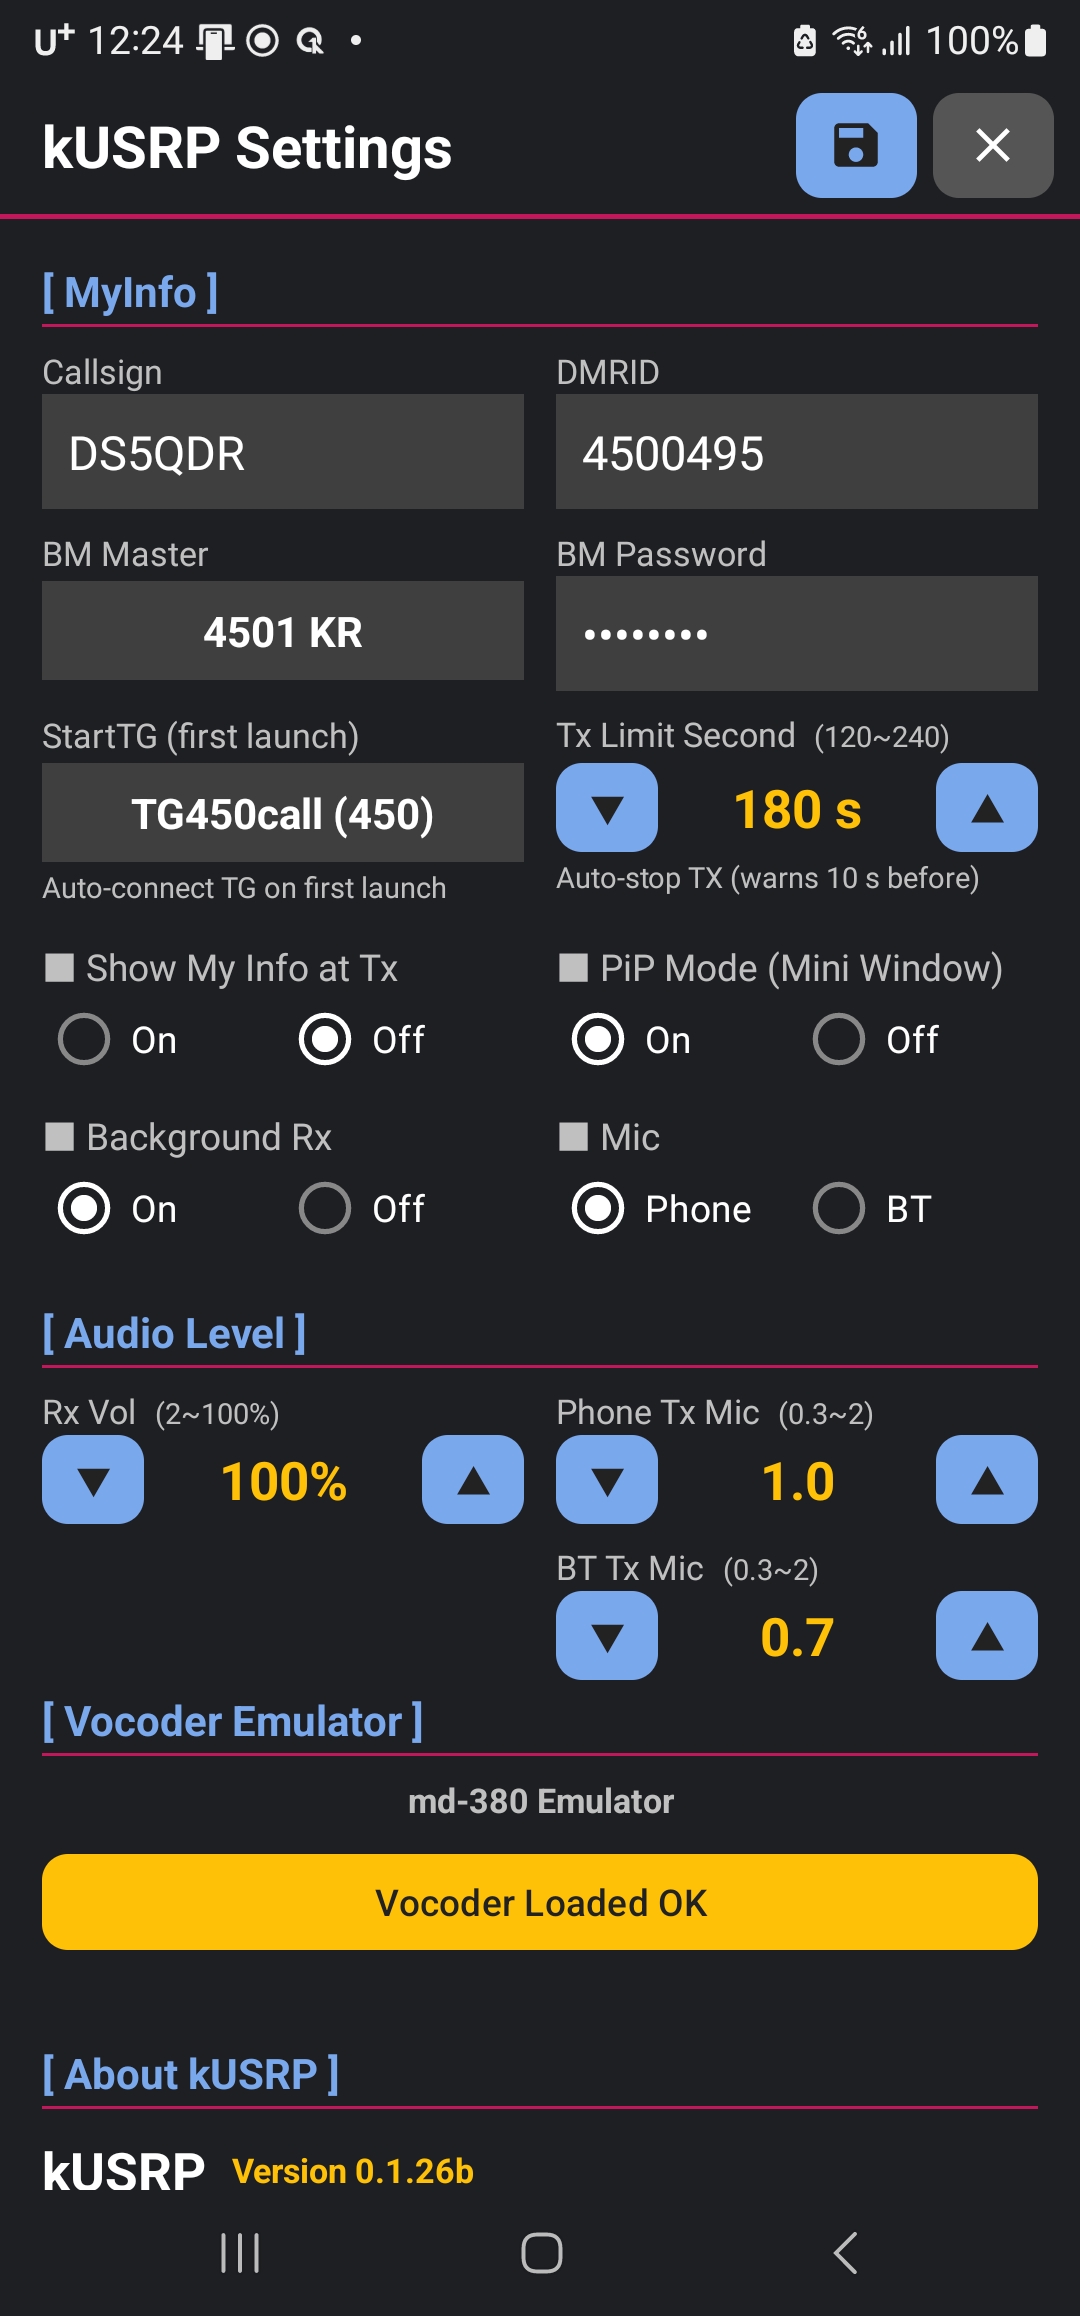
KO설정 화면의 [ MyInfo ] 항목을 입력합니다.

ENFill in the [ MyInfo ] fields on the settings screen.

  • Callsign — 본인 호출부호. 소문자로 입력해도 자동으로 대문자로 변환됩니다. Callsign — your callsign. Lowercase entries are auto-converted to uppercase.
  • DMRID — 본인 DMR ID. 콜사인과 일치하지 않으면 저장 시 경고가 표시됩니다. DMRID — your DMR ID. A warning appears on save if it doesn't match the callsign.
  • BM Master — 접속할 BrandMeister 서버. 기본값은 4501 KR(한국)입니다. BM Master — the BrandMeister server to connect to. Default is 4501 KR (Korea).
  • BM Password — BrandMeister SelfCare에서 설정한 비밀번호. BM Password — the password set in BrandMeister SelfCare.
  • StartTG (first launch) — 앱 첫 실행 시 자동 접속할 토크그룹. StartTG (first launch) — the talkgroup to auto-connect to on first launch.
  • Tx Limit Second (120~240) — 연속 송신 제한 시간(초). 종료 10초 전 경고가 표시됩니다. Tx Limit Second (120–240) — maximum continuous transmit time in seconds; a warning appears 10s before auto-stop.
  • Show My Info at Tx — On으로 켜면 송신 중에도 상단 정보 영역에 내 정보를 표시합니다. Show My Info at Tx — when On, your own info stays shown in the top info area while transmitting.
  • PiP Mode (Mini Window) — 다른 앱 사용 중에도 작은 팝업 창으로 kUSRP를 계속 표시합니다. PiP Mode (Mini Window) — keeps kUSRP visible in a small floating window while using other apps.
  • Background Rx — On이면 화면을 모두 닫아도 백그라운드에서 수신을 계속 유지합니다. Background Rx — when On, receiving continues in the background even after closing all screens.
  • Mic (Phone / BT) — 송신에 사용할 마이크를 휴대폰 내장 마이크 또는 블루투스로 선택합니다(블루투스는 8장 참고). Mic (Phone / BT) — choose the transmit microphone: the phone's built-in mic or Bluetooth (see section 8).

입력 후 Save를 누르면 저장되고 자동으로 접속을 시도합니다. Tapping Save stores the settings and automatically attempts to connect.
Save 후 Connected가 되지 않으면 BM 비밀번호나 Callsign/DMR ID 오류일 수 있습니다. 안내 팝업이 뜨면 설정을 다시 확인하세요.
If Connected doesn't appear after Save, the BM password or Callsign/DMR ID may be incorrect. If a prompt appears, double-check your settings.
설정 화면 / Settings screen
▲ 설정 화면 (MyInfo · Audio Level · Vocoder Emulator · About)Settings screen (MyInfo · Audio Level · Vocoder Emulator · About)

4. 메인 화면 사용법4. Main Screen Guide

메인 화면 / Main screen
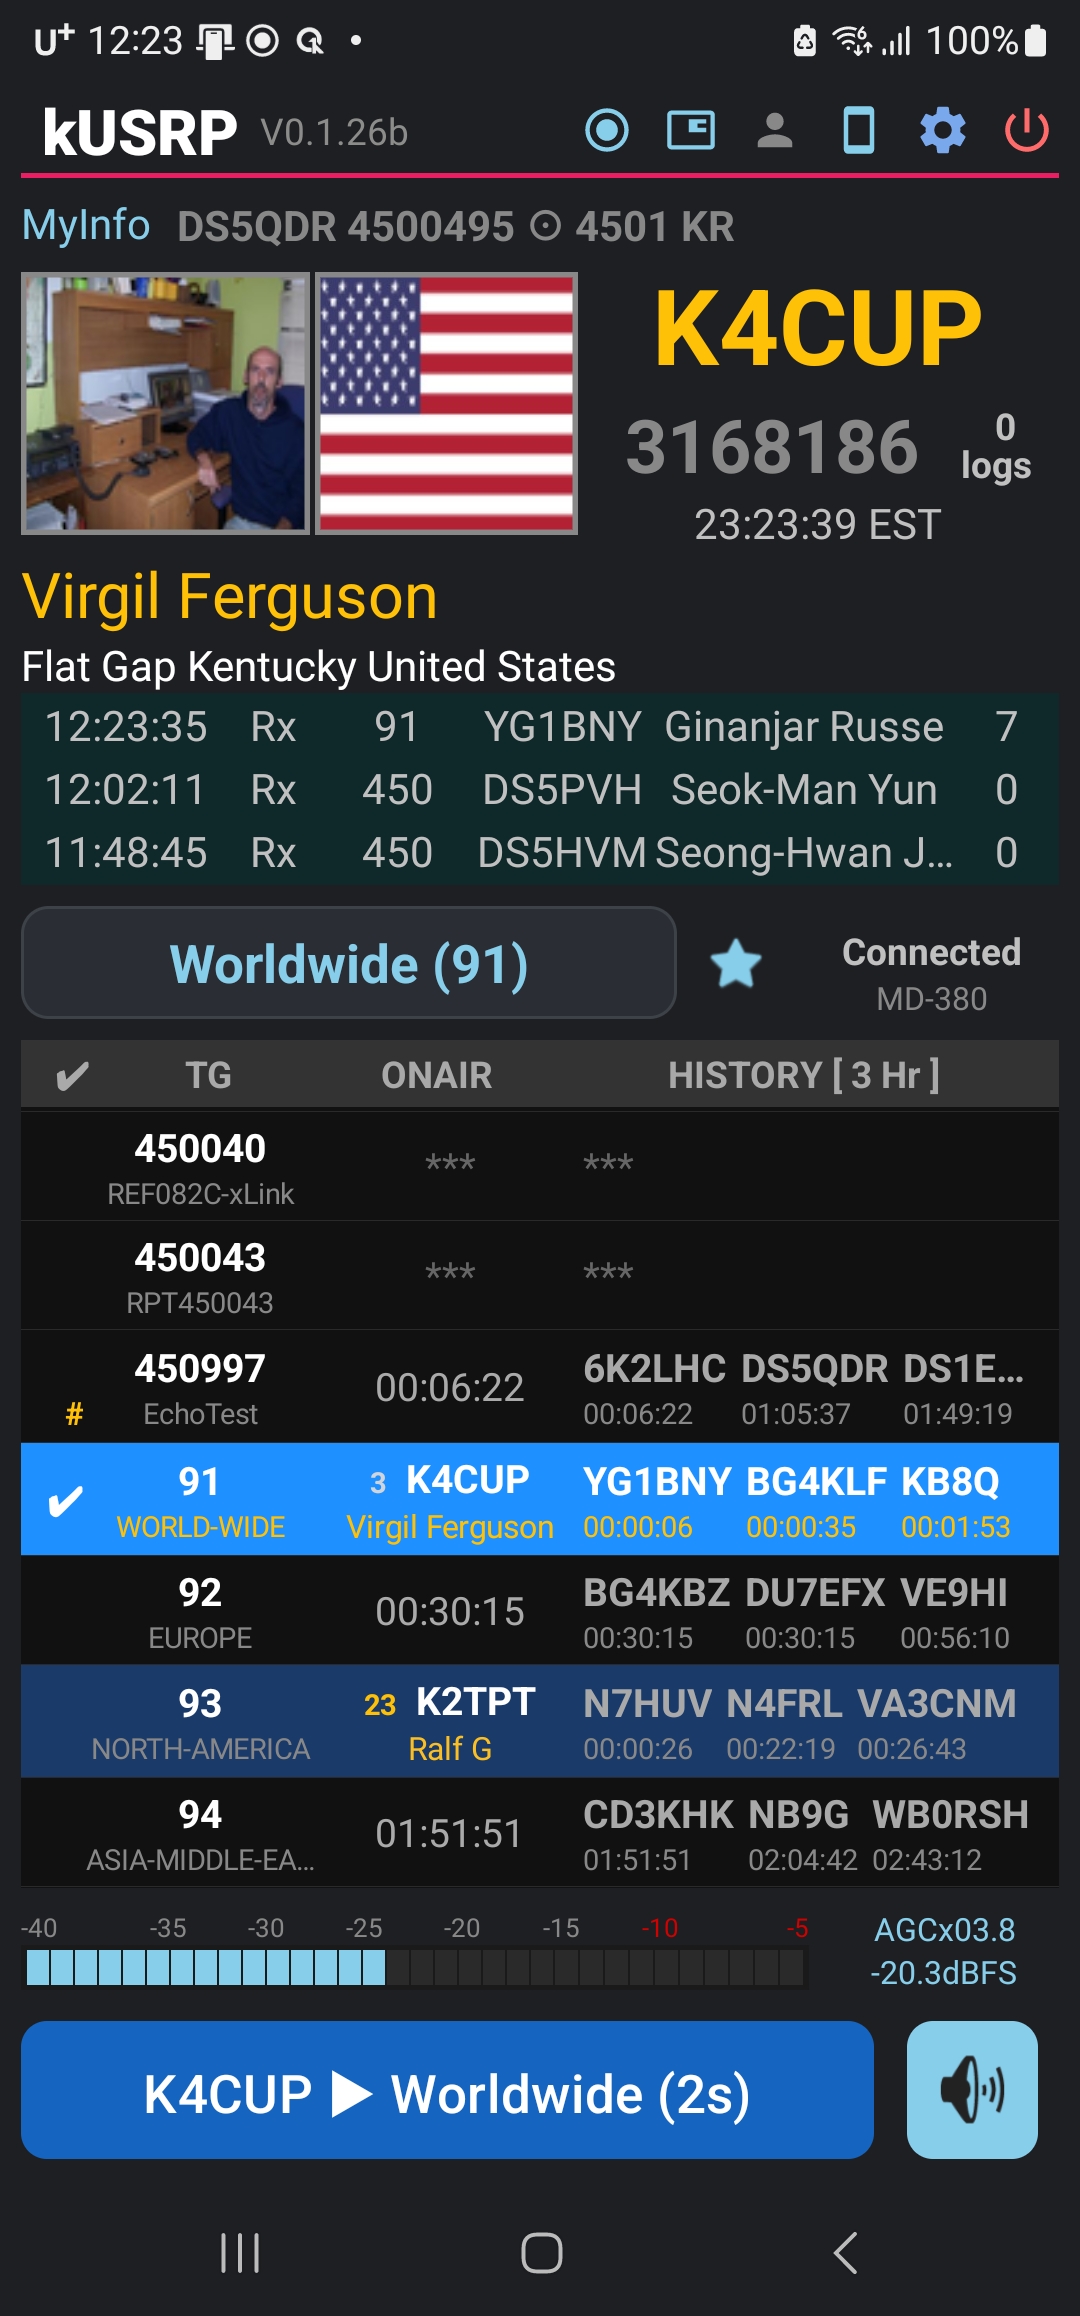
▲ 메인 화면Main screen

KO메인 화면은 위에서부터 다음과 같이 구성됩니다.

ENFrom top to bottom, the main screen is laid out as follows.

  • 제목줄 — kUSRP 로고, 오른쪽에 설정(톱니바퀴)과 종료(전원) 아이콘 Title bar — kUSRP logo, with Settings (gear) and Exit (power) icons on the right
  • MyInfo 요약바 — 내 콜사인·DMR ID·접속 서버·현재 AGC 값 MyInfo summary bar — your callsign, DMR ID, connected server, and current AGC value
  • 정보 영역 — 현재 교신자의 QRZ 사진, 국기, 콜사인, DMR ID, 이름, 주소 Info area — the current operator's QRZ photo, flag, callsign, DMR ID, name, and address
  • 로그(BM Log) — 최근 수신(Rx)/송신(Tx) 기록 Log (BM Log) — recent receive (Rx) / transmit (Tx) records
  • 토크그룹 선택바 — 현재 TG 표시, 오른쪽에 접속 상태(Connected)와 현재 사용 중인 보코더(MD-380 / mbelib) Talkgroup selector bar — shows the current TG, with connection status (Connected) and the active vocoder (MD-380 / mbelib) on the right
  • LastHeard 목록 — TG별 현재 교신자(ONAIR)와 최근 3시간 이력(HISTORY) LastHeard list — current operators (ONAIR) and last 3 hours of history (HISTORY) per TG
  • 미터 & PTT — 음량 미터와 송신 버튼 Meter & PTT — volume meter and the transmit button

LastHeard 목록에서 원하는 TG 행을 탭하면 그 토크그룹으로 전환됩니다. Tapping a TG row in the LastHeard list switches to that talkgroup.

5. 송신(PTT)과 수신5. Transmit (PTT) & Receive

수신Receive

KO접속되면 선택한 토크그룹의 음성이 자동으로 들립니다. 누군가 송신하면 상단 정보 영역에 그 사람의 QRZ 정보가 표시되고, 로그에 Rx 기록이 남습니다.

ENOnce connected, audio from the selected talkgroup plays automatically. When someone transmits, their QRZ info appears in the top info area and an Rx entry is logged.

송신Transmit

  • 화면 하단의 파란 PTT 버튼을 눌러 송신을 시작/종료합니다(탭하면 켜짐, 다시 탭하면 꺼짐). Tap the blue PTT button at the bottom of the screen to start/stop transmitting (tap to key up, tap again to key down).
  • 송신 중에는 상단 정보가 내 정보로 바뀌고, 미터가 음량을 표시합니다. While transmitting, the top info area shows your own info, and the meter displays your volume.
  • USB 키보드를 연결하면 스페이스바로 PTT를 토글할 수 있습니다. With a USB keyboard connected, you can toggle PTT with the spacebar.
송신 전에 반드시 해당 토크그룹의 사용 예절을 지키고, 먼저 듣고 나서 송신하세요.
Always follow proper etiquette for the talkgroup and listen before you transmit.

6. 오디오 레벨 & 보코더6. Audio Level & Vocoder

Audio LevelAudio Level

KO설정 화면의 [ Audio Level ]에서 수신/송신 음량을 조절합니다. ▲▼ 버튼을 누르면 즉시 반영·저장됩니다(재실행 불필요).

ENAdjust receive/transmit volume under [ Audio Level ] in settings. Pressing the ▲▼ buttons applies and saves immediately (no restart needed).

항목Item설명Description범위Range
Rx Vol수신 음량Receive volume2 ~ 100%
Phone Tx Mic휴대폰 내장 마이크 송신 게인Phone built-in mic transmit gain0.3 ~ 2
BT Tx Mic블루투스 마이크 송신 게인Bluetooth mic transmit gain0.3 ~ 2

Vocoder EmulatorVocoder Emulator

KOkUSRP는 두 가지 보코더 중 하나로 동작합니다. 실제 MD-380 펌웨어 에뮬레이터(고음질, 최초 1회 펌웨어 다운로드 필요)와, 펌웨어가 없거나 초기화에 실패하면 자동으로 전환되는 mbelib(오픈소스, 다운로드 불필요) 방식입니다.

ENkUSRP runs on one of two vocoders: the real MD-380 firmware emulator (higher audio quality, requires a one-time firmware download) or mbelib (open-source, no download needed), which it automatically falls back to if the firmware is missing or fails to initialize.

  • 설정 화면의 [ Vocoder Emulator ] 버튼이 "Vocoder Loaded OK"로 표시되면 MD-380 에뮬레이터가 정상 로드된 것입니다. When the [ Vocoder Emulator ] button reads "Vocoder Loaded OK", the MD-380 emulator has loaded successfully.
  • 아직 다운로드하지 않았다면 버튼을 눌러 펌웨어를 내려받을 수 있습니다(최초 1회, 진행률 표시). If you haven't downloaded it yet, tap the button to fetch the firmware (one-time, with a progress indicator).
Audio Level / Vocoder Emulator / About 화면
▲ Audio Level · Vocoder Emulator · About kUSRPAudio Level · Vocoder Emulator · About kUSRP
수신(Rx) 음량과 마이크 게인은 본인 단말에만 영향을 주므로 자유롭게 조절해도 됩니다. 다만 마이크 게인을 너무 높이면 상대방 쪽에서 음성이 찌그러질 수 있으니 조금씩 조절하며 확인하세요.
Rx volume and mic gain only affect your own device, so feel free to adjust them. Raising mic gain too high can distort your audio for the other station, though — adjust gradually and check as you go.

7. 토크그룹(TG) 편집7. Talkgroup (TG) Editing

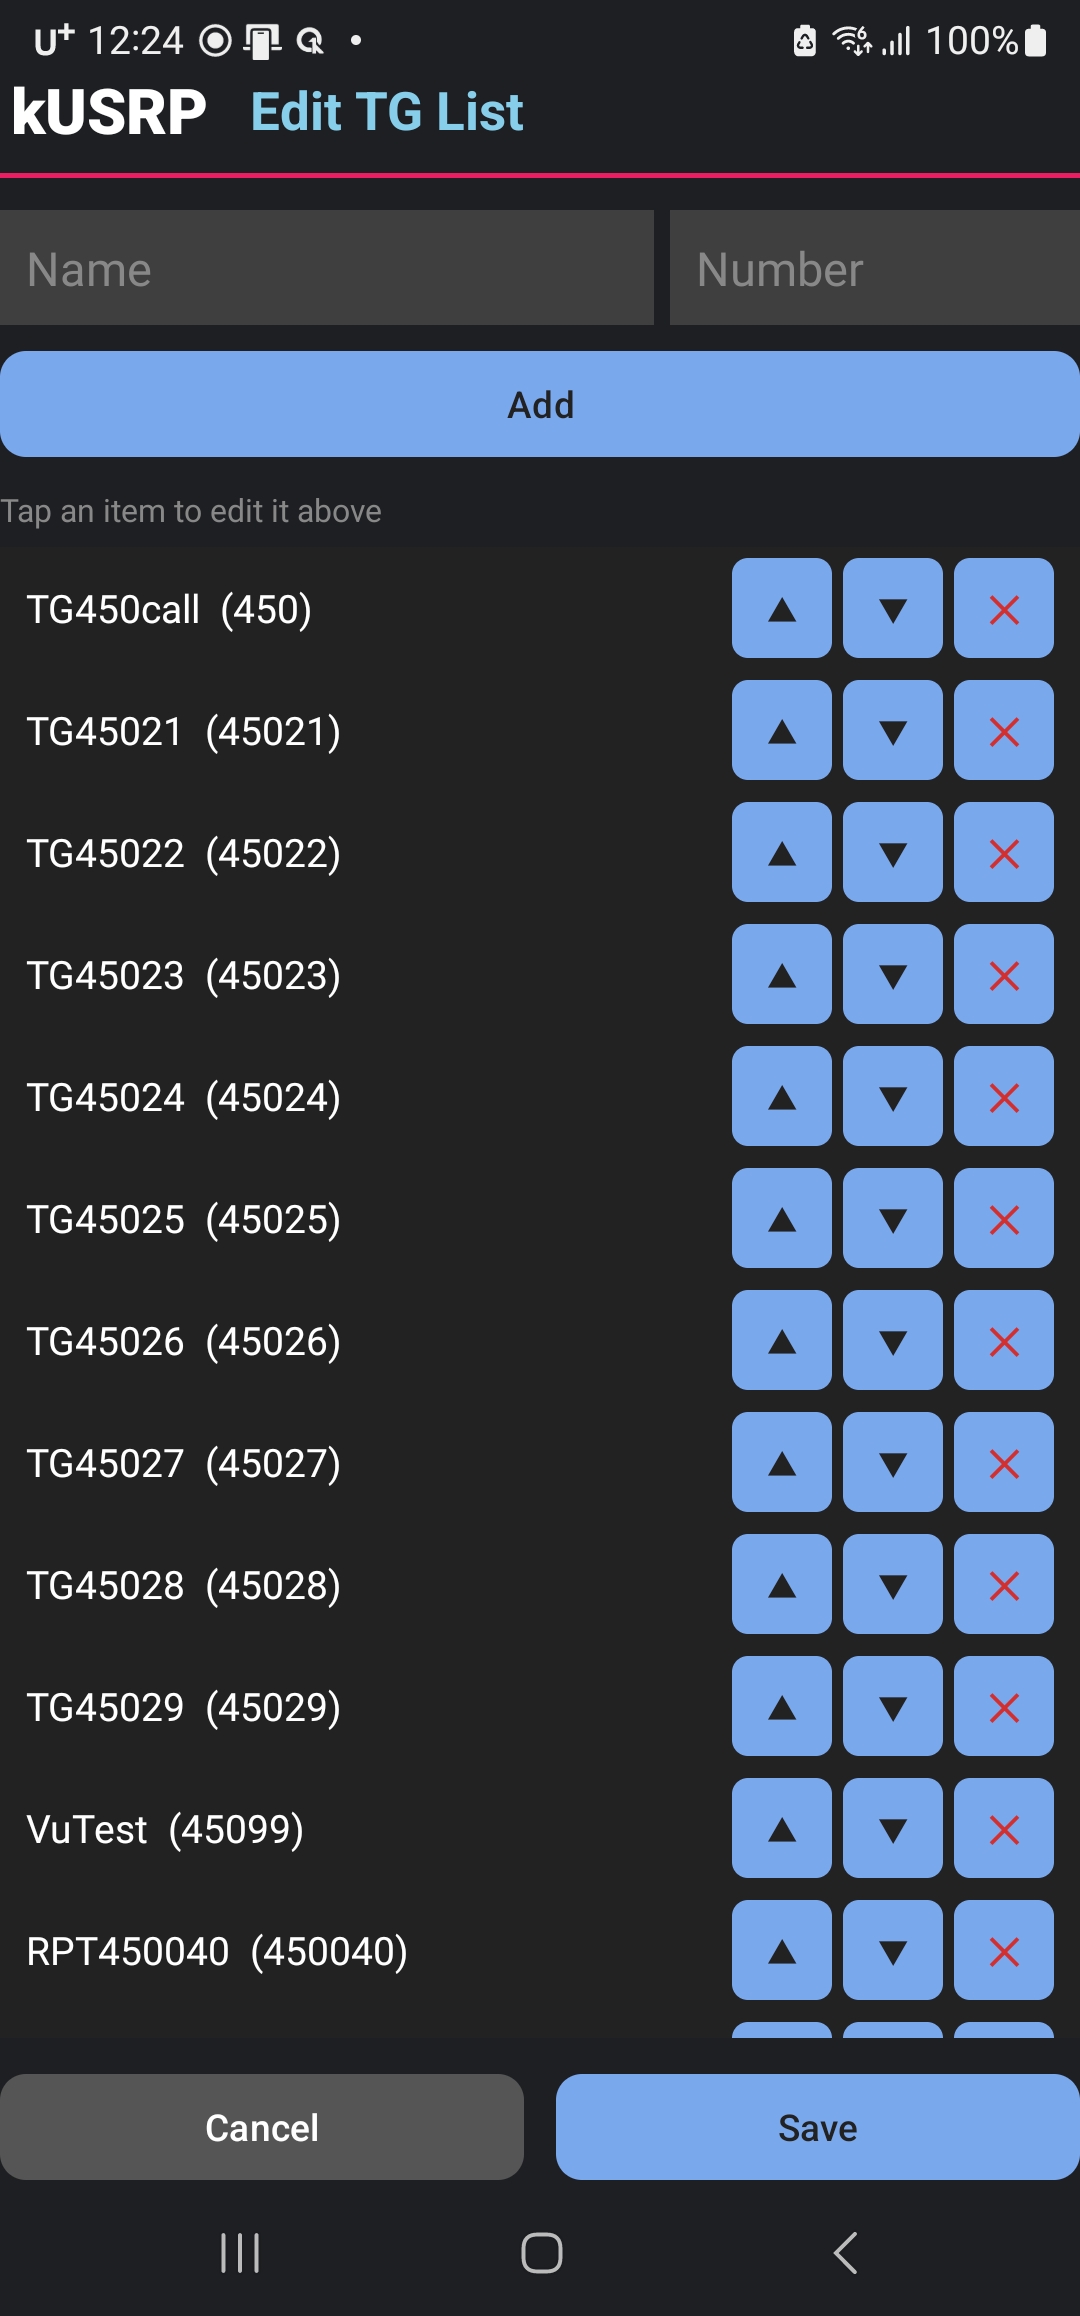
KO토크그룹 선택바 옆의 편집 버튼(별표 근처)으로 Edit TG List 화면에 들어갑니다.

ENUse the edit button (near the star) next to the talkgroup selector bar to enter the Edit TG List screen.

  • Name / Number를 입력하고 Add로 새 TG를 추가합니다. Enter a Name / Number and tap Add to add a new TG.
  • 목록의 ▲▼로 순서를 바꾸고, ✕로 삭제합니다. Use ▲▼ in the list to reorder, and ✕ to delete.
  • 항목을 탭하면 위 입력란으로 불러와 수정할 수 있습니다. Tapping an item loads it into the input fields above for editing.
  • Save를 눌러 변경사항을 저장합니다. Tap Save to save your changes.

여기서 정리한 TG 목록이 메인 화면의 LastHeard와 선택바에 반영됩니다. The TG list you organize here is reflected in the main screen's LastHeard list and selector bar.
TG 편집 화면 / TG editing screen
▲ Edit TG List 화면Edit TG List screen
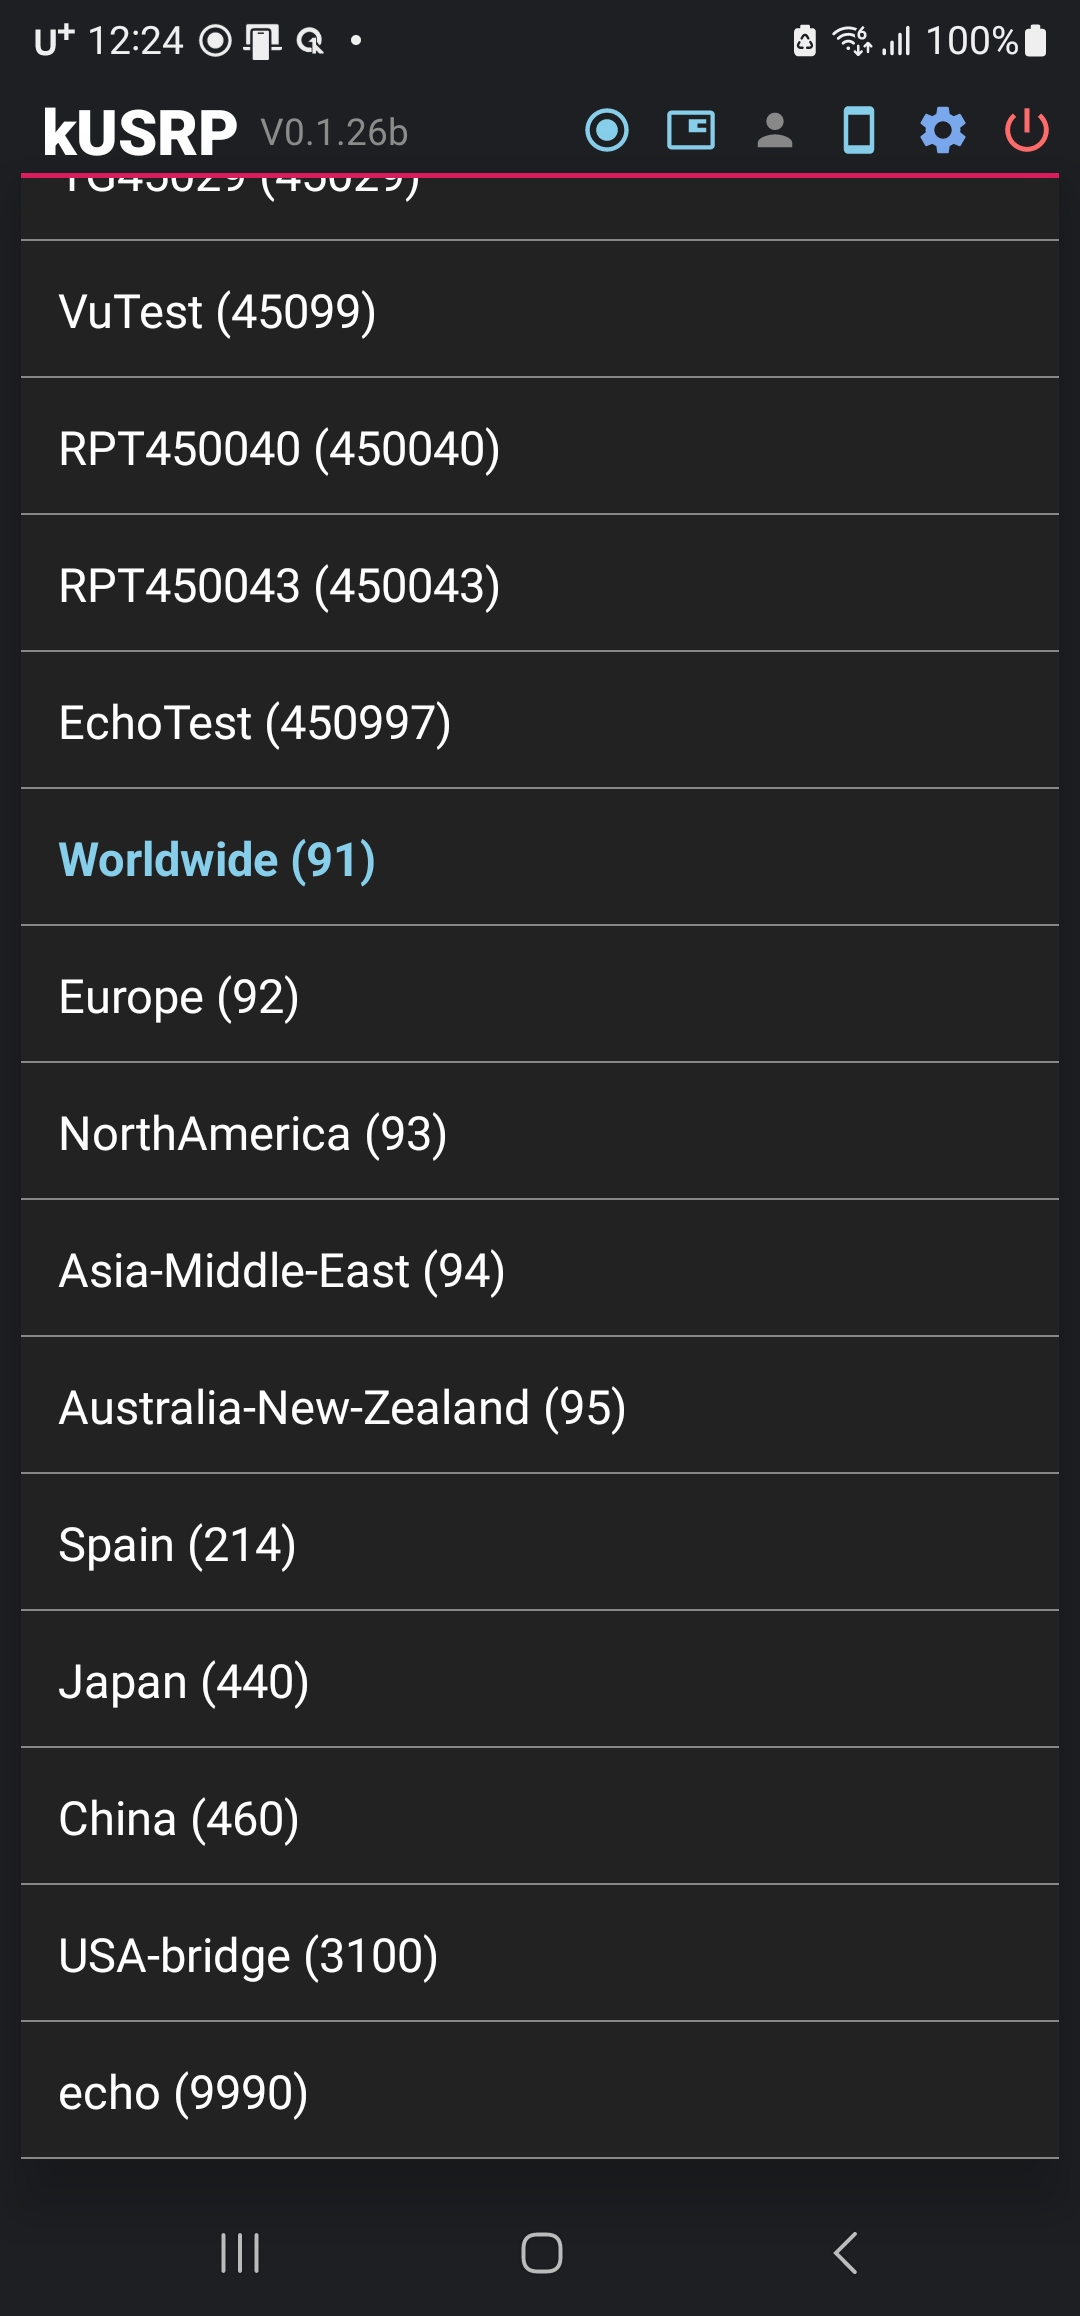
kUSRP는 Worldwide/Europe/North America/Asia-Middle-East/Australia-New-Zealand 등 지역별 TG와 EchoTest(에코 테스트), VuTest 등 기본 TG 목록을 미리 포함하고 있습니다. 목록 하단으로 스크롤하면 확인할 수 있습니다.
kUSRP ships with a built-in TG list — regional groups such as Worldwide/Europe/North America/Asia-Middle-East/Australia-New-Zealand, plus EchoTest and VuTest. Scroll down the list to see them.
기본 제공 TG 목록
▲ 기본 제공 TG 목록 (지역별 TG · EchoTest 등)Built-in TG list (regional TGs · EchoTest, etc.)

8. 블루투스 PTT 마이크8. Bluetooth PTT Microphone

KOInrico B01 같은 블루투스 PTT 마이크를 사용할 수 있습니다.

ENYou can use Bluetooth PTT microphones such as the Inrico B01.

  1. 휴대폰 블루투스 설정에서 B01을 페어링합니다(통화 오디오/HFP 프로파일 필요). Pair the B01 in your phone's Bluetooth settings (requires the call audio/HFP profile).
  2. kUSRP를 실행하면 자동으로 인식됩니다. It's detected automatically once kUSRP is running.
  3. B01의 PTT 버튼을 눌러 송신합니다(누름=시작, 뗌=종료 또는 토글). Press the B01's PTT button to transmit (press = start, release = stop, or toggle mode).
블루투스 마이크는 감도가 높아, 앱이 자동으로 입력을 보정하여 휴대폰 내장 마이크와 비슷한 음량으로 송신합니다. 처음 사용 시 근처 기기(블루투스) 권한을 반드시 허용하세요.
Bluetooth microphones tend to be more sensitive, so the app automatically compensates the input to transmit at a volume similar to the phone's built-in mic. Be sure to grant the Nearby devices (Bluetooth) permission the first time you use one.

9. 문제 해결9. Troubleshooting

증상Symptom확인 사항What to check
Connected가 안 됨Won't show ConnectedBM 비밀번호, Callsign/DMR ID 확인. 팝업 안내에 따라 설정 재입력.Check BM password and Callsign/DMR ID. Re-enter settings as prompted by the popup.
블루투스 PTT 버튼이 안 됨Bluetooth PTT button doesn't work근처 기기(블루투스) 권한 허용 여부, HFP 프로파일 연결 확인.Check whether the Nearby devices (Bluetooth) permission is granted and that the HFP profile is connected.
B01 마이크 소리가 안 들어감No audio from the B01 mic블루투스 통화 오디오 프로파일 연결 확인. 앱 재실행.Check the Bluetooth call-audio profile connection. Restart the app.
재실행 시 음성이 찌그러짐Audio distorts after restart전원 아이콘으로 완전 종료 후 다시 실행.Fully quit using the power icon, then relaunch.
송신 음량이 너무 큼/작음Transmit volume too loud/quietAudio Level의 Phone Tx Mic(또는 BT Tx Mic) 게인을 조금씩 조절.Adjust the Phone Tx Mic (or BT Tx Mic) gain under Audio Level in small steps.
"Vocoder Loaded OK"가 안 뜨고 음질이 낮음"Vocoder Loaded OK" doesn't appear / audio quality is lowMD-380 펌웨어가 아직 없어 mbelib로 자동 전환된 상태. 설정의 Vocoder Emulator 버튼으로 펌웨어를 다운로드.The MD-380 firmware isn't installed yet, so it auto-fell back to mbelib. Download the firmware via the Vocoder Emulator button in settings.

10. 라이선스 안내10. License Notice

KOkUSRP는 AMBE™ 보코더 기술로 디지털 음성을 인코딩·디코딩합니다. (설정 화면의 [ About kUSRP ]에서 언제든 다시 확인할 수 있습니다.)

ENkUSRP encodes and decodes digital voice using AMBE™ vocoder technology. (You can revisit this notice anytime under [ About kUSRP ] in settings.)

  • 고품질 엔진 — 펌웨어 기반 처리(md380_fw)를 송신·수신 양쪽에 사용하여, 일반 소프트웨어 구현 대비 음질이 크게 향상됩니다. High-Quality Engine — uses firmware-assisted processing (md380_fw) for both transmission and reception, providing significantly improved audio clarity compared to standard software implementations.
  • 지적재산권 — AMBE™ 및 AMBE+2™는 Digital Voice Systems, Inc.(DVSI)의 특허·상표 기술입니다. 이 소프트웨어는 아마추어 무선 커뮤니티 내 연구 및 상호운용을 위해 제공되며, 사용자는 자신의 관할권에서 관련 특허·라이선스 요건을 준수할 책임이 있습니다. Intellectual Property — AMBE™ and AMBE+2™ are proprietary technologies patented and trademarked by Digital Voice Systems, Inc. (DVSI). This software is provided for research and interoperability within the amateur radio community. Users are responsible for complying with all applicable patent and licensing requirements in their jurisdiction.
kUSRP는 교육·실험 목적의 아마추어 무선 프로젝트로 제공되며, 상업적 사용은 엄격히 금지됩니다.
kUSRP is an amateur-radio project provided for educational and experimental use only; commercial use is strictly prohibited.

Developer: DS5QDR · Heonmin Lee · Enhanced with Claude and Gemini AI Collaborative Coding · © 2026~2027 DS5QDR. All rights reserved. Developer: DS5QDR · Heonmin Lee · Enhanced with Claude and Gemini AI Collaborative Coding · © 2026–2027 DS5QDR. All rights reserved.

About / 라이선스 화면 / License screen
▲ About kUSRP · 라이선스 안내About kUSRP · License notice
KOkUSRP for PoC는 AnySecu W70 등 전용 PoC(Push-to-talk over Cellular) 단말에 탑재되는 버전입니다. 일반 스마트폰용과 동일한 BrandMeister DMR 접속/오디오 엔진을 쓰지만, 화면 크기와 물리 버튼(PTT·다이얼 노브)에 맞춰 UI와 조작 방식이 최적화되어 있습니다.
ENkUSRP for PoC is the build that runs on dedicated PoC (Push-to-talk over Cellular) hardware such as the AnySecu W70. It shares the same BrandMeister DMR connection and audio engine as the phone version, but its UI and controls are optimized for the device's smaller screen and physical buttons (PTT and dial knob).
PoC 단말은 내장 마이크·스피커와 물리 버튼을 사용하므로, Phone 버전에 있는 PiP Mode(미니 창)와 Mic(Phone/BT) 선택 항목이 없습니다. 대신 물리 버튼을 앱 기능에 연결하는 Key Mapping 기능이 있습니다(6장 참고).
Since the PoC device uses its built-in mic/speaker and physical buttons, it has no PiP Mode or Mic (Phone/BT) selection like the Phone version. Instead it has a Key Mapping feature that binds the hardware buttons to app functions (see section 6).

1. 앱 소개1. App Introduction

KOkUSRP for PoC는 DS5QDR(이헌민)이 개발한, PoC 전용 단말용 디지털 음성 클라이언트입니다. 주요 특징은 다음과 같습니다.

ENkUSRP for PoC is a digital voice client developed by DS5QDR (Heonmin Lee) for dedicated PoC hardware. Key features include:

  • BrandMeister 직접 접속 — Phone 버전과 동일한 방식으로 핫스팟 없이 DMR 네트워크에 연결 Direct BrandMeister connection — connects to the DMR network with no hotspot, same as the Phone version
  • 실시간 LastHeard 모니터링 — 각 토크그룹의 최근 교신자와 이력을 화면에서 확인 Real-time LastHeard monitoring — view recent operators and history for each talkgroup on screen
  • QRZ 정보 표시 — 교신 상대의 사진·국기·이름·주소를 자동 표시 QRZ information display — automatically shows the other station's photo, flag, name, and address
  • 물리 버튼 Key Mapping — 단말의 PTT·다이얼 노브(▲▼)를 앱 기능에 매핑 Physical button Key Mapping — maps the device's PTT and dial knob (▲▼) to app functions
  • 고품질 보코더 엔진 — Phone 버전과 동일한 MD-380 펌웨어 에뮬레이터 / mbelib 이중 구조 High-quality vocoder engine — the same MD-380 firmware emulator / mbelib fallback as the Phone version

2. 초기 설정 (MyInfo)2. Initial Setup (MyInfo)

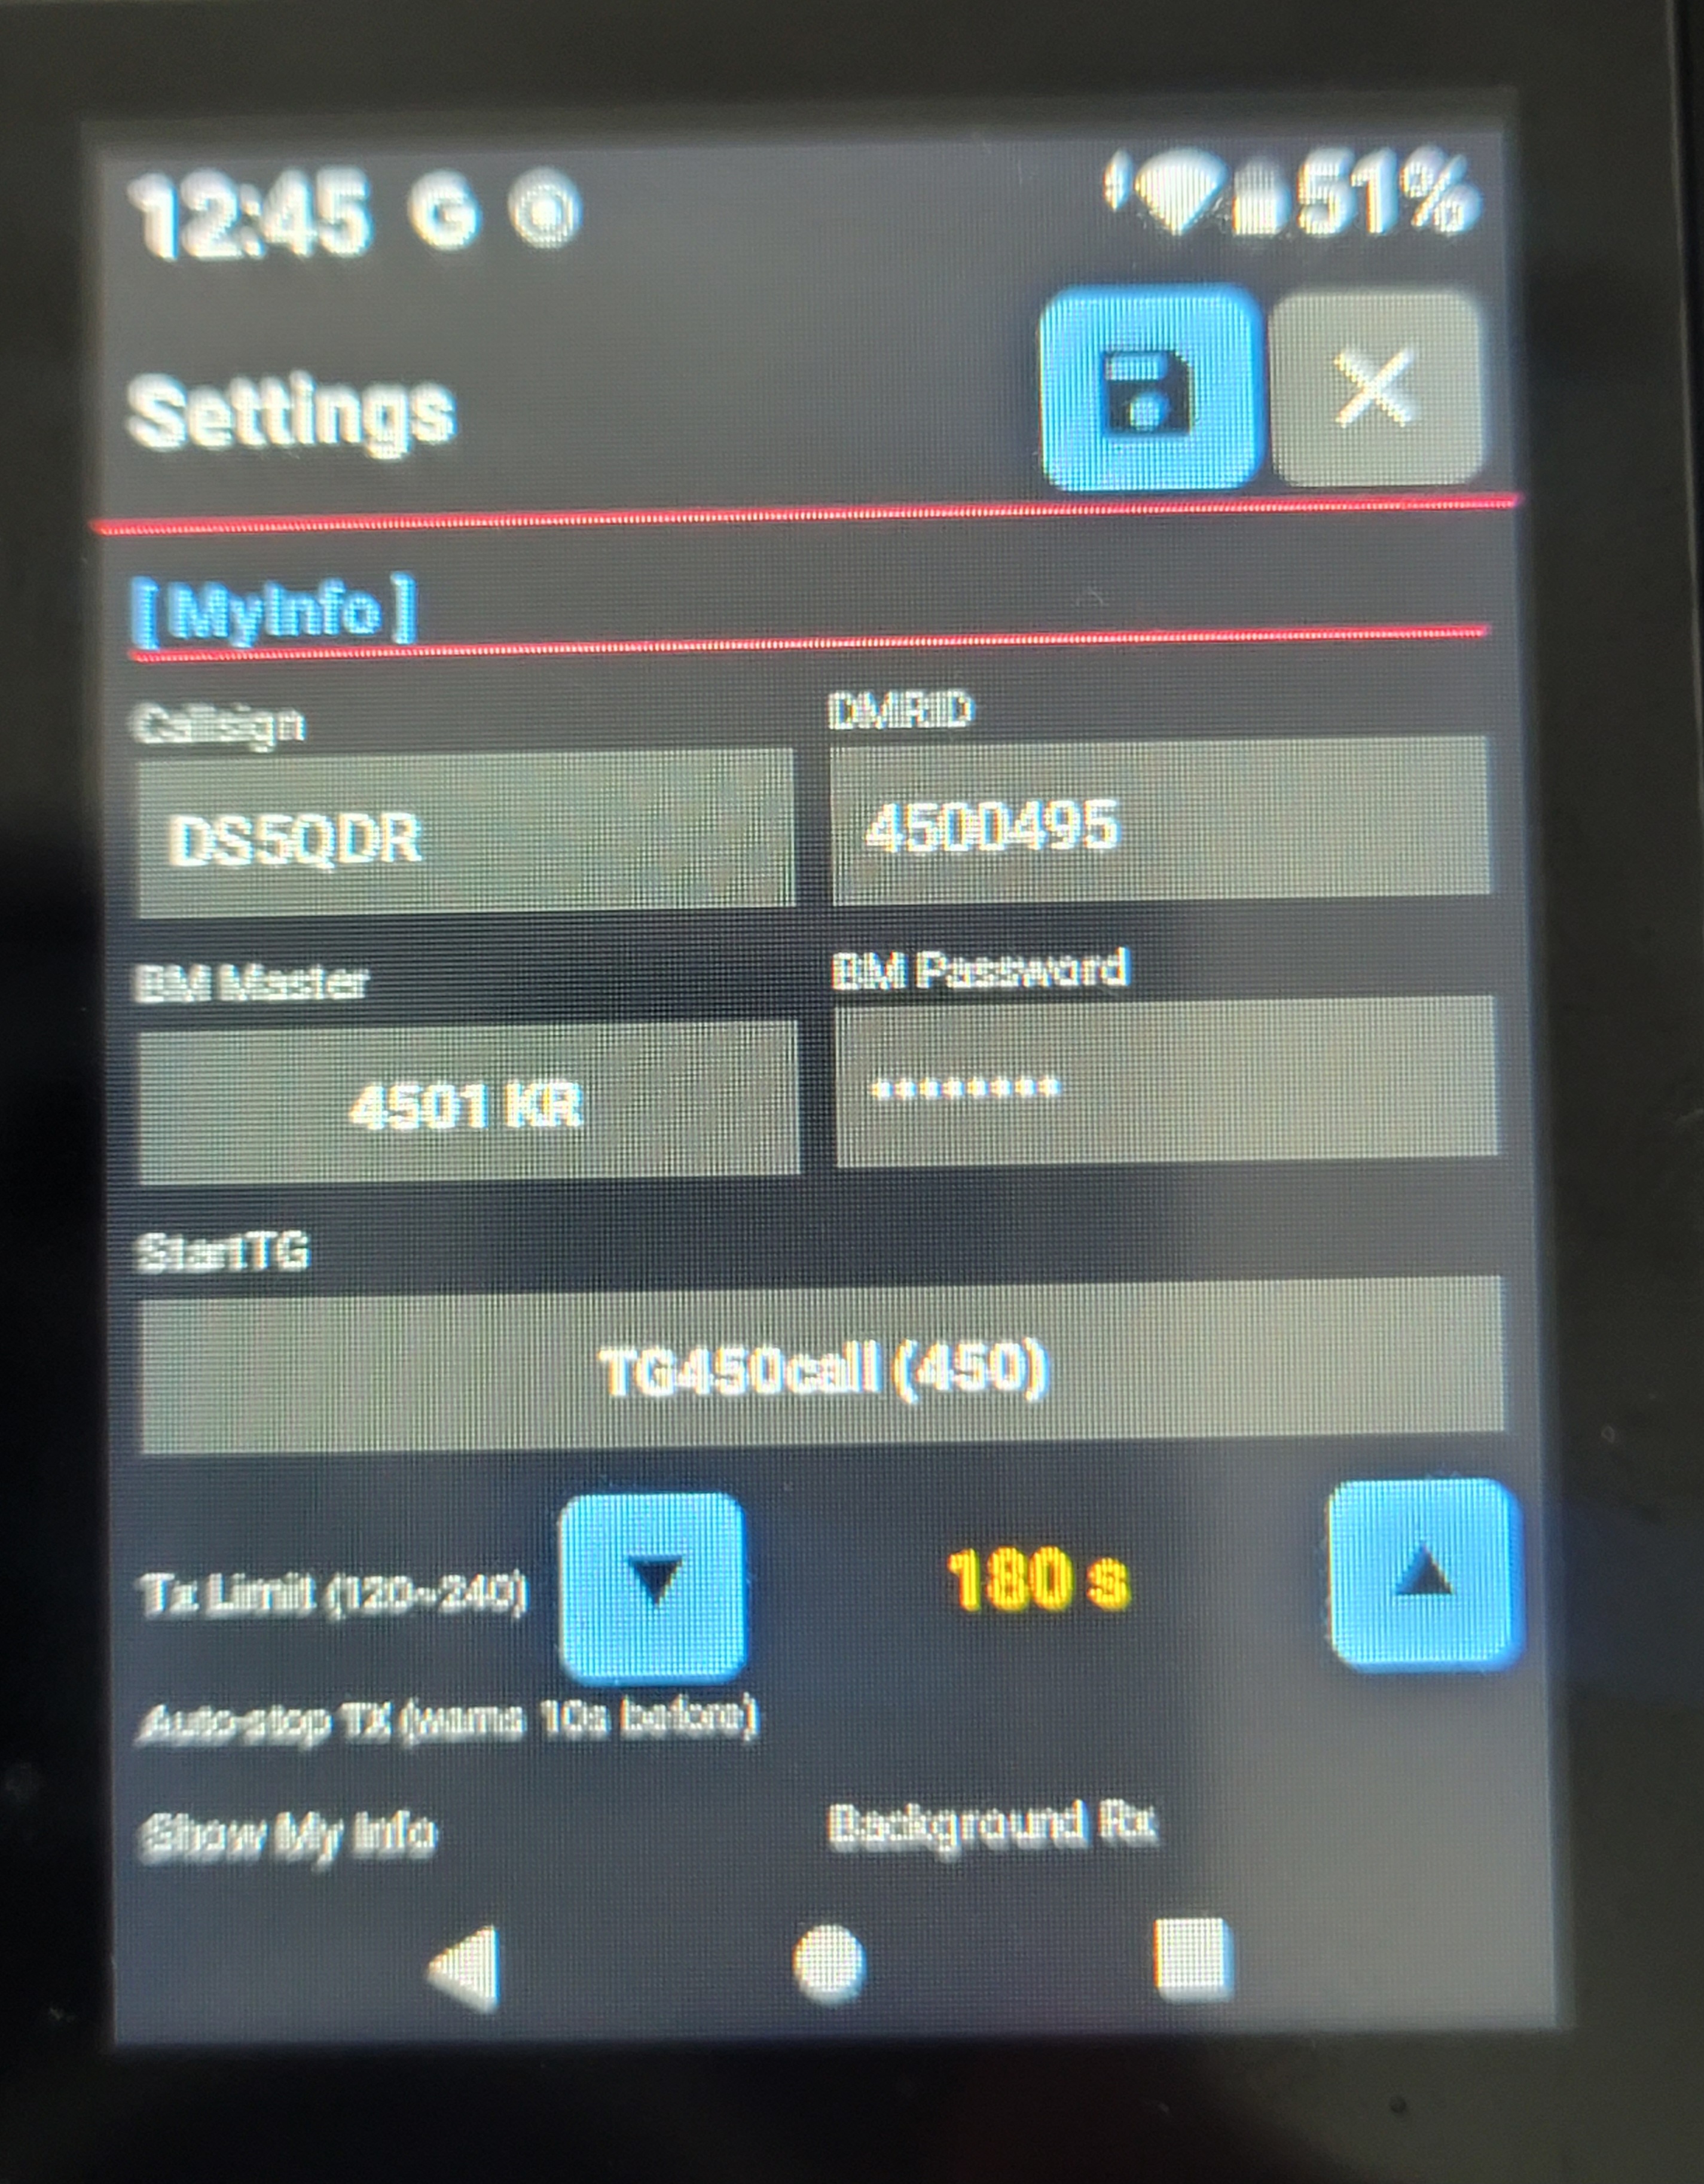
KO설정 화면의 [ MyInfo ] 항목을 입력합니다. Phone 버전과 거의 동일하지만, 아래 두 항목은 PoC 단말에는 없습니다.

ENFill in the [ MyInfo ] fields on the settings screen. This is almost identical to the Phone version, except the two items below don't exist on the PoC device.

  • Callsign — 본인 호출부호. 소문자로 입력해도 자동으로 대문자로 변환됩니다. Callsign — your callsign. Lowercase entries are auto-converted to uppercase.
  • DMRID — 본인 DMR ID. 콜사인과 일치하지 않으면 저장 시 경고가 표시됩니다. DMRID — your DMR ID. A warning appears on save if it doesn't match the callsign.
  • BM Master — 접속할 BrandMeister 서버. 기본값은 4501 KR(한국)입니다. BM Master — the BrandMeister server to connect to. Default is 4501 KR (Korea).
  • BM Password — BrandMeister SelfCare에서 설정한 비밀번호. BM Password — the password set in BrandMeister SelfCare.
  • StartTG (first launch) — 앱 첫 실행 시 자동 접속할 토크그룹. StartTG (first launch) — the talkgroup to auto-connect to on first launch.
  • Tx Limit Second (120~240) — 연속 송신 제한 시간(초). 종료 10초 전 경고가 표시됩니다. Tx Limit Second (120–240) — maximum continuous transmit time in seconds; a warning appears 10s before auto-stop.
  • Show My Info at Tx — On으로 켜면 송신 중에도 상단 정보 영역에 내 정보를 표시합니다. Show My Info at Tx — when On, your own info stays shown in the top info area while transmitting.
  • Background Rx — On이면 화면을 모두 닫아도 백그라운드에서 수신을 계속 유지합니다. Background Rx — when On, receiving continues in the background even after closing all screens.
PoC 단말에는 PiP Mode와 Mic (Phone/BT) 항목이 없습니다 — 단말 자체 마이크/스피커를 고정으로 사용하고, 별도 창 모드가 필요 없기 때문입니다.
The PoC device has no PiP Mode or Mic (Phone/BT) item — it always uses the device's own mic/speaker, and a floating window mode isn't needed.

입력 후 Save를 누르면 저장되고 자동으로 접속을 시도합니다. Tapping Save stores the settings and automatically attempts to connect.
PoC 설정 화면 / PoC settings screen
▲ PoC 설정 화면 (MyInfo)PoC settings screen (MyInfo)

3. 메인 화면 사용법3. Main Screen Guide

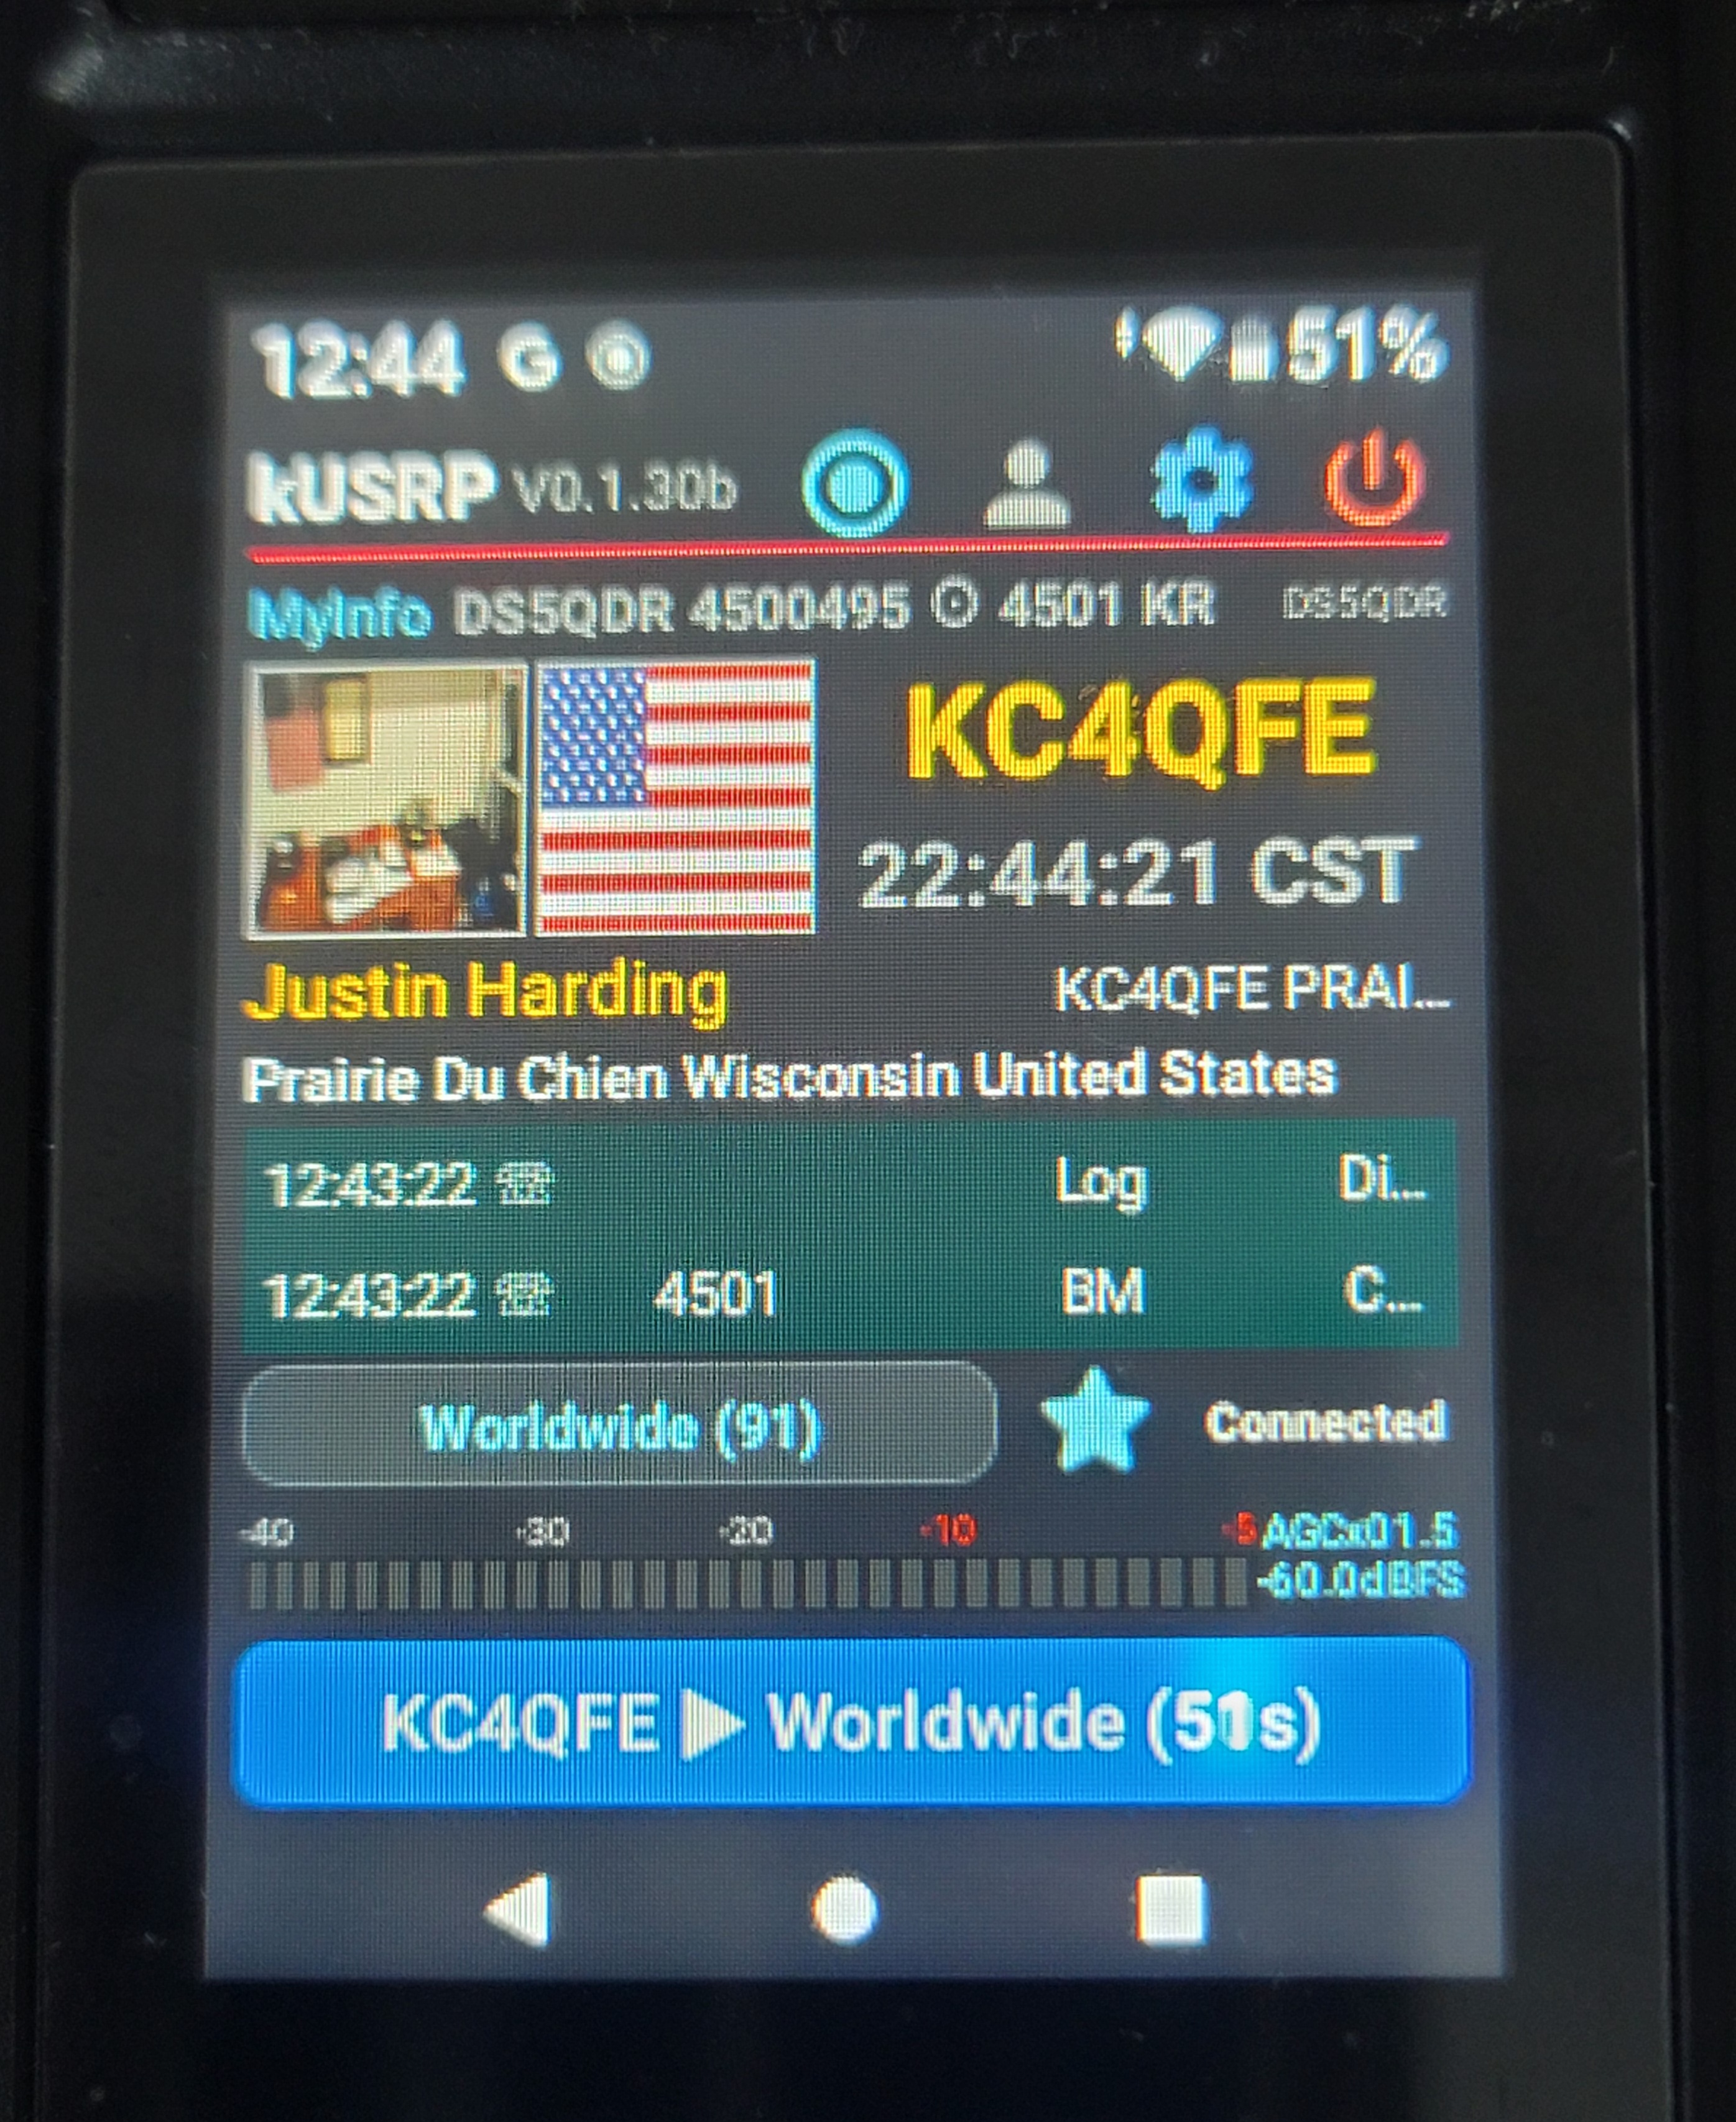
PoC 메인 화면 / PoC main screen
▲ PoC 메인 화면PoC main screen

KO메인 화면 구성은 Phone 버전과 동일하며, 단말의 작은 화면에 맞춰 배치되어 있습니다.

ENThe main screen layout is the same as the Phone version, arranged to fit the device's smaller screen.

  • 제목줄 / MyInfo 요약바 — 내 콜사인·DMR ID·접속 서버 Title bar / MyInfo summary bar — your callsign, DMR ID, and connected server
  • 정보 영역 — 현재 교신자의 QRZ 사진, 국기, 콜사인, DMR ID, 이름, 주소 Info area — the current operator's QRZ photo, flag, callsign, DMR ID, name, and address
  • 토크그룹 선택바 — 현재 TG와 접속 상태(Connected) 표시 Talkgroup selector bar — shows the current TG and connection status (Connected)
  • 미터 & PTT 바 — 음량 미터와 현재 송신자/토크그룹, 경과 시간 표시 Meter & PTT bar — volume meter plus the current transmitting station/talkgroup and elapsed time

화면을 직접 탭해도 되지만, 대부분의 조작은 단말의 물리 PTT·노브 버튼으로 하는 것이 더 편리합니다(6장 Key Mapping 참고). You can tap the screen directly, but most operations are more convenient using the device's physical PTT and knob buttons (see section 6, Key Mapping).

4. 송신(PTT)과 수신4. Transmit (PTT) & Receive

KO접속되면 선택한 토크그룹의 음성이 단말 스피커로 자동 재생됩니다. 송신은 화면의 PTT 버튼 대신, 단말 측면의 물리 PTT 버튼을 누르는 것이 기본입니다.

ENOnce connected, audio from the selected talkgroup plays automatically through the device speaker. Instead of an on-screen PTT button, transmitting is normally done with the physical PTT button on the side of the device.

기본적으로 PTT는 Auto 매핑(눌러서 송신)으로 동작합니다. 원하는 다른 버튼에 PTT 기능을 옮기고 싶다면 6장의 Key Mapping을 참고하세요.
By default, PTT works with the Auto mapping (press to transmit). If you want to move the PTT function to a different button, see Key Mapping in section 6.

5. Audio Level5. Audio Level

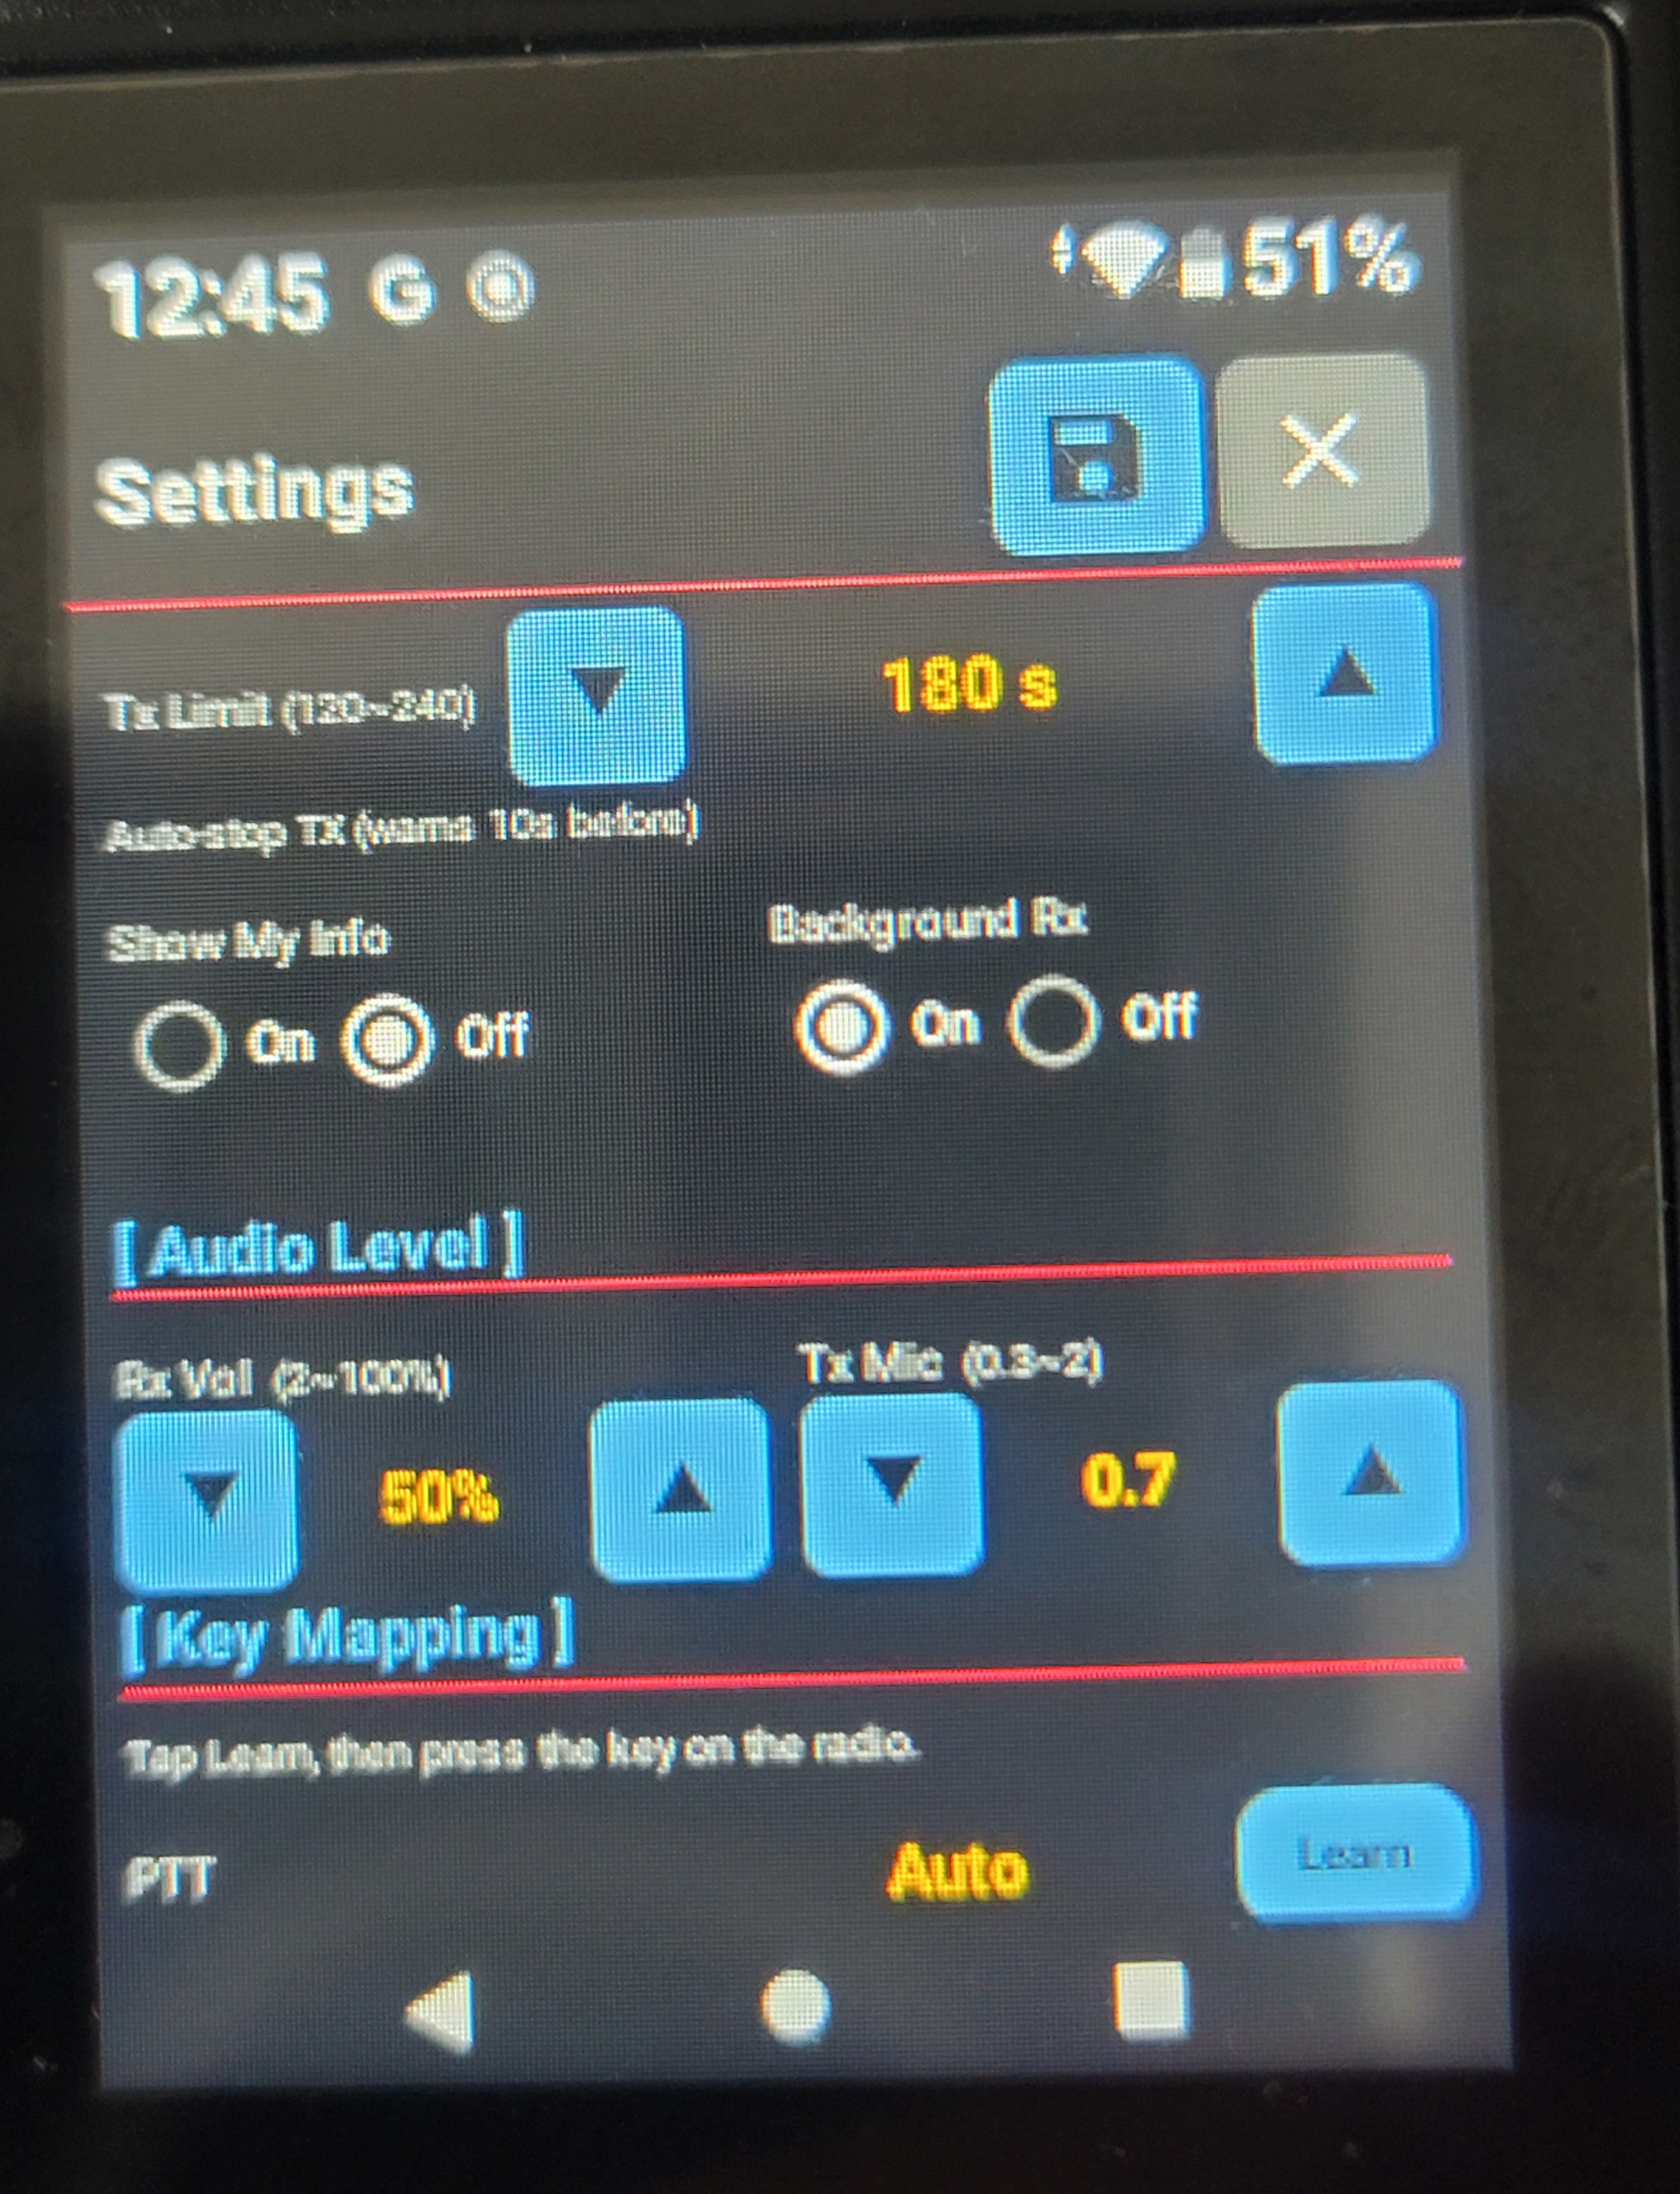
KO설정 화면의 [ Audio Level ]에서 수신/송신 음량을 조절합니다. Phone 버전과 달리 PoC는 마이크가 하나뿐이라 Tx Mic 게인이 하나로 통합되어 있습니다.

ENAdjust receive/transmit volume under [ Audio Level ] in settings. Unlike the Phone version, the PoC has a single microphone, so there is just one combined Tx Mic gain setting.

항목Item설명Description범위Range
Rx Vol수신 음량Receive volume2 ~ 100%
Tx Mic송신 마이크 게인 (단일)Transmit mic gain (single, combined)0.3 ~ 2

보코더(Vocoder Emulator)는 Phone 버전과 동일하게 MD-380 펌웨어 에뮬레이터를 우선 사용하고, 로드에 실패하면 mbelib로 자동 전환됩니다. The vocoder works the same as the Phone version — it prefers the MD-380 firmware emulator and automatically falls back to mbelib if loading fails.
PoC Audio Level 화면
▲ PoC Audio Level 화면PoC Audio Level screen

6. Key Mapping (물리 버튼 매핑)6. Key Mapping (Physical Buttons)

KOPoC 단말 전용 기능으로, 단말의 물리 버튼(PTT, 다이얼 노브 ▲▼)에 원하는 앱 동작을 지정할 수 있습니다.

ENThis is a PoC-only feature that lets you assign app actions to the device's physical buttons (PTT, dial knob ▲▼).
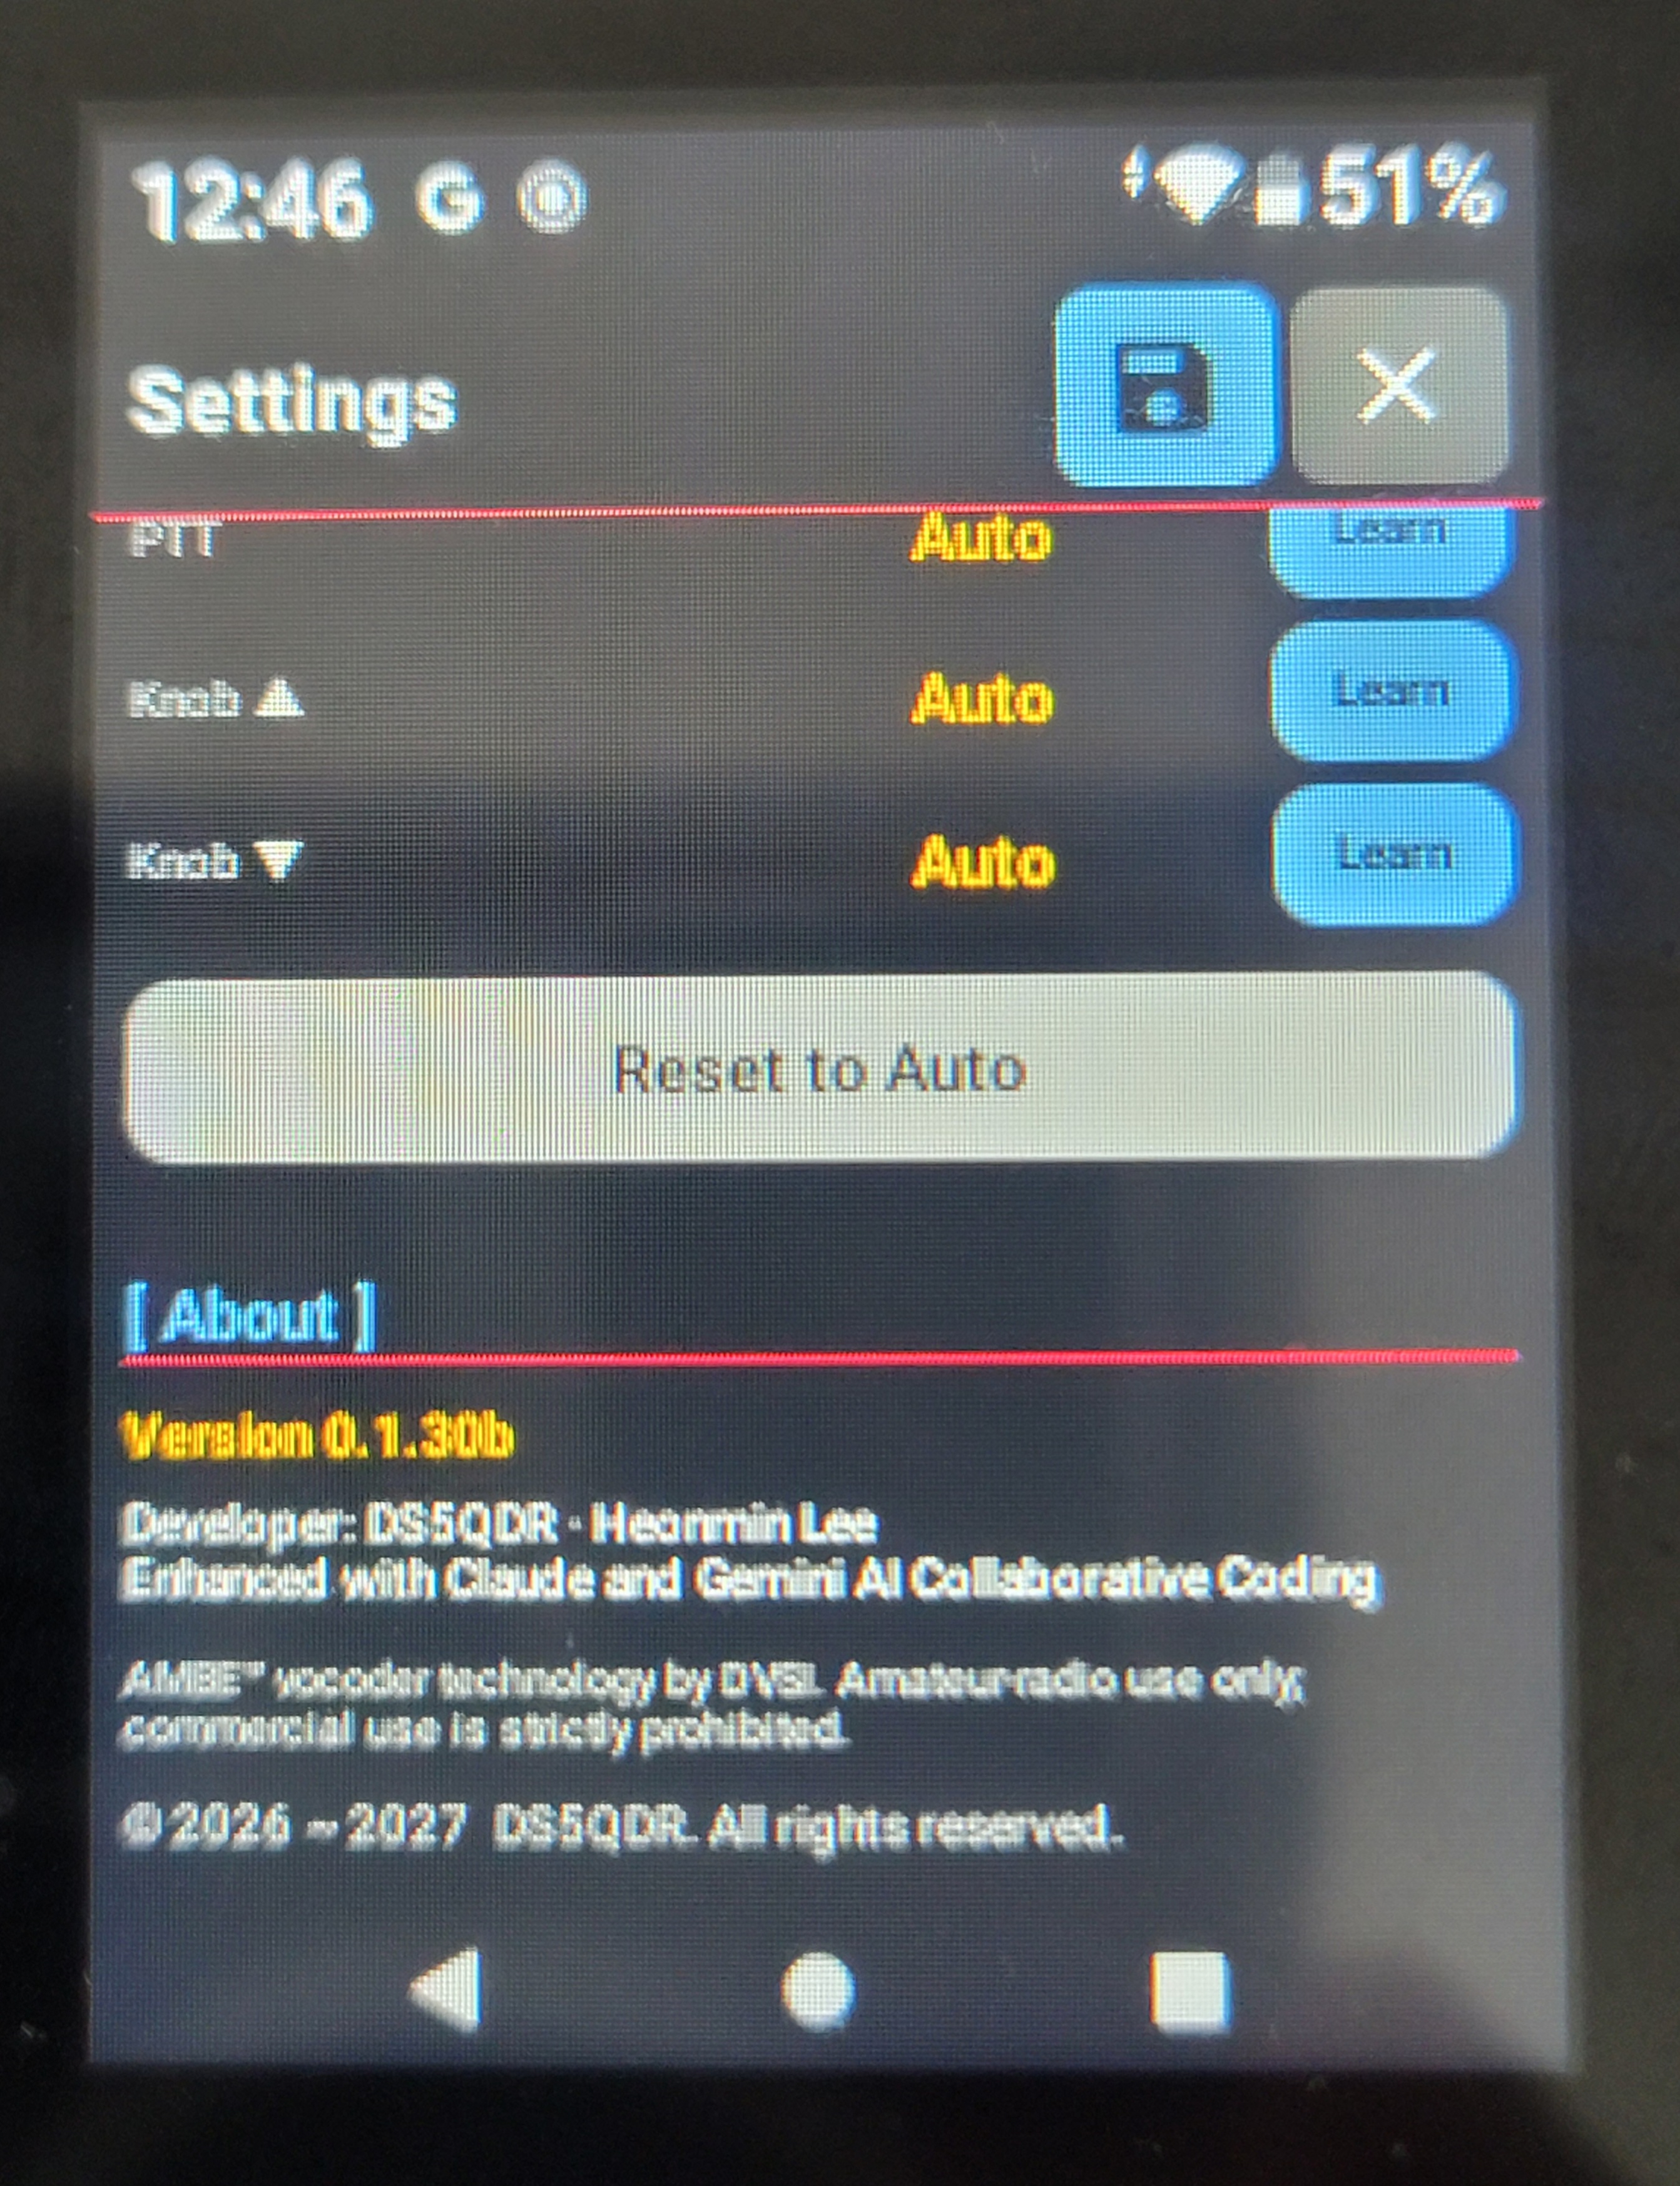
  • PTT — 기본값 Auto(눌러서 송신). Learn을 누른 뒤 원하는 버튼을 누르면 그 버튼으로 매핑이 변경됩니다. PTT — default is Auto (press to transmit). Tap Learn, then press the button you want, and PTT is remapped to it.
  • Knob ▲ / Knob ▼ — 기본값 Auto(토크그룹/채널 위아래 전환). 마찬가지로 Learn으로 원하는 버튼에 재매핑할 수 있습니다. Knob ▲ / Knob ▼ — default is Auto (switches talkgroup/channel up or down). Also remappable to any button via Learn.
  • Reset to Auto — 모든 매핑을 공장 기본값(Auto)으로 되돌립니다. Reset to Auto — restores all mappings back to their factory default (Auto).
화면 안내대로 Learn을 누른 다음, 매핑하고 싶은 단말의 실제 버튼을 눌러주세요. 일부 단말 모델은 버튼 배치가 다를 수 있으니, 매핑 후 PTT/채널 전환이 의도대로 동작하는지 꼭 확인하세요.
As shown on screen, tap Learn and then press the actual button on the device you want to map. Button layouts can differ between device models, so always verify that PTT/channel switching works as intended after remapping.
PoC Key Mapping / About 화면
▲ PoC Key Mapping · About 화면PoC Key Mapping · About screen

7. 토크그룹(TG) 편집7. Talkgroup (TG) Editing

KO토크그룹 선택바 옆의 편집 버튼으로 Edit TG List 화면에 들어갑니다. Phone 버전과 동일하게 동작하되, Number 입력란에 #=PC 힌트가 표시됩니다.

ENUse the edit button next to the talkgroup selector bar to enter the Edit TG List screen. It works the same as the Phone version, except the Number field shows a #=PC hint.

  • Name / Number를 입력하고 Add로 새 TG를 추가합니다. Enter a Name / Number and tap Add to add a new TG.
  • Number (#=PC) — 그룹콜(TG) 번호 앞에 #을 붙이면 프라이빗콜(PC, 개인호출) 번호로 등록됩니다. Number (#=PC) — prefixing the number with # registers it as a private call (PC) number instead of a talkgroup.
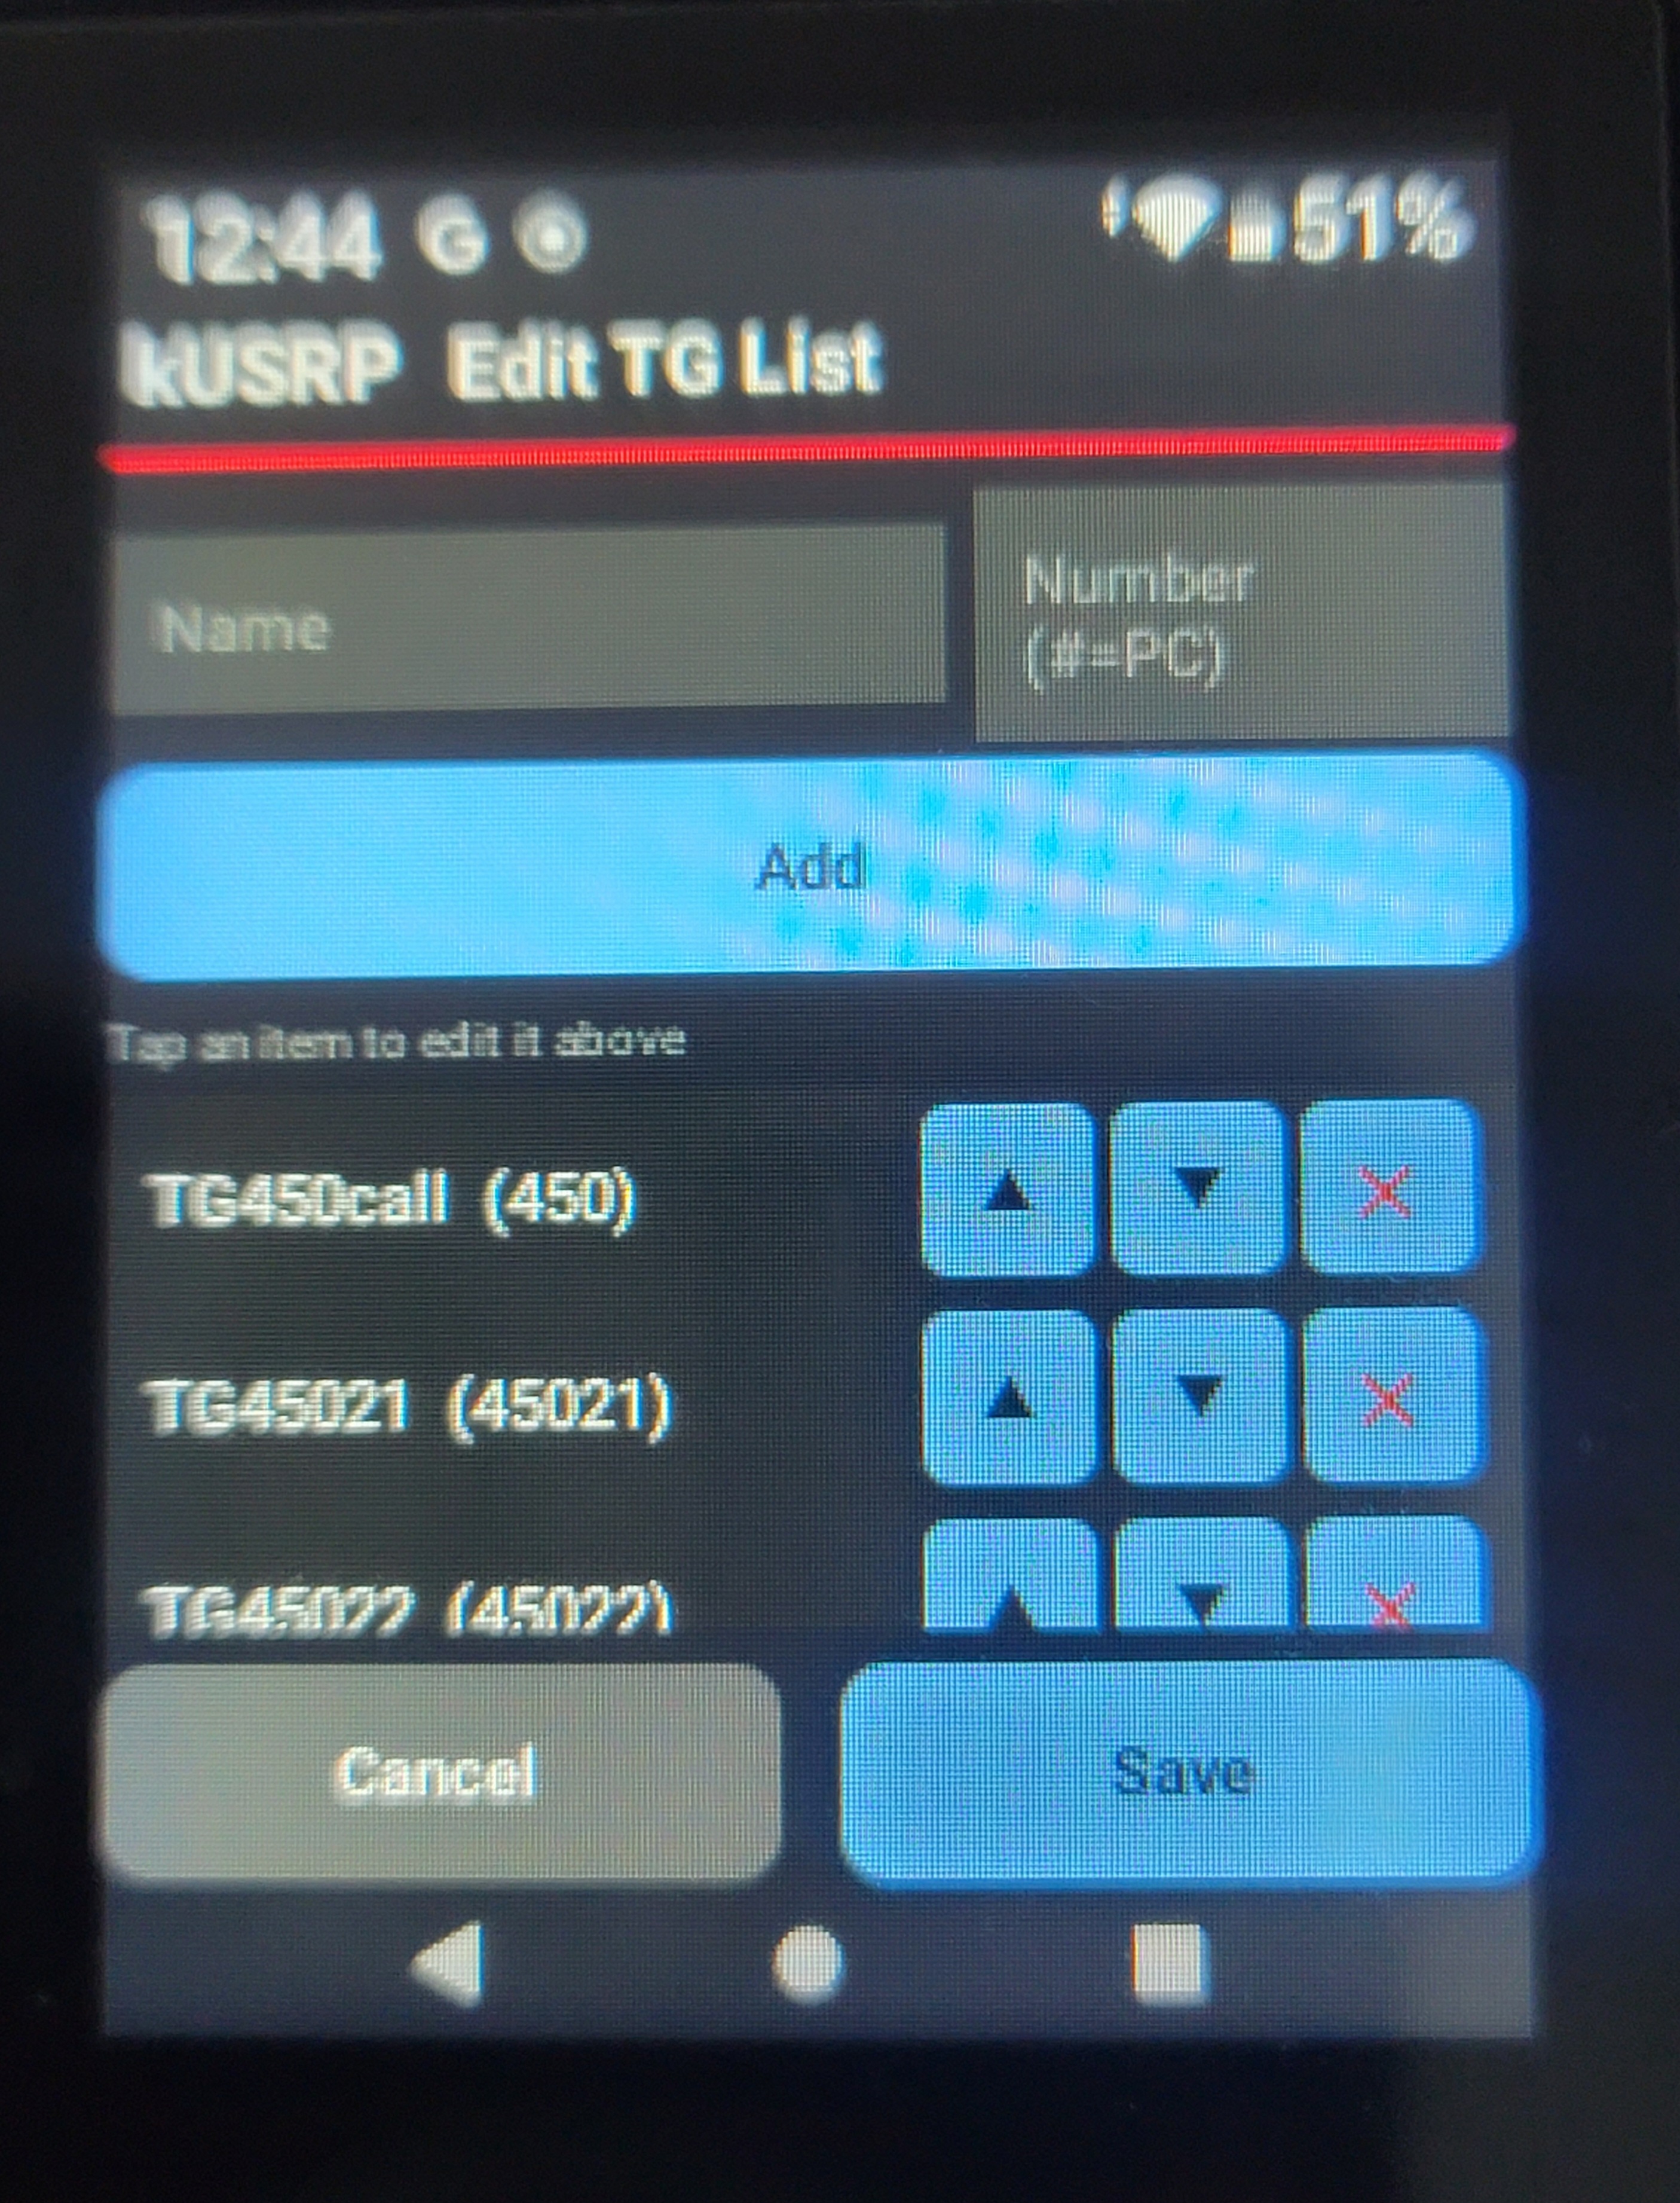
  • 목록의 ▲▼로 순서를 바꾸고, ✕로 삭제합니다. Use ▲▼ in the list to reorder, and ✕ to delete.
  • Save를 눌러 변경사항을 저장합니다. Tap Save to save your changes.
PoC TG 편집 화면 / PoC TG editing screen
▲ PoC Edit TG List 화면PoC Edit TG List screen
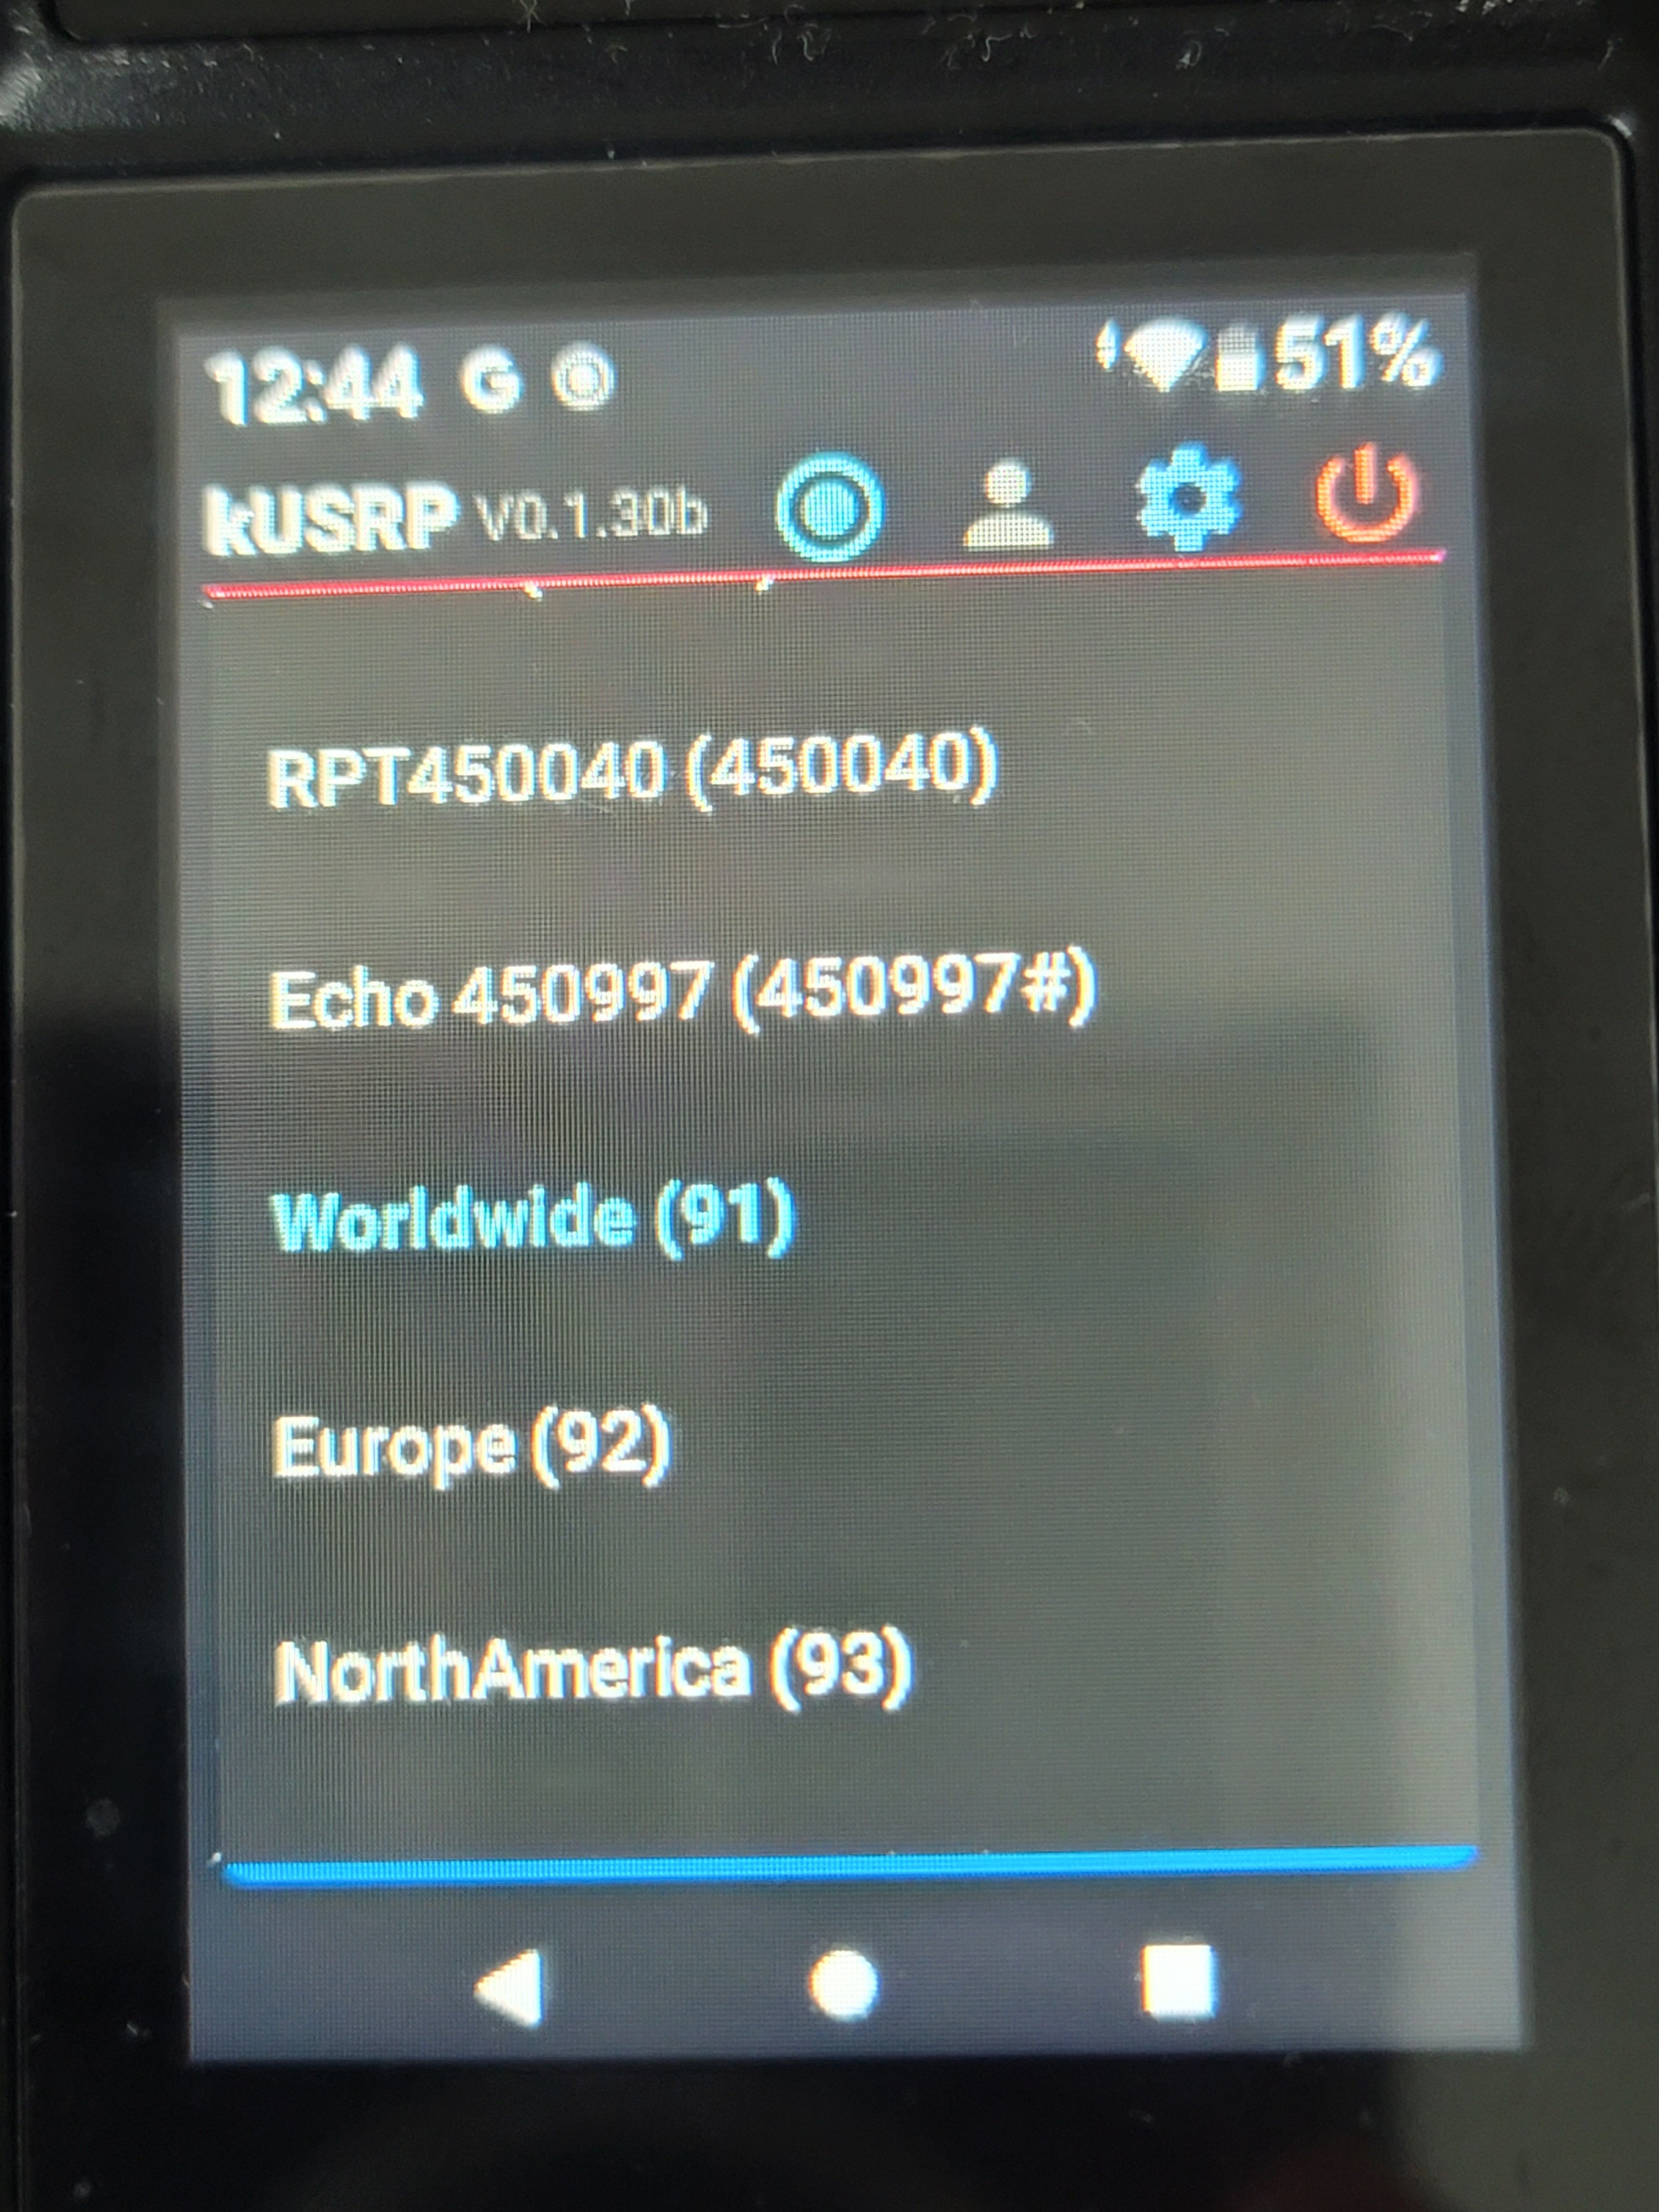
PoC 토크그룹 선택 목록
▲ PoC 토크그룹 선택 목록 (지역별 TG 등)PoC talkgroup selector list (regional TGs, etc.)

8. 문제 해결8. Troubleshooting

증상Symptom확인 사항What to check
Connected가 안 됨Won't show ConnectedBM 비밀번호, Callsign/DMR ID 확인. 팝업 안내에 따라 설정 재입력.Check BM password and Callsign/DMR ID. Re-enter settings as prompted by the popup.
물리 PTT 버튼이 안 눌림Physical PTT button doesn't respondKey Mapping에서 PTT가 다른 버튼으로 잘못 매핑되지 않았는지 확인. 필요시 Reset to Auto.Check whether PTT was accidentally remapped in Key Mapping. Use Reset to Auto if needed.
노브(▲▼)로 채널이 안 바뀜Knob (▲▼) doesn't change channelKey Mapping의 Knob ▲/▼ 매핑 확인 후 Learn으로 재설정.Check the Knob ▲/▼ mapping in Key Mapping and re-learn it if needed.
송신 음량이 너무 큼/작음Transmit volume too loud/quietAudio Level의 Tx Mic 게인을 조금씩 조절.Adjust the Tx Mic gain under Audio Level in small steps.
음질이 낮음 (MD-380 미로드)Low audio quality (MD-380 not loaded)MD-380 펌웨어가 없어 mbelib로 자동 전환된 상태. 설정의 Vocoder Emulator 버튼으로 펌웨어를 다운로드.The MD-380 firmware isn't installed yet, so it fell back to mbelib. Download the firmware via the Vocoder Emulator button in settings.

9. 라이선스 안내9. License Notice

KOkUSRP for PoC는 AMBE™ 보코더 기술로 디지털 음성을 인코딩·디코딩합니다. (설정 화면의 [ About kUSRP ]에서 언제든 다시 확인할 수 있습니다.)

ENkUSRP for PoC encodes and decodes digital voice using AMBE™ vocoder technology. (You can revisit this notice anytime under [ About kUSRP ] in settings.)

  • 고품질 엔진 — 펌웨어 기반 처리(md380_fw)를 송신·수신 양쪽에 사용하여, 일반 소프트웨어 구현 대비 음질이 크게 향상됩니다. High-Quality Engine — uses firmware-assisted processing (md380_fw) for both transmission and reception, providing significantly improved audio clarity compared to standard software implementations.
  • 지적재산권 — AMBE™ 및 AMBE+2™는 Digital Voice Systems, Inc.(DVSI)의 특허·상표 기술입니다. 이 소프트웨어는 아마추어 무선 커뮤니티 내 연구 및 상호운용을 위해 제공되며, 사용자는 자신의 관할권에서 관련 특허·라이선스 요건을 준수할 책임이 있습니다. Intellectual Property — AMBE™ and AMBE+2™ are proprietary technologies patented and trademarked by Digital Voice Systems, Inc. (DVSI). This software is provided for research and interoperability within the amateur radio community. Users are responsible for complying with all applicable patent and licensing requirements in their jurisdiction.
kUSRP는 교육·실험 목적의 아마추어 무선 프로젝트로 제공되며, 상업적 사용은 엄격히 금지됩니다.
kUSRP is an amateur-radio project provided for educational and experimental use only; commercial use is strictly prohibited.

Developer: DS5QDR · Heonmin Lee · Enhanced with Claude and Gemini AI Collaborative Coding · © 2026~2027 DS5QDR. All rights reserved. Developer: DS5QDR · Heonmin Lee · Enhanced with Claude and Gemini AI Collaborative Coding · © 2026–2027 DS5QDR. All rights reserved.

PoC About / 라이선스 화면
▲ PoC About kUSRP · 라이선스 안내PoC About kUSRP · License notice
KOkUSRP for Windows는 DVSwitch 서버 없이 BrandMeister DMR 네트워크와 D-STAR 리플렉터에 직접 접속하는 Windows용 소프트웨어 클라이언트입니다. voxDMR에서 아이디어를 얻은 STFU(DMR) 접속 기능에 D-STAR 접속 기능을 더해, 하나의 프로그램에서 두 모드를 자유롭게 전환할 수 있습니다.
ENkUSRP for Windows is a software client that connects directly to the BrandMeister DMR network and D-STAR reflectors — without a DVSwitch server. Building on the STFU (DMR) connectivity inspired by voxDMR, D-STAR support was added so both modes can be switched freely within a single program.

1. 개요 및 특징1. Overview & Features

KOkUSRP for Windows는 DS5QDR(이헌민)이 개발한 PC용 디지털 음성 클라이언트입니다. 주요 특징은 다음과 같습니다.

ENkUSRP for Windows is a PC digital voice client developed by DS5QDR (Heonmin Lee). Key features include:

  • DVSwitch 서버 불필요 — 별도 DVSwitch 서버 없이 BrandMeister와 D-STAR 리플렉터에 직접 접속 No DVSwitch server needed — connects directly to BrandMeister and D-STAR reflectors, no separate server
  • STFU ↔ DSTAR 전환 — 버튼 클릭 한 번으로 DMR(STFU)과 D-STAR 모드를 즉시 전환 STFU ↔ DSTAR switching — switch between DMR (STFU) and D-STAR with a single click
  • 교신 중 TG/REF 변경 — 통화 중에도 다른 TG 또는 REF로 즉시 전환 가능 Change TG/REF mid-QSO — switch instantly, even during an active transmission
  • 하드웨어 동글 불필요 — 소프트웨어 보코더 사용, ThumbDV 등 불필요(단, ThumbDV 연결 시 음질 향상 가능) No hardware dongle required — uses a software vocoder; a ThumbDV can optionally be connected for better audio quality
  • LastHeard 실시간 — MQTT 기반으로 구독 TG/REF의 교신 이력을 실시간 표시 Real-time LastHeard — MQTT-based live QSO history for subscribed TGs/REFs
  • QRZ·국기 자동 표시 — 수신국의 사진과 국기, 이름, 주소를 자동으로 불러와 표시 Auto QRZ / Flag display — automatically loads the receiving station's photo, flag, name, and address
보코더(AMBE+2 코덱)는 DVSI(Digital Voice Systems Inc.)의 특허 기술이며, 아마추어 무선 및 비상업적 용도로만 사용할 수 있습니다.
The vocoder uses the AMBE+2 codec, patented by DVSI (Digital Voice Systems Inc.), and is licensed for amateur radio, non-commercial use only.
kUSRP.exe는 이 사이트의 다운로드 탭에서 받을 수 있습니다.
kUSRP.exe can be downloaded from the Download tab on this site.

2. 파일 구성2. File Structure

KOkUSRP는 단일 실행파일(kUSRP.exe) 배포를 기본으로 합니다. 배포 ZIP을 풀면 아래와 같은 구성입니다.

ENkUSRP is distributed as a single executable (kUSRP.exe) by default. Extracting the release ZIP gives the following structure.

파일/폴더File / Folder역할Role비고Notes
kUSRP.exe메인 프로그램Main programNuitka/PyInstaller 빌드 결과Nuitka/PyInstaller build output
kusrp.iniCallsign, DMR ID, TG/REF 목록, OPTION 설정Callsign, DMR ID, TG/REF list, OPTION settings사용자별 편집 필요 (필수)Edited per-user (required)
lib/*.dllAMBE+2 보코더 및 관련 런타임 DLLAMBE+2 vocoder and related runtime DLLsexe 빌드 시 내장됨(별도 관리 불필요) — kUSRP.py를 소스로 실행 시에만 필요Bundled into the built exe (nothing extra to manage) — needed only when running kUSRP.py from source
Hosts/*.txtD-STAR 리플렉터(XRF/DCS/REF) 서버 주소 목록D-STAR reflector (XRF/DCS/REF) server address lists실행 시 24시간마다 pistar.uk(주)/dstarinfo.com(보조)에서 자동 갱신 (필수)Auto-refreshed every 24h from pistar.uk (primary) / dstarinfo.com (fallback) at runtime (required)
kusrp.ini와 Hosts\ 폴더는 반드시 kUSRP.exe와 같은 폴더에 있어야 합니다.
kusrp.ini and the Hosts\ folder must be in the same folder as kUSRP.exe.

3. 최초 실행 및 LOGIN 설정3. First Run & LOGIN Setup

KOkUSRP.exe를 더블클릭하면 SETTINGS 창이 자동으로 열립니다. 필수 항목을 입력하고 SAVE를 클릭합니다.

ENDouble-click kUSRP.exe. The SETTINGS panel opens automatically. Fill in the required fields and click SAVE.
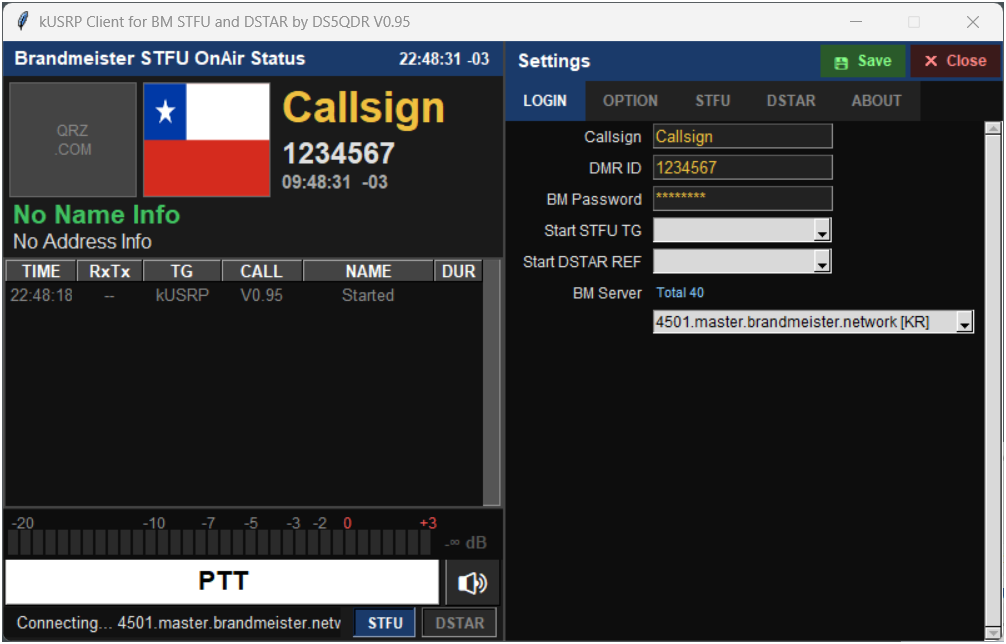
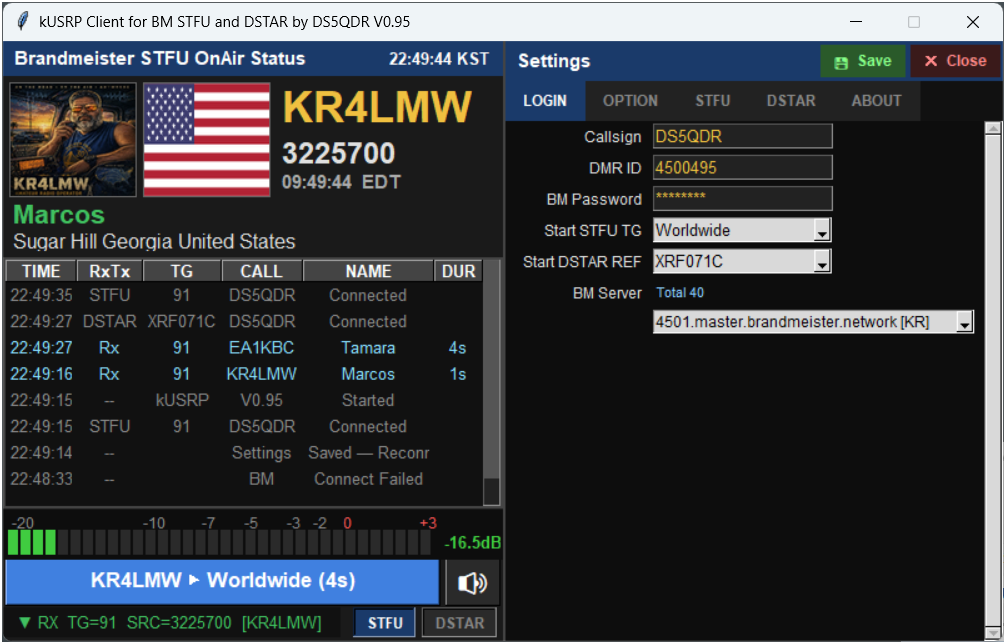
  • Callsign — 본인 호출부호(대문자) Callsign — your callsign (uppercase)
  • DMR ID — BrandMeister에 등록된 DMR ID DMR ID — your BrandMeister-registered DMR ID
  • BM Password — BrandMeister Hotspot Password (brandmeister.network 로그인 후 내 프로필에서 확인) BM Password — the BrandMeister Hotspot Password (find it at brandmeister.network → your profile)
  • Start STFU TG — 시작 시 접속할 토크그룹 Start STFU TG — the talkgroup to join on STFU startup
  • Start DSTAR REF — 시작 시 접속할 D-STAR 리플렉터 Start DSTAR REF — the reflector to join on D-STAR startup
  • BM Server — 접속 마스터 서버(드롭다운, BrandMeister API 자동 로딩) BM Server — the master server, chosen from a dropdown (auto-loaded from the BrandMeister API)
한국 사용자는 BM Server를 4501로 설정하는 것을 권장합니다.
Korean users should select 4501 as the BM Server.
LOGIN 탭 (최초 실행, 빈 값)
▲ 최초 실행 시 LOGIN 화면 (빈 값)LOGIN tab on first launch (empty fields)
LOGIN 탭 (입력 완료)
▲ 입력 완료 후 LOGIN 화면LOGIN tab after entering values

4. 화면 구성 설명4. Screen Layout

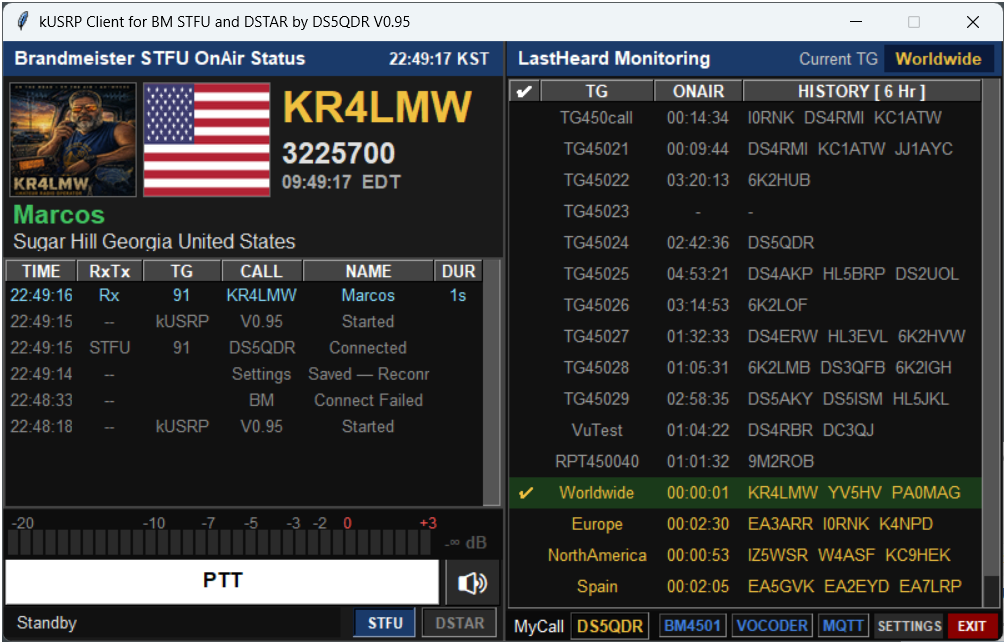
STFU 메인 화면
▲ STFU 모드 화면STFU mode screen

KOkUSRP는 좌측(On Air 상태)과 우측(LastHeard 모니터링) 두 패널로 구성됩니다. 모드(STFU/DSTAR)에 따라 패널 제목과 일부 컬럼 명칭이 자동으로 바뀝니다.

ENkUSRP has two panels: the left (On Air status) and right (LastHeard monitoring). Panel titles and some column labels switch automatically depending on the mode (STFU/DSTAR).

왼쪽 패널 — On Air StatusLeft Panel — On Air Status

영역Area내용Content
타이틀Title모드에 따라 "Brandmeister STFU OnAir Status" 또는 "DSTAR Reflector OnAir Status"로 표시Shows "Brandmeister STFU OnAir Status" or "DSTAR Reflector OnAir Status" depending on mode
QRZ 사진Photo수신국 사진 자동 표시 · 클릭 시 QRZ.COM 페이지 열림Auto-loads the receiving station's photo · click to open its QRZ.COM page
국기Flag수신국 국기 · 클릭 시 BrandMeister 프로필 열림Country flag · click to open its BrandMeister profile
콜사인·ID·시간Callsign / ID / Time수신국 콜사인(황금색) · DMR ID · 현지 시각Callsign (gold) · DMR ID · the station's local time
이름·주소Name / Address수신국 이름(녹색) · 도시 · 국가Name (green) · city · country
교신 로그QSO LogTIME / RxTx / TG / CALL / NAME / DUR
VU 미터Meter세그먼트 음량 표시 + dB 수치 (RX=녹색, TX=파란색)Segment level meter + dB value (RX=green, TX=blue)
PTT 버튼Button클릭으로 송신 · 🔊 스피커 음소거 토글Click to transmit · 🔊 toggles speaker mute
상태표시줄Status barStandby / ▼RX / ▲TX 상태 표시Shows Standby / ▼RX / ▲TX status

오른쪽 패널 — LastHeard MonitoringRight Panel — LastHeard Monitoring

영역Area내용Content
제목바Title bar"LastHeard Monitoring" / "DSTAR LastHeard" · 현재 TG/REFCurrent TG/REF
LastHeard 목록list✔ / TG·REF / ONAIR / HISTORY
하단 버튼바Bottom buttonsMyCall · BM 서버server · VOCODER · MQTT · SETTINGS · EXIT

5. STFU ↔ DSTAR 모드 전환5. Switching STFU ↔ DSTAR

KO좌측 하단의 [STFU] / [DSTAR] 버튼을 클릭하면 해당 모드로 전환됩니다. 프로그램 시작 시 기본 모드는 STFU입니다.

ENClick the [STFU] / [DSTAR] button at the bottom-left to switch modes. The default mode on startup is STFU.
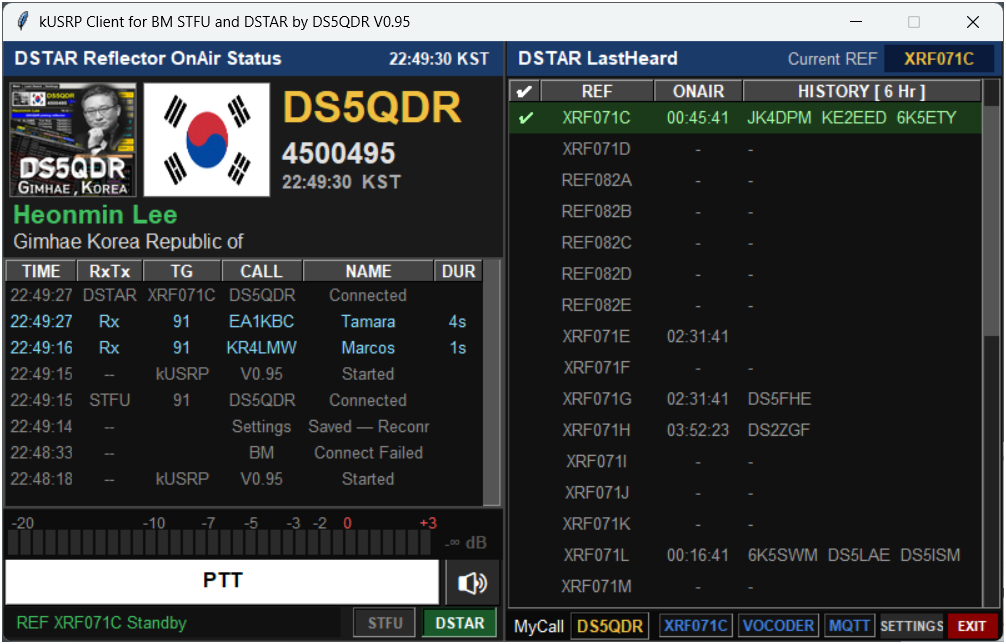
모드 전환 시 정리 작업이 백그라운드에서 진행되어 화면이 멈추지 않으며, 짧은 지연(약 1~2초) 후 새 모드로 연결됩니다.
Mode-switch cleanup runs in the background so the UI never freezes; the new mode connects after a brief delay (about 1–2 seconds).
D-STAR 메인 화면
▲ D-STAR 모드 화면D-STAR mode screen

6. PTT 송신 조작6. PTT Transmit Operation

방법Method동작Behavior
PTT 버튼 클릭button마우스 Down → TX 시작 / Up → TX 종료Mouse Down → TX starts / Up → TX stops
스페이스바Space barOPTION에서 PTT Space Key = True 설정 시 토글 방식으로 동작Acts as a toggle when PTT Space Key = True in OPTION
송신 중 PTT 버튼이 빨간색으로 변하고 상태바에 ▲TX가 표시됩니다. 최대 송신 시간은 SETTINGS의 TX Limit으로 제한됩니다(기본 150초, 최대 240초).
During TX the PTT button turns red and the status bar shows ▲TX. Max TX duration is limited by TX Limit in SETTINGS (default 150s, max 240s).

7. TG/REF 전환 & LastHeard 모니터링7. TG/REF Switching & LastHeard

방법Method설명Description
LastHeard 행 클릭row click원하는 TG 또는 REF 행 클릭 → 즉시 전환Click the desired TG or REF row to switch instantly
Current TG/REF 입력input우측 상단 입력란에 번호 또는 키 이름 입력 후 EnterType a number or key name in the top-right field, then press Enter

목록에 없는 TG/REF로 전환해도 자동으로 모니터링 목록에 추가됩니다. 영구 저장은 SETTINGS → STFU/DSTAR 탭에서 합니다. Switching to a TG/REF not yet in the list adds it automatically. To save it permanently, use SETTINGS → STFU/DSTAR tab.

LastHeard의 ONAIR 컬럼은 교신 중이면 콜사인, 종료 후에는 경과시간(HH:MM:SS)을 표시하고, HISTORY 컬럼은 설정된 시간 범위 내 최근 교신 콜사인 목록을 표시합니다(콜사인에 마우스를 올리면 이름·도시·국가 팝업 표시). The ONAIR column shows a callsign during an active QSO, or elapsed time (HH:MM:SS) once it ends; HISTORY lists recent callsigns within the configured time window (hover a callsign to see name, city, and country).

8. SETTINGS 상세 설정8. SETTINGS Details

KO하단 SETTINGS 버튼을 클릭하면 LOGIN / OPTION / STFU / DSTAR / ABOUT 탭으로 구성된 설정 패널이 열립니다.

ENClick SETTINGS to open the settings panel, organized into LOGIN / OPTION / STFU / DSTAR / ABOUT tabs.

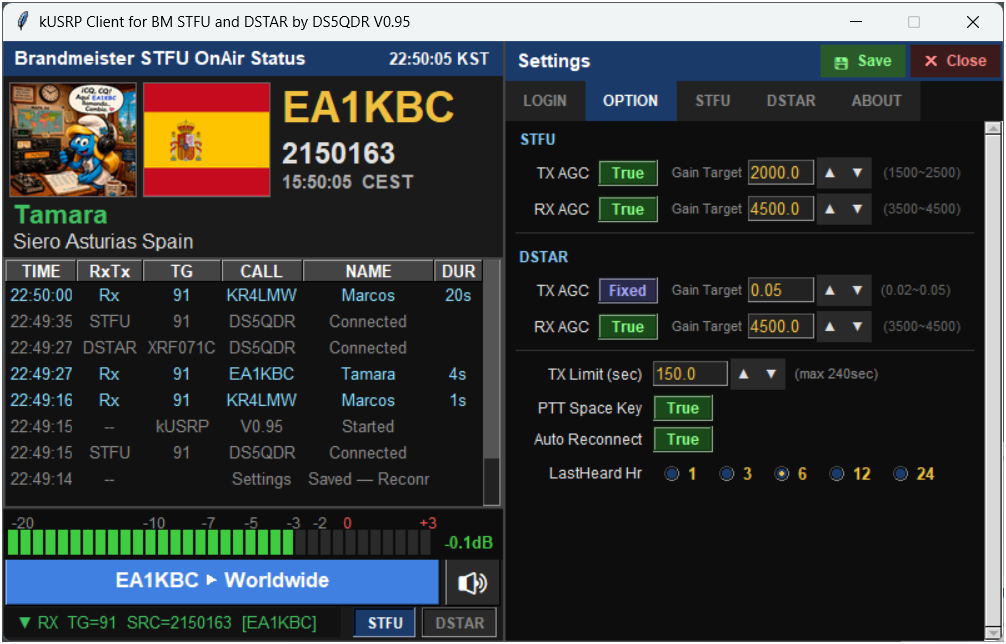
OPTION 탭Tab

항목Field설명Description
STFU TX/RX AGCDMR 송수신 자동이득제어 활성화 여부 및 목표 레벨DMR TX/RX automatic gain control on/off and target level
DSTAR TX AGCD-STAR 송신 게인 — 고정값(0.02~0.05)D-STAR TX gain — fixed value (0.02–0.05)
DSTAR RX AGCD-STAR 수신 자동이득제어 활성화 여부 및 목표 레벨D-STAR RX automatic gain control on/off and target level
TX Limit (sec)최대 송신 시간, 10~240초(기본 150초)Maximum TX duration, 10–240s (default 150s)
PTT Space Key스페이스바 PTT 토글 사용 여부Enable spacebar as PTT toggle
Auto Reconnect접속 끊길 시 자동 재접속 여부Auto-reconnect on disconnect
LastHeard HrLastHeard HISTORY 표시 시간 범위(1/3/6/12/24시간)LastHeard HISTORY time window (1/3/6/12/24 hours)
OPTION 탭의 변경 사항은 SAVE 없이도 즉시 런타임에 반영됩니다.
Changes in the OPTION tab take effect immediately, no SAVE required.
SETTINGS OPTION 탭
▲ SETTINGS — OPTION 탭tab

STFU 탭 (TG 목록)Tab (TG List)

모니터링할 DMR 토크그룹을 관리합니다. 각 행은 키 이름과 TG 번호로 구성됩니다. + Add TG로 행을 추가하고 ✕로 삭제한 뒤 SAVE를 클릭합니다. Manage the DMR talkgroups to monitor. Each row has a key name and a TG number. Click + Add TG to add a row, ✕ to delete, then click SAVE.
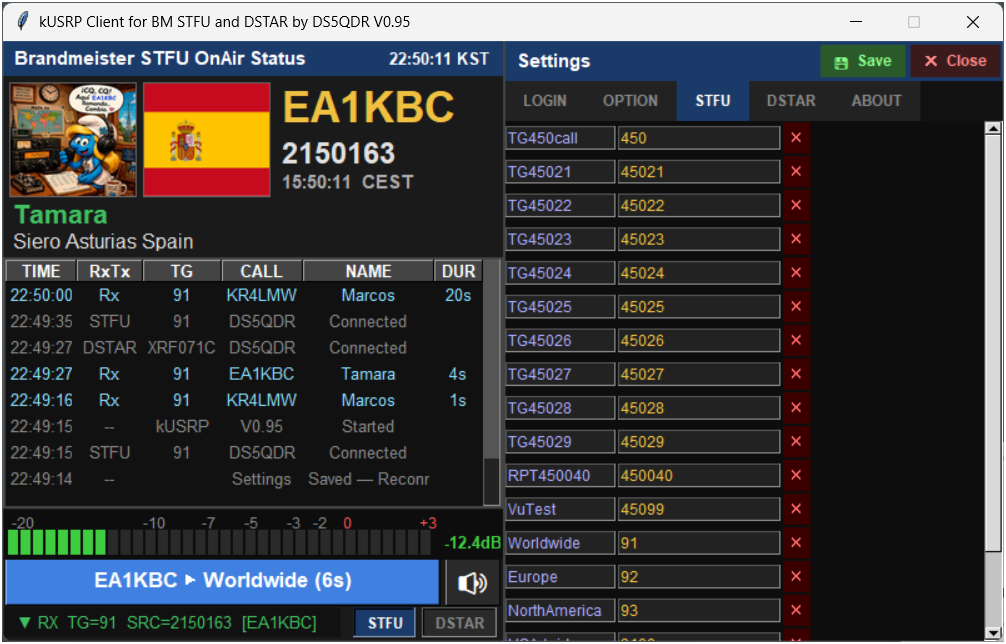
SETTINGS STFU 탭
▲ SETTINGS — STFU 탭tab

DSTAR 탭 (D-STAR 리플렉터 목록)Tab (D-STAR Reflector List)

모니터링할 D-STAR 리플렉터를 관리합니다. 각 행은 키 이름과 표시 라벨(예: XRF071A → XRF071AL)로 구성되며, 실제 서버 주소는 Hosts\ 폴더에서 자동으로 조회됩니다. Manage the D-STAR reflectors to monitor. Each row has a key name and a display label (e.g. XRF071A → XRF071AL); the actual server address is looked up automatically from the Hosts\ folder.
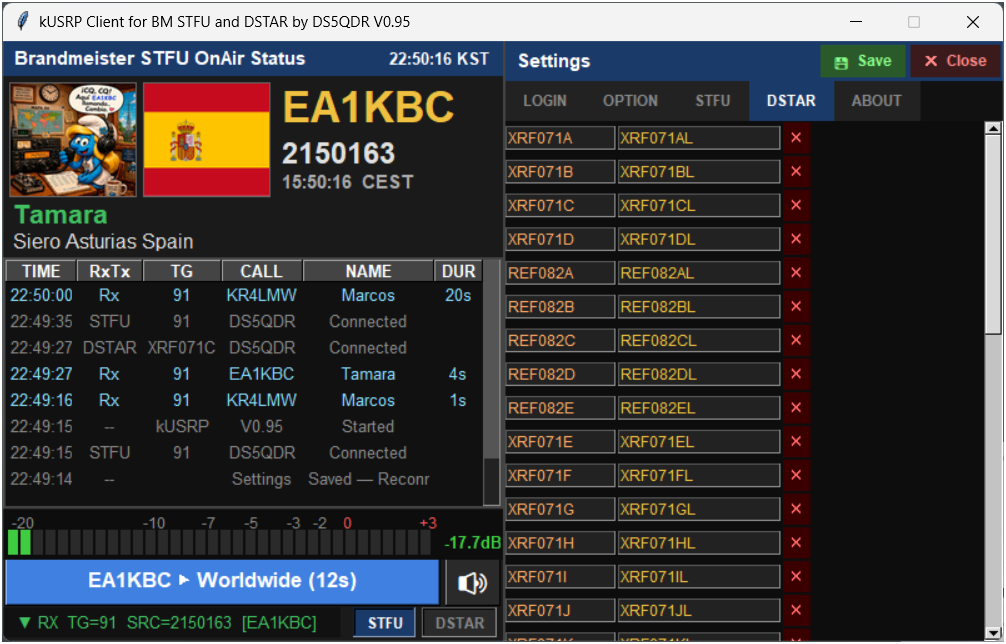
SETTINGS DSTAR 탭
▲ SETTINGS — DSTAR 탭tab

ABOUT 탭Tab

프로그램 버전, 보코더 라이선스 안내, 저작권 정보를 표시합니다. Displays the program version, vocoder license notice, and copyright information.
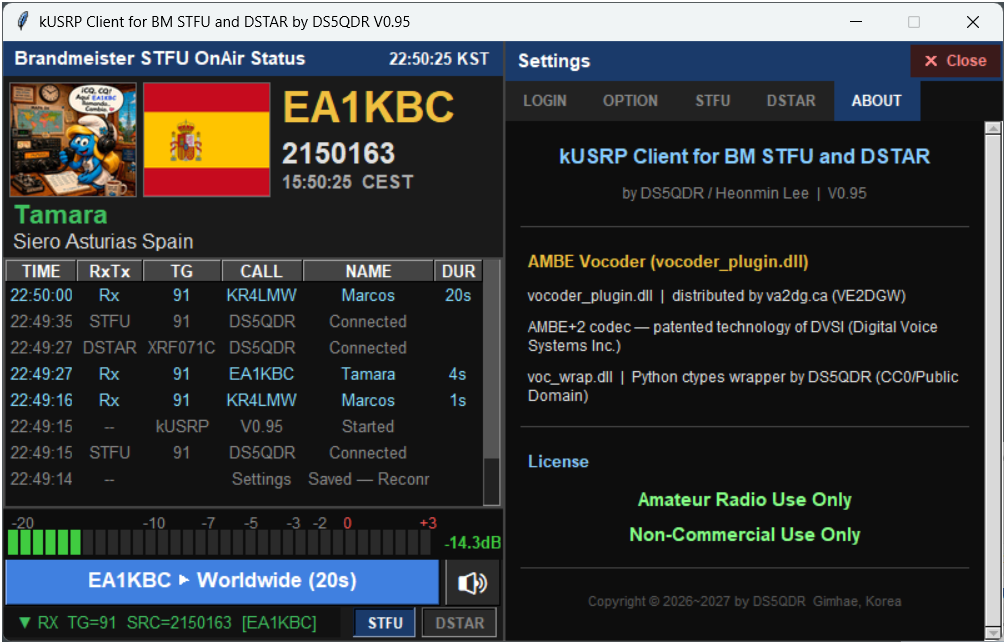
SETTINGS ABOUT 탭
▲ SETTINGS — ABOUT 탭tab

9. kusrp.ini 직접 편집9. Editing kusrp.ini

KO텍스트 에디터로 직접 편집할 수 있습니다. 반드시 UTF-8 인코딩으로 저장하세요.

ENkusrp.ini can be edited directly in any text editor. Save it as UTF-8.

[LOGIN]
Callsign   = DS5QDR
DmrId      = 4500495
BMPW       = xxxxxxxx
StartSTFU  = TG450call
StartDSTAR = XRF071L
BMServer   = 4501.master.brandmeister.network

[OPTION]
STFU_Tx_agc    = True
STFU_Tx_gain   = 2000
STFU_Rx_agc    = True
STFU_Rx_gain   = 4000
DSTAR_Tx_gain  = 0.03
DSTAR_Rx_agc   = True
DSTAR_Rx_gain  = 4000
VocoderDevice  = thumbdv
ThumbDVPort    = auto
ThumbDVBaud    = 460800
TxTime         = 150
PTTtoggle      = False
Autorecon      = True
LastHeardHr    = 3

[STFU]
TG450call    = 450
Worldwide    = 91
Europe       = 92
NorthAmerica = 93

[DSTAR]
XRF071A = XRF071AL
REF082A = REF082AL
VocoderDevice: plugin(소프트웨어 보코더) 또는 thumbdv(ThumbDV 하드웨어 동글 — DSTAR/DMR 음질 향상). ThumbDVPort: auto(자동탐지, 권장) 또는 포트명(예: COM3). 자동탐지 실패 시 자동으로 Vocoder(DLL)로 폴백합니다. ThumbDVBaud는 기본값(460800) 그대로 두세요.
VocoderDevice: plugin (software vocoder) or thumbdv (ThumbDV hardware dongle — better DSTAR/DMR audio quality). ThumbDVPort: auto (auto-detect, recommended) or a port name (e.g. COM3). Falls back to Vocoder(DLL) automatically if auto-detect fails. Leave ThumbDVBaud at its default (460800).
[DSTAR] 섹션의 값은 서버 주소가 아니라 표시용 라벨입니다. 실제 리플렉터 서버 주소는 Hosts\ 폴더의 *.txt 파일에서 자동으로 조회됩니다.
The value in the [DSTAR] section is a display label, not a server address. The actual reflector server address is looked up automatically from the *.txt files in the Hosts\ folder.

10. 상태바 & 사진·국기 링크10. Status Bar & Photo/Flag Links

버튼Button의미Meaning
MyCall내 콜사인 표시Shows your callsign
BM4501녹색=접속 OK, 빨강=접속 실패Green = connected, red = failed
VOCODER녹색=정상(Vocoder=DLL 또는 ThumbDV=하드웨어 라벨), 빨강=오류Green = OK (label shows Vocoder=DLL or ThumbDV=hardware), red = error
MQTT녹색=연결됨, 빨강=미연결Green = connected, red = disconnected

QRZ 사진 영역을 클릭하면 qrz.com/db/{콜사인} 페이지가, 국기 이미지를 클릭하면 brandmeister.network의 해당 콜사인 프로필 페이지가 열립니다. 콜사인이 표시된 상태에서만 동작하며, 마우스가 손 모양(☞)으로 바뀌면 클릭 가능합니다. Clicking the QRZ photo opens qrz.com/db/{callsign}; clicking the flag opens that callsign's brandmeister.network profile. Works only when a callsign is displayed — the cursor changes to a hand pointer (☞) to indicate the clickable area.

11. 문제 해결11. Troubleshooting

증상Symptom원인Likely Cause해결 방법Fix
접속 실패Connection failsCallsign/DMR ID/Password 오류Wrong Callsign/DMR ID/PasswordSETTINGS → LOGIN 재확인Re-check SETTINGS → LOGIN
접속 실패Connection failsUDP 포트 차단UDP port blocked공유기/방화벽 포트 설정 확인Check firewall / router port forwarding
VOCODER 빨간색shows redlib\ DLL 파일 누락Missing lib\ DLL fileslib\ 폴더 및 파일 존재 여부 확인Verify the lib\ folder and required files
수신 음성 없음No audio on RX스피커 음소거 상태 / Windows 오디오 장치 미인식Speaker muted / audio device not detected🔊 버튼으로 음소거 해제, Windows 기본 오디오 장치 확인Click 🔊 to unmute; check Windows default audio device
MQTT 빨간색shows redMQTT 브로커 접속 불가Cannot reach MQTT broker네트워크 확인(교신 자체는 가능)Check network (QSOs still work)
LastHeard 갱신 안 됨not updatingSTFU/DSTAR 목록 미설정No TG/REF in the listSETTINGS → STFU/DSTAR에 추가Add entries via SETTINGS → STFU/DSTAR
D-STAR REF 접속 실패connect failsHosts\ 목록에 없음 또는 다운로드 실패Reflector not in Hosts\ list, or auto-download failed네트워크 확인 후 재시작(24시간마다 자동 재시도)Check network and restart (auto-retries every 24h)
ThumbDV 연결 안 됨won't connect포트 지정 오류 또는 드라이버 미설치Wrong port or driver not installedThumbDV Port를 "auto"로 설정하거나 COM 포트 직접 입력, FTDI/CP210x 드라이버 설치 확인Set ThumbDV Port to "auto" or enter the correct COM port; verify FTDI/CP210x drivers are installed

12. 라이선스 안내12. License Notice

이 프로그램은 AMBE+2 보코더 관련 파일을 포함합니다. AMBE 코덱은 DVSI(Digital Voice Systems Inc.)의 특허 기술로, 상업적 사용은 절대 금지되며 아마추어 무선 목적으로만 사용할 수 있습니다.
This software includes AMBE+2 vocoder related files. The AMBE codec is patented technology of DVSI (Digital Voice Systems Inc.) — commercial use is strictly prohibited; amateur radio use only.

Developer: DS5QDR · Heonmin Lee · Gimhae, Korea Developer: DS5QDR · Heonmin Lee · Gimhae, Korea

도와주신분Acknowledgements

kUSRP 개발에 도움을 주신 분들입니다. Those who helped make kUSRP possible.

감사의 글A Note of Thanks

개발 기간 동안 열정적으로 테스트해 주시고
귀한 피드백을 보내주신 국장님들께 진심으로 감사드립니다.

My sincere thanks to the operators below, who tested the app with great enthusiasm throughout its development and sent me such valuable feedback.


여러분의 관심과 응원이 kUSRP를 계속 발전시키는 힘이 됩니다. 73! Your interest and encouragement keep kUSRP moving forward. 73!